Showing posts with label office365. Show all posts

Wednesday, January 3, 2018

Using flow to automate document locations in Dynamics 365

I recently had the following requirement to solve in Dynamics 365

When a customer (account only) is created a new Teams channel should be created.

All documents regarding the customer should be put into this channel folder in a specific group.

This should happen automatically, and be easy to maintain and support.

I decided to solve this in Microsoft Flow, as this seems like the type of problem it is meant to solve, and the following is the brick walls I ran headfirst into trying to get it working.

Prerequisites:

  1. Server side document integration enabled
  2. Group site added to SharePoint sites
  3. Documents (Shared Documents) added as SharePoint Document Location
  4. Guid of the document location record in Dynamics


Creating a flow which triggers on account creation

image

Starting out I create a new flow from blank, and set the trigger to “When a record is created” in Dynamics 365. If this is the first time you create a flow then you might get a JSON error message in the organization drop down. To work around this simply go to “Connectors” from the toolbar, and find the Dynamics 365 connector. Click on the “When a record is created” trigger, and a flow editor will start with a working Organization drop-down.

Select the organization you want to connect to, and then choose Accounts from the Entity drop down. If this is the first time you use the Dynamics connector it can take a minute or two before the drop down is populated.

Creating a channel for Microsoft Teams

My first thought was to create a condition to check if there already is a channel with the same name. Unfortunately, the only actions for Microsoft Teams as of today is “Create a channel”, “List channels”, “List teams” and “Post message”.

image

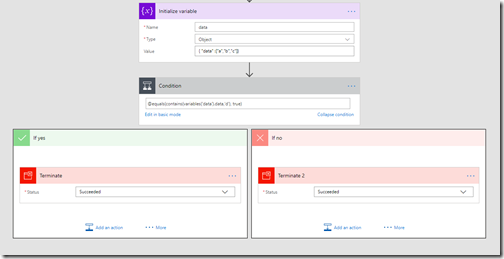
While List channels might sound like a good way to check whether a channel exists, you’re getting all the channels from a specific team without filters. This also means that looping through the list will generate a lot of unnecessary actions in Flow (which again might start to cost money if you’re not careful). An alternative, as Mikael “I dare you to ask me about search” Svenson pointed out is to write your own formula to check the content for an existing channel. The result looks something like this
image

This works fine, but the formula used is barely human readable, and not something I feel comfortable leaving at a customer’s environment to maintained by someone else. I decided to try and strong-arm the Flow into doing what I wanted instead.

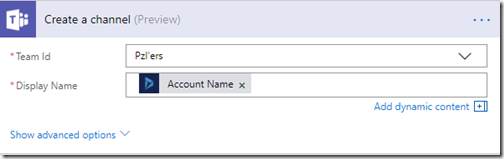
I put in the “Create channel” action, where I pick the team Id and I set the display name to the Account Name from the MSDYN365 trigger. This means that every time an account is created, a corresponding channel is created. Next I hit Save flow and Done.
image

Testing channel creation

First thing I did was create a new channel in teams. Then I replace the account name in the “Create a channel” action with the same name. I did this is to see what happens when it tries to create an existing channel. Creating a new account which triggered the flow produced the following error:

image

So when we try to create an existing channel we get an error 400 telling us that the channel already exists. That’s great, that means we have a good description that we can use in a condition to handle existing channels.

We’ll create a new Condition from that step, change to advanced method and paste in the following formula (if body contains NameAlreadyExists or does not contain “error”:)

@or(contains(body('Create_a_channel'), 'NameAlreadyExists'), not(contains(body('Create_a_channel'), '"error":')))

Then click on the elipsis (…) and click the “Configure run after” option, and make sure both “is successful” and “has failed” is checked. It should look something like this

image

In the failed step you can add actions to notify when an unexpected error occurs, for this example I’ve chosen to notify myself whenever the condition is false, where the formula for the email body is:
body(‘Create_a_channel’)

Next I add a Terminate action to prevent the flow from processing more steps. The result looks like this

image

Creating a new document location in Dynamics

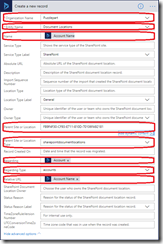
After we’ve handled errors on creation of a new Teams channel, we have to create a new document location in Dynamics. Add the “Create a new record” for Dynamics 365 action. Choose the organization you’re working with, and choose Document Locations as the entity name.

Click on the Show advanced options expansion link to enable filling out everything we need.

  • Organization Name –> Select the organization you’re working with
  • Entity Name –> Document Locations
  • Parent Site or Location –> The Guid of the Documents (Shared Documents) record in Dynamics (prerequisites in the beginning of this post)
  • Parent Site or Location type –> Select sharepointdocumentlocations
  • Regarding –> Expand the “When a record is created” selection from the dynamic content, and select Account (Unique identitifer of the account)
  • Regarding Type –> Select accounts

The end result should look like the following:
image

Creating a SharePoint folder

Testing the flow it looks like everything runs fine, and checking in Dynamics we can see that the document location has been created successfully. However, if you try to browse to the document location on the account created you get an error message saying that the folder does not exist in SharePoint. After poking around a bit I found out that creating a Teams channel from Flow (which in turn uses the Graph API) does not create a corresponding folder immediately. Instead, it is picked up by some timer job in the backend. I feel like that is kind of risky business, so I decided to create the folder manually to speed up the process, and prevent unnecessary error messages in the user interface.

Unfortunately, there is no way to just create a new folder in a document library using Microsoft Flow. This left me quite frustrated until I found out that creating a new file will create subfolders automatically if they don’t already exist. We’ll use that feature to create the folder for us, by creating a new dummy file.

Start by adding a new action above the “Create a new record” action, and choose the “SharePoint – Create File” action. Choose the site for the Group you want to work with, and in the folder path type /Shared Documents/, then append Account Name from the dynamic variables. Name the file deleteme.txt, and type some useful content should it fail to be deleted.
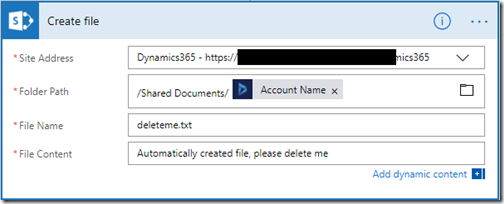
image

Now, create a new action beneath this one and select “SharePoint – Delete File”. Select the site where the file was created, and for File Identifier select Path from the “Create file” action.

image

The entire flow should now look like this
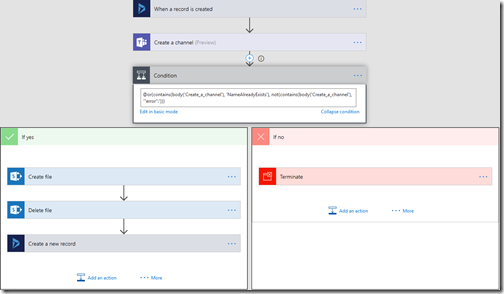
image

Taking this beauty out for a spin

To test out our new flow I created a new channel in Teams first, then created a new account with the same name as the channel. After a short while the flow triggers, and I can see that it fails on the create channel step, but it hits the “if yes” condition because it’s an existing folder, and the result says success.
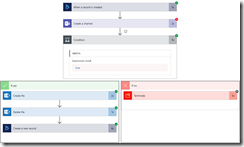
image

I create another new account with a name that doesn’t exist as a channel already, and this time all the blocks are marked with green check marks
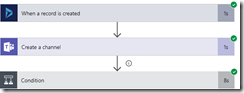
image

Summary

So there you have it. A flow which automatically creates a new channel in teams and adds a document location to the Dynamics 365 account so you can share and collaborate on documents.

Wednesday, October 11, 2017

SharePoint retention policy and Office Groups, part 2

In the previous post we looked at how to create a label and apply a policy.
In this part we're going to look at how this will work in a real life scenario.

Labeling content

First of all lets head into the Office Group we created, and look at the site collection overview. I'm saying site collection, because that's basically what it is, but unlike traditional site collections it's not available through SharePoint admin, and it has some extra settings to it. But don't take my word for it, check out Mikael Svenson's blog for a lot of amazing content on everything Office 365.
Opening up the site we see that there's nothing special going on here. It's an empty landing page with the only activity being the creation of the group and the document we uploaded (at least I did).

Going into the documents section, we find the file uploaded in the previous post (or you can just create a new file here). Click on the vertical ellipsis, expand the More category, and click on Compliance details.
This will show you a screen that looks something like this:

Click on the "None" link for the Label status. This will open a page where you can specify the label for this document. Go ahead and select the label we created in part 1, and then hit save.

Deleting the document

Now that we have a document with a label, let's try to see what happens if we try to delete it.
Click the ellipsis and select delete, then click Delete in the confirmation box.
If you set up the archive policy like me, you should be presented with the following message

Great, so that means the stuff we're saving cannot be deleted. We didn't select the checkbox for treating files as records (read-only), so we can still edit the document like we want.

Deleting the group

That's right, we're going to delete the Group already. We now have a Group with one document in it, and the document has a label which says to have a 2 year retention after the last modified on date.
Click on the cogwheel in the top right, then select Site information. In the side bar, click on the Delete site link, and then check the box which says "Yes, delete this group and all its associated resources.". Now click that delete button and cross your fingers.

Where did everything go?

If your tenant is like mine, the group was deleted and you were redirected to the SharePoint root site. Let's take a look around to see if we can find traces of the group.
Going into Outlook we can see that the Group is still there, which is just because Exchange handles these deletions on a schedule that nobody® knows how works. I'm going to go ahead and delete it from Outlook as well. Click on the down-arrow in the top right corner, then select Edit group.
Click on the Delete group link, and in the dialog window check the box stating "I understand that all group content will be deleted"


OK, now everything is gone? No, there's the the matter of the recycling bin. Unfortunately, deleted groups are not available through the UI, so you have to bring out some of your awesome PowerShell skills (or just copy the commands below). Now, I'm assuming you have a modern version of Windows with the possibility to install modules from the shell. If you don't, then you kinda have to do some internet research on how to install them for your environment.

Open PowerShell as an administrator and run the following commands to find a deleted group:

Install-Module AzureADPreview
You will get a warning about the repository, I trust the repo so I'm choosing yes. If you don't trust this repo then I'm afraid this is the end of the line for you, if not select yes and continue.

Import the newly installed module and connect to Azure AD, and then retrieve the deleted groups using the following commands

Import-Module AzureADPreview
Connect-AzureAD
Get-AzureADMSDeletedGroup -SearchString CrmVikingDoesSharePoint

For me that lists out the Group I deleted. Now, do delete the groups, simply run the following command

Get-AzureADMSDeletedGroup -SearchString CrmVikingDoesSharePoint | Remove-AzureA
DMSDeletedDirectoryObject -Id $_.Id

Group deleted, not a single warning presented.
This means that the retention policy provided by labels does not prevent Groups with the content to be deleted.
To recover a group, the following command can be run instead
Get-AzureADMSDeletedGroup -SearchString CrmVikingDoesSharePoint | Restore-AzureA
DMSDeletedDirectoryObject -Id $_.Id

Wrap up: OK, this seems weird.

So it seems that the retention policy set by using labels will prevent us from deleting files by mistake, but it certainly does not protect the site from deletion.
I'm guessing that there's some sort of logical mishap on the server side, because why would you force an administrator to verify that no content inside a group is set to be archived?

This tells me that the retention policies aren't quite production ready, and I have to find some other clever way to use Office Groups that helps reduce Outlook clutter while not deleting all content.

Until next time!

Saturday, February 6, 2016

Create CRM 2016 Online instance

Creating a CRM Online instance (with Office365)

This blog post will go through the details of creating a new CRM Online trial subscriction.
It is one of the steps on my "February CRM roll" where I'm setting up CRM 2016 on-premises, going through a lot of configuration and migrating over to CRM Online, data, config plugins, the works!
This part is all about setting up Office365, and it's a lot simpler than you think, in large parts thanks to the guidance the office365 portal gives you.

Sign up for a new trial

First of all, head over to the trail website (Microsoft)
Click the Get Started button under "Self-Start Trial" to start the registration.

Step #1. They'll want to know a little about you, like the country you're in, name, phone, company, etc. I presume you'll know how to fill out these fields yourself.

Step #2. Create a user name and instance ID. The username will be the tenant administrator, and will be your login name. The tenant name will be appended to .onmicrosoft.com to generate a complete username. In my case it's: crmviking@crmviking.onmicrosoft.com

Step #3. Confirm your details by letting them text you a confirmation message, or receive an awkward, automated phone call. If you're interested about the other online products you can check the boxes for email, phone, etc.

Creating your account details will only take a minute or two, so don't run off yet!

Step #4. Log in with your new account details, and you'll be presented with a form to confirm some details like language, country and currency. REMEMBER! The currency cannot be changed later, so stick to the one you'll want as your base (additional currencies can be added, but the base will always be the same). I recommend that you choose the country you'll be working from, so you will get a tenant with the lowest possible latency.
It'll spend a few minutes creation your account, but when it's done you'll be presented with a link to your CRM environment.

Congratulations! You have your own CRM Online environment with a bit of sample data to play around with!

Add more services

Ok, so we have our new CRM Online environment up and running, and even though that's alluring we'll do some more housework first. If you head over to the Office365 portal you can get an overview of your services. If you're asked for a username and password it's the new one you just created:
username@instance.onmicrosoft.com

As you can see, you have 4 services available. CRM, Identity Service, Office365 portal and Social Engagement. These are all the default services that comes with CRM Online. That's fine, if CRM is all you need, but I'm want more services available so I can make use of all the cool functions CRM has to offer, like synchronization of email, contacts and tasks, as well as sharepoint and onedrive for business integration. And you won't be wrong to assume that I'll be doing a future post on powerbi integration with MSCRM Online either.

So, head over to the "Purchase Services" over on the left hand side. Don't worry, we'll just be adding trial services, so there's no credit card requirements or anything like that. So, we're currently running a CRM Online 30 day trail, but there are loads of additions to choose from. I recommend that you spend some time reading about the different products, like Dynamics Marketing and Parature. It might not be something you're interested in at this time, but they full of really cool features that you'll want to keep in mind as your business' digital needs evolve and expend.
As I mentioned earlier, I would like to add some integration features, so I've scrolled down to the Office365 E5 plan. The E3 plan is, by far, the more popular choice, but I want to show off how incredibly cool it is to integrate with Power BI.
So, just hover your mouse over the E5 plan, and click on the "Start free trial" option.
You'll be presented with a confirmation order and instrutions to assign licenses to your users. We'll be doing that a bit later, and I'll also go through adding new members and setting up some basic settings. When you return to the overview you'll see additional services available.

In my case you can see a warning about the Power BI service being degraded. I've expanded the warning which shows that the Microsoft techies have already located the error and are applying a fix. No matter which provider you choose as your cloud platform provider you will experiences issues from time to time, especially if you want to be on the fast-track for new, exciting features. I think this is a brilliant example on how Microsoft gives you the information up-front, with additional information in regards to what they are doing to remediate the issue. In this case, the issue was that some users could experience issues when importing excel files into Power BI, so it was not even a major issue but you're still getting the information so you know that it isn't your system that's the problem. This isn't something revolutionary, but being honest and proactive is a lot better than many other providers who just stamp their products with "Beta" or something like that and tell you that you're using their products at your own risk.

But enough with the preaching, head over to the "Users" section in the left hand navigation, and open up active users. Click on your user account and you can see the different options you have available. At this time, I'll be adding additional features to my user account, but I advice you not to do that in your production account. I would rather have that account as a dedicated administrator, without any licenses applied. Give the account an insanely difficult password, and activate multi factor authentication with the phone number to one of the stake holders in your company. That way, the tenant admin will be secure, and is not used for daily, mundane tasks that increases the risk of credentials being stolen or man-in-the-middle attacks that could give an attacker the opportunity to delete all your stuff, or even worse act on your behalf.
But as I said, in my case I'll just be adding licenses to the default user, because this is just a demo environment. Click on the "Edit" link on the right hand side under "Assigned licenses"


Check the box for E5 license license, and click the save button to continue. At this point a mailbox will be assigned to the user, as well as permissions to download the Office 365 suit for desktop and access to the other cool features (power bi, sharepoint online, etc).

Setting up your Office 365 portal

OK, so we've added CRM Online and the rest of the Office365 suite, as well as adding licenses to your user. What I recommend that you do is navigate through the Office365 Portal and get familiar with the options available and what you can do. I could probably do a a dozen blogposts just to cover all the possibilities, but that would be a bit pointless.
The next step, at least in this guide, is adding a domain and some users. I'm going to go through the "Setup" from the left hand navigation to complete these steps. It's an easy way to get your environment up and going. As you might see from the coming screenshots I've always taken the liberty of styling/theming my Office365 portal as well.
Click the "Start Setup" button to start the Offie365 setup. Just a quick tip early on, if you need to migrate mail content to your O365 portal then you should plan that before you go ahead. It's important that your users are aware of the transition and able to verify that they're able to access all the services they need after the migration is done. I don't have an environment to transfer from, so I'll just go ahead and select that option and push on through.
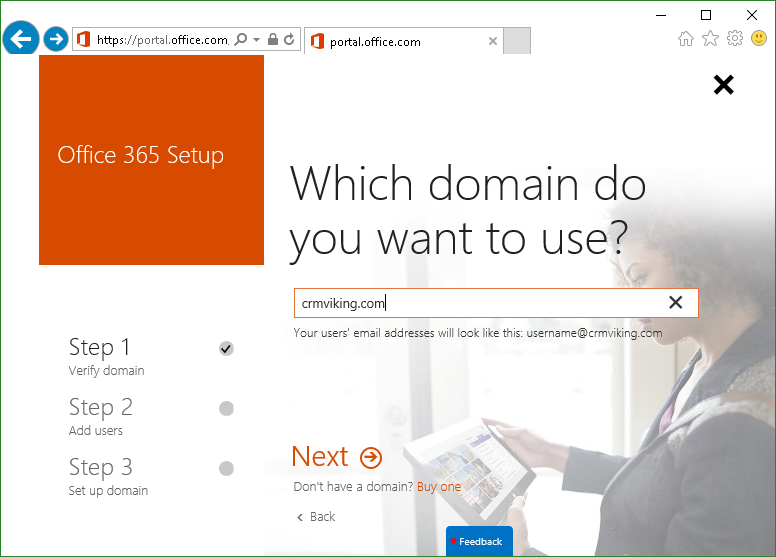
Now! The next step is to add domains to your deployment. I'm going to go ahead and add the crmviking.com domain, which will allow me to send and receive emails, as well as getting a more user friendly username. You are also able to buy a domain from this step, Microsoft will direct you to godaddy.com to complete the registration of a new domain if you choose to do so. In my case, I already own the crmviking.com and crmviking.no domain, so I'll just go ahead with the wizard.

You'll be provided with a request to add a txt record to verify your domain. It gives some straight forward instructions on how to do that, but you could also contact your domain provider and ask them to help you perform the required configuration changes. When the changes have taken effect, come back and verify your settings. if you've done everything correct you'll be presented with a success screen, and you can continue to updating user IDs.

I'm just going ahead and marking my only account for update, effectively switching usernames from "crmviking@crmviking.onmicrosoft.com" to "crmviking@crmviking.com". If you have several users you can select all for update, or just pick out a selection. If you don't want to update any users at this time you can go ahead and skip, else proceed to the success screen.
If you changed your own account, you'll have to sign out and sign in with the new account name to continue with step 3.

Now, if you had to go through this step, it might have required you to close the browser and try again. In that case, you'll be directed to your user start page in Office365. To get back to the administration site simply scroll down and click on the "Administration" tile.
Head back to the setup area and start the setup wizard again. The next step is adding additional users. I will be adding a dummy account and proceeding, but it's also possible to import a CSV file at this point to mass create users.

Next you will be presented with a screen with the new users created and a temporary password. You can use this to send your users their new account names and passwords, or you can reset the password for them later. Personally I don't like storing passwords, even temporary ones, so if I'm not distributing them straight away I'll just reset them later if need be. Proceed to the next and final step, adding DNS records to use your domain in Office365.
At this step you'll be prompted if you want to transfer DNS management to Office365. There are, of course, both pros and cons to doing this. If you change then you'll be changing the DNS servers you want to use to handle your domains DNS records. This makes everything available from the Office365 portal, which can be handy. On the other hand, you might be more comfortable using your existing DNS servers, in which case you can continue using them and just add the DNS records yourself. I'll be opting in to use my existing servers, because this is a demo environment and I like the domain registration I have at my current registrar.

On the next page, select which services you want to use in Office365 (which requires DNS records). I'll go ahead and select mail and Skype for Business, I do not want to manage my mobile for this demo, and head over to the next page. The next page lists all the DNS records which needs to be created.
Like instructed earlier, you can either update these yourself or ask your domain registrar for help.

That's quite a few, so do what you've got to do to get those registered, and get back to the setup and click next to verify the records. Now, there might be a trick to get the SRV-records to work. If you can't specify the service and protocol at your registrar's DNS settings, you have to specify _sip._tls.yourdomain.com as the service name. John White did a great blog post on this.
And now you're finished! Rate the service/experience, and rock on through back to the office portal.


Wrap-up

And there you have it, CRM Online with an Office365 Enterprise plan created and fully functional. I'll be doing more blogposts on this throughout February to show how you can administer users and licenses, as well as permissions and sharing content with groups. I will also be doing a migration from CRM 2016 On-Premises to CRM Online, with data migration, configuration, plugins. Stay tuned for more CRM goodness!