Showing posts with label customization. Show all posts

Wednesday, January 3, 2018

Using flow to automate document locations in Dynamics 365

I recently had the following requirement to solve in Dynamics 365

When a customer (account only) is created a new Teams channel should be created.

All documents regarding the customer should be put into this channel folder in a specific group.

This should happen automatically, and be easy to maintain and support.

I decided to solve this in Microsoft Flow, as this seems like the type of problem it is meant to solve, and the following is the brick walls I ran headfirst into trying to get it working.

Prerequisites:

  1. Server side document integration enabled
  2. Group site added to SharePoint sites
  3. Documents (Shared Documents) added as SharePoint Document Location
  4. Guid of the document location record in Dynamics


Creating a flow which triggers on account creation

image

Starting out I create a new flow from blank, and set the trigger to “When a record is created” in Dynamics 365. If this is the first time you create a flow then you might get a JSON error message in the organization drop down. To work around this simply go to “Connectors” from the toolbar, and find the Dynamics 365 connector. Click on the “When a record is created” trigger, and a flow editor will start with a working Organization drop-down.

Select the organization you want to connect to, and then choose Accounts from the Entity drop down. If this is the first time you use the Dynamics connector it can take a minute or two before the drop down is populated.

Creating a channel for Microsoft Teams

My first thought was to create a condition to check if there already is a channel with the same name. Unfortunately, the only actions for Microsoft Teams as of today is “Create a channel”, “List channels”, “List teams” and “Post message”.

image

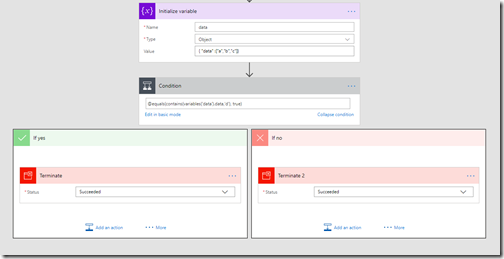
While List channels might sound like a good way to check whether a channel exists, you’re getting all the channels from a specific team without filters. This also means that looping through the list will generate a lot of unnecessary actions in Flow (which again might start to cost money if you’re not careful). An alternative, as Mikael “I dare you to ask me about search” Svenson pointed out is to write your own formula to check the content for an existing channel. The result looks something like this
image

This works fine, but the formula used is barely human readable, and not something I feel comfortable leaving at a customer’s environment to maintained by someone else. I decided to try and strong-arm the Flow into doing what I wanted instead.

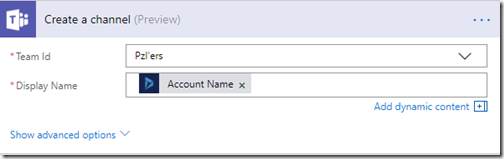
I put in the “Create channel” action, where I pick the team Id and I set the display name to the Account Name from the MSDYN365 trigger. This means that every time an account is created, a corresponding channel is created. Next I hit Save flow and Done.
image

Testing channel creation

First thing I did was create a new channel in teams. Then I replace the account name in the “Create a channel” action with the same name. I did this is to see what happens when it tries to create an existing channel. Creating a new account which triggered the flow produced the following error:

image

So when we try to create an existing channel we get an error 400 telling us that the channel already exists. That’s great, that means we have a good description that we can use in a condition to handle existing channels.

We’ll create a new Condition from that step, change to advanced method and paste in the following formula (if body contains NameAlreadyExists or does not contain “error”:)

@or(contains(body('Create_a_channel'), 'NameAlreadyExists'), not(contains(body('Create_a_channel'), '"error":')))

Then click on the elipsis (…) and click the “Configure run after” option, and make sure both “is successful” and “has failed” is checked. It should look something like this

image

In the failed step you can add actions to notify when an unexpected error occurs, for this example I’ve chosen to notify myself whenever the condition is false, where the formula for the email body is:
body(‘Create_a_channel’)

Next I add a Terminate action to prevent the flow from processing more steps. The result looks like this

image

Creating a new document location in Dynamics

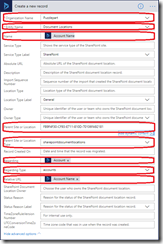
After we’ve handled errors on creation of a new Teams channel, we have to create a new document location in Dynamics. Add the “Create a new record” for Dynamics 365 action. Choose the organization you’re working with, and choose Document Locations as the entity name.

Click on the Show advanced options expansion link to enable filling out everything we need.

  • Organization Name –> Select the organization you’re working with
  • Entity Name –> Document Locations
  • Parent Site or Location –> The Guid of the Documents (Shared Documents) record in Dynamics (prerequisites in the beginning of this post)
  • Parent Site or Location type –> Select sharepointdocumentlocations
  • Regarding –> Expand the “When a record is created” selection from the dynamic content, and select Account (Unique identitifer of the account)
  • Regarding Type –> Select accounts

The end result should look like the following:
image

Creating a SharePoint folder

Testing the flow it looks like everything runs fine, and checking in Dynamics we can see that the document location has been created successfully. However, if you try to browse to the document location on the account created you get an error message saying that the folder does not exist in SharePoint. After poking around a bit I found out that creating a Teams channel from Flow (which in turn uses the Graph API) does not create a corresponding folder immediately. Instead, it is picked up by some timer job in the backend. I feel like that is kind of risky business, so I decided to create the folder manually to speed up the process, and prevent unnecessary error messages in the user interface.

Unfortunately, there is no way to just create a new folder in a document library using Microsoft Flow. This left me quite frustrated until I found out that creating a new file will create subfolders automatically if they don’t already exist. We’ll use that feature to create the folder for us, by creating a new dummy file.

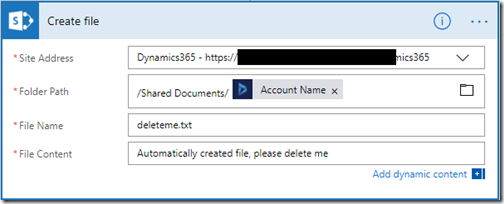
Start by adding a new action above the “Create a new record” action, and choose the “SharePoint – Create File” action. Choose the site for the Group you want to work with, and in the folder path type /Shared Documents/, then append Account Name from the dynamic variables. Name the file deleteme.txt, and type some useful content should it fail to be deleted.
image

Now, create a new action beneath this one and select “SharePoint – Delete File”. Select the site where the file was created, and for File Identifier select Path from the “Create file” action.

image

The entire flow should now look like this
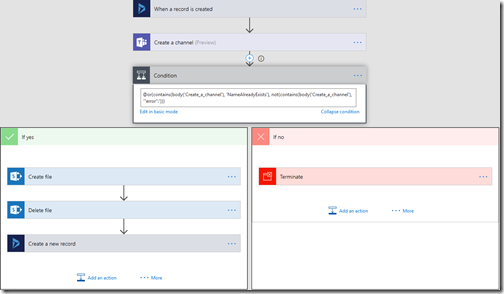
image

Taking this beauty out for a spin

To test out our new flow I created a new channel in Teams first, then created a new account with the same name as the channel. After a short while the flow triggers, and I can see that it fails on the create channel step, but it hits the “if yes” condition because it’s an existing folder, and the result says success.
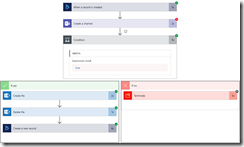
image

I create another new account with a name that doesn’t exist as a channel already, and this time all the blocks are marked with green check marks
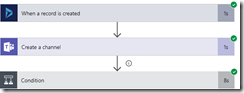
image

Summary

So there you have it. A flow which automatically creates a new channel in teams and adds a document location to the Dynamics 365 account so you can share and collaborate on documents.

Thursday, May 18, 2017

Refreshing web resources and iframes, the supported way

I wrote this great (IMO) little snippet to refresh web resources and iframes (which is basically the same thing) on an MSDYN365 form.
A great thing about the client side library is that it allows you to control form components even when you're operating from inside another frame (be aware that this is also a risk, and something you should be aware of).

I made a web resource which lists out data from several different child-entity records, lets call it RecordLister, and then I have another web resource which allows for creation of different child-entity records, lets call it RecordCreator.

When I create new child records from the RecordCreator I want to refresh the RecordListener resource, but as you might know the "Xrm.Page.data.refresh" function does not reload the web resources, it only reloads the data in the native fields. However, since the web resources are basically iframes it should be possible to reload the content, and luckily for us there is.

First off, I'm doing this in typescript, and I'm using the excellent DefinitelyTyped definitions made by Daryl Labar. You should too!

So here's the code I used to get this to work, and I'll explain it step by step.


var recordLister = parent.Xrm.Page.ui.controls.get("WebResource_recordlister") as Xrm.Page.FramedControl;

What this bit does is just getting the web resource using the Xrm client library, and since I’m using DefinitelyTyped I’m casting it to the specific type I know it is (in this case a FramedControl).

var oldSource = recordLister.getSrc();

Next I’m getting the source url from the control and store it in a local variable, followed by setting the source to about:blank. This way I’m keeping the relative URL that was used before, and I’m changing the source value to make sure the client recognizes the change (setting the value to the same thing doesn’t trigger a reload). I use about:blank just to make sure that should anything crash, hang or otherwise work improperly then at least the frame is blank.

recordLister.SetSrc(oldSource);

Finally I’m setting the source back to its original value, triggering a reload of the contents.

So that’s an easy way to reload your web resource or iframe using supported javascript (typescript) client side functions.

Edit:
I have been notified that the xrm definitions of DefinitelyTyped is an effort made by the following:
David Berry
Matt Ngan
Markus Mauch
Daryl LaBar
Tully H

Tuesday, March 14, 2017

Query Builder Error in MSDYN365

Query Build Error

The specified field does not exist in Microsoft Dynamics 365

I recently encountered this error in an on-premises environment one of my customers have. The issue occurs when I try to export the unmanaged solution, and it happened after I deleted a currency field from an entity that was included in the solution.
I managed to reproduce the issue in my online-environment, and I've sent a ticket to Microsoft so they might get it fixed soon, but I'll outline my findings in this blog post.

To reproduce this error, simply do the following (please do this in a dev-environment which you can break as you please, and back up all your solutions first):
  1. Create a new solution
  2. Add an existing entity to it
  3. Add an existing (or create a new) currency field
  4. Delete the currency field
  5. Try to export the solution (managed/unmanaged, happens with both)
You will probably be presented with this error message (unless it is fixed by the time you're reading this):


I tried to create each of the field types, it only fails on the currency type. I think this might have something to do with the secondary attribute which contains the currency base. In the back-end both option set and currency has two columns in the database, but only the currency field has a secondary field available in the UI.
If you mark both the currency and the currencybase field for deletion it will give you an error saying one attribute was not deleted, so that is not a viable workaround.
If you have created the entity in the solution you're working on then everything is OK, but if it's created in another solution (for example default solutions, or default entities) that are added as existing entities then this happens.

Workarounds (I prefer the first one, the other two are best for fresh installations and new solutions that haven't been through the normal ALM cycle yet):

  1. Restore a new dev environment (sandbox if you're online) from a backup, remove the field from the solution and export it as unmanaged. In the target dev-environment, make sure the field is deleted, then delete the solution (it's unmanaged, so the customizations will still be in place). Then import the newly exported solution which doesn't have the currency field included, it can now be exported as usual.
  2. Happens for unmanaged solutions, so you can just delete the solution and re-create it. Can be quite arduous, or near impossible, if you have included a lot of customization in the solution.
  3. Delete the entity and recreate it with the same id (only applicable for custom entities). Might be possible for simple entities without too much customization (will cause data loss). Can be re-created with the same id and schema and logical name so it doesn't break inheritance. I find this one most risky, so I would avoid it. Would work for solutions and entities that haven't been exported before.

Monday, February 13, 2017

Change form translations on secondary languages (exploit)

Changing section translations in MSDYN365

So first of all, thanks to my fellow (and much more experienced) expert @rappen who pointed out that this could potentially mess up your solutions.
ALWAYS BACK UP YOUR SOLUTIONS FIRST!
Also, only use this for the display name on the sections, if you change the section name it will change for the base language as well.

So we all know that translations in #MSDYN365 can be a pain unless you're using tools (a big shout-out to http://www.xrmtoolbox.com/ ). But did you know that there's a simple way to translate section and category labels? 
First off I'm not giving you any guarantees on this one, it seems like an exploit and they might change the implementation without prior warning, but if you're willing to take the (relatively small) risk you can do the following:
1) Change the language to the base language
2) Go to "settings -> solutions" and open up the solution you're working on (you are working on solutions, right?)
3) Change the language in the main tab to the language you want to translate to
4) Navigate to the form you want, and you'll see all the secondary language names. You can then edit the label, save and publish.
Now the sections on your forms will have translations for all the languages you repeat this for.

This isn't anything revolutionary, but if you're doing this as a one-off you might consider it instead of installing third party solutions or taking the chance and editing the XML.