PowerApps is a relatively new feature to the Office365 portfolio which allows advanced users to create their own apps which can be used on mobile (and desktop) platforms to perform daily tasks. It is a great tool for creating those small functions you usually have to book a developer for a few hours/days, and is ready for authentication, authorization, and distribution right out of the box.
PowerApps comes with the ability to connect to a wide array of sources to collect and manipulate data, and today I'm going to demonstrate how to connect with MSDYN365:CRM and how to use connect with related records.
Now this is the easiest part. To connect with MSDYN365 in your powerapp simply go to the 'Content' tab and select Data Sources, and you'll be presented with the option to add new connections and data sources. Here it will probably show you something like this (I have a completely new trial organization with only O365 E3 and MSDYN365 Plan1:
What I'm doing is connecting to the MSDYN365 suggestion, and I'm going to add 3 tables (entities) to my data source list; Accounts, Contacts and Users (systemusers).
Once that's done I'm going to add a new screen with the browse template. This will give me the option to search and display records from the chosen data source.
Now, from the right hand side, choose the advanced tab and select your Gallery component from the dropdown list. Next through the Home tab on the top toolbar select "Items" from the property dropdown box. We're going to do some drastic changes to the formula used to collect data, but first a little insight.
When a function is run/validated in powerapps it returns the result set to the parent function (or context, whatever you'd like to call it). This means that we can build an advanced data source or query by nesting functions inside each other, and end up with a pretty good set of data to play with.
So to get the data I want in my gallery browser I'm going to use the following formula:
SortByColumns(Search(AddColumns(Accounts, "User", LookUp(Users, systemuserid = _ownerid_value), "Contact", LookUp(Contacts, contactid = _primarycontactid_value)), TextSearchBox1.Text, "accountnumber", "name"), "name", If(SortDescending1, Descending, Ascending))
Now this might seem a little frightening at first, but I'll go through it step by step and you'll see how I thought through it. Remember the part about nesting functions that I mentioned above? Well that's how I start building a function, by nesting backwards.
- I want a collection of accounts, but I also want to add the primary contact and the account owner (I'm not checking for teams, I'm just assuming that all accounts are owned by users. This is just a quick demo). That means I'll have to use a function to join those sources. A quick search online says that I can use AddColumns to do joins in a PowerApp formula, and thanks to the built in intellisense it's easy to create the formula required.
AddColumns(<data source>, <table alias>, LookUp(<data source>, <condition>))
This will nest the related table underneath the table alias (or namespace if you will), and you can add additional tables by just specifying new column aliases and lookup expressions. To get the ones I needed I filled in the following:
AddColumns(Accounts, "User", LookUp(Users, systemuserid = _ownerid_value), "Contact", LookUp(Contacts, contactid = _primarycontactid_value))
This means that I've nested the Users entity underneath the "User" column alias, and the Contacts entity underneath the "Contact" column alias.
- I need to be able to search for these records, I don't simply want all the accounts listed at all times. Search is a function designed for this, but I could also use Filter if it was a set query I wanted to use. Now I know that the AddColumns(...) functon I used will return the result set of that function, so I could potentially search through the related records as well. I'm going to do it a lot simpler so I'll want to search through the account number and name field on account. The syntax is :
Search(<data source>, <Search text>, <Column to search in>, <Column2 to search in>, ...)
The data source in our case will be our previous AddColumns formula. The search text we'll get from the default search box, TextSearchBox1.Text, and the columns we want are "accountnumber" and "name", which makes the formula look like this:
Search(AddColumns(.....), TextSearchBox1.Text, "accountnumber", "name")
- Lastly I'd like to sort the result, so I'm going to add a SortByColumns function just to get a predictive list instead of a random one. This starts just the same as our previous function, the result of everything we've done so far has been returned, and we can order by the columns we want. The syntax looks like this:
SortByColumns(<data source>, <column name>, If(<logical test>, <true value>, <false value>))
We want to use the data source we've built so far, and we want to use the "name" column of the account. The logical test will be the default sorting button, with true as Descending and false as Ascending (false is the default value). We end up with the following formula:
SortByColumns(Search(...), "name", If(SortDescending1, Descending, Ascending))
Now we've got a search gallery were we can search for accounts and get the related primary contact and the owning user data values. We can use that to further style our result list so it will look something like this:
Customizing the details form
So now that we have a decent-ish looking gallery we want to do some modifications to our details and edit forms. There isn't really any magic to this, you simply add and remove the data fields that you want. There are however two things I would like to point out so that you don't walk into the sweet honey traps.
First of all, we want to set a data source and item that PowerApps has a relation to and can work with. If we choose the same data source as we used in the gallery then we can certainly we the data and place it on the form, but updating the record or creating a new one could prove a bigger challenge. So what we do here is that for the data source, we set the "Accounts" entity table. The Items property is a bit more special though, and here we have two options (I'm going for option 2):
- We use the item from the gallery, ie. BrowseGallery1.Selected. This will work perfectly fine as long as you don't try to update any other fields than the main account fields. However, you will get an error in the PowerApp user interface because the data source chosen for the details form is not the same data source as you have in your gallery. The upside is that you don't have to do a new query to get the account data, but on the downside you will have to live with a warning sign that comes with not following the best practices.
- We use the accountid from the gallery to look up the specific account from the account data source, ie we use the following formula:
LookUp(Accounts, accountid = BrowseGallery1.Selected.accountid)
The positive thing about this is that we're now 100% compliant with the best practices, but we now don't have direct access to the sub-components, and we're doing an additional query to CRM for a lookup. Luckily, this lookup is very cheap because we're getting 1 entity based on the Guid, and I'll be picking this one just so we can demonstrate how to do a lookup inside a field.
So now that we've got the data available we can start adding the fields to the forms. If we want to have some fields from related records we can simply use the LookUp function to get them. For example, if I want the full name of the primary contact I can use this formula in a data form:
LookUp(Contacts, contactid = _primarycontactid_value).fullname
So now that I've done a very small amount of customization my detail form looks like this.
Customizing the details form and changing the primary contact
So now we're ready to do some customization to the edit form. I've gone ahead and added the same data source and item as we did on the detail form, and I've added the address fields just so we have something to play with. The results so far looks like this:
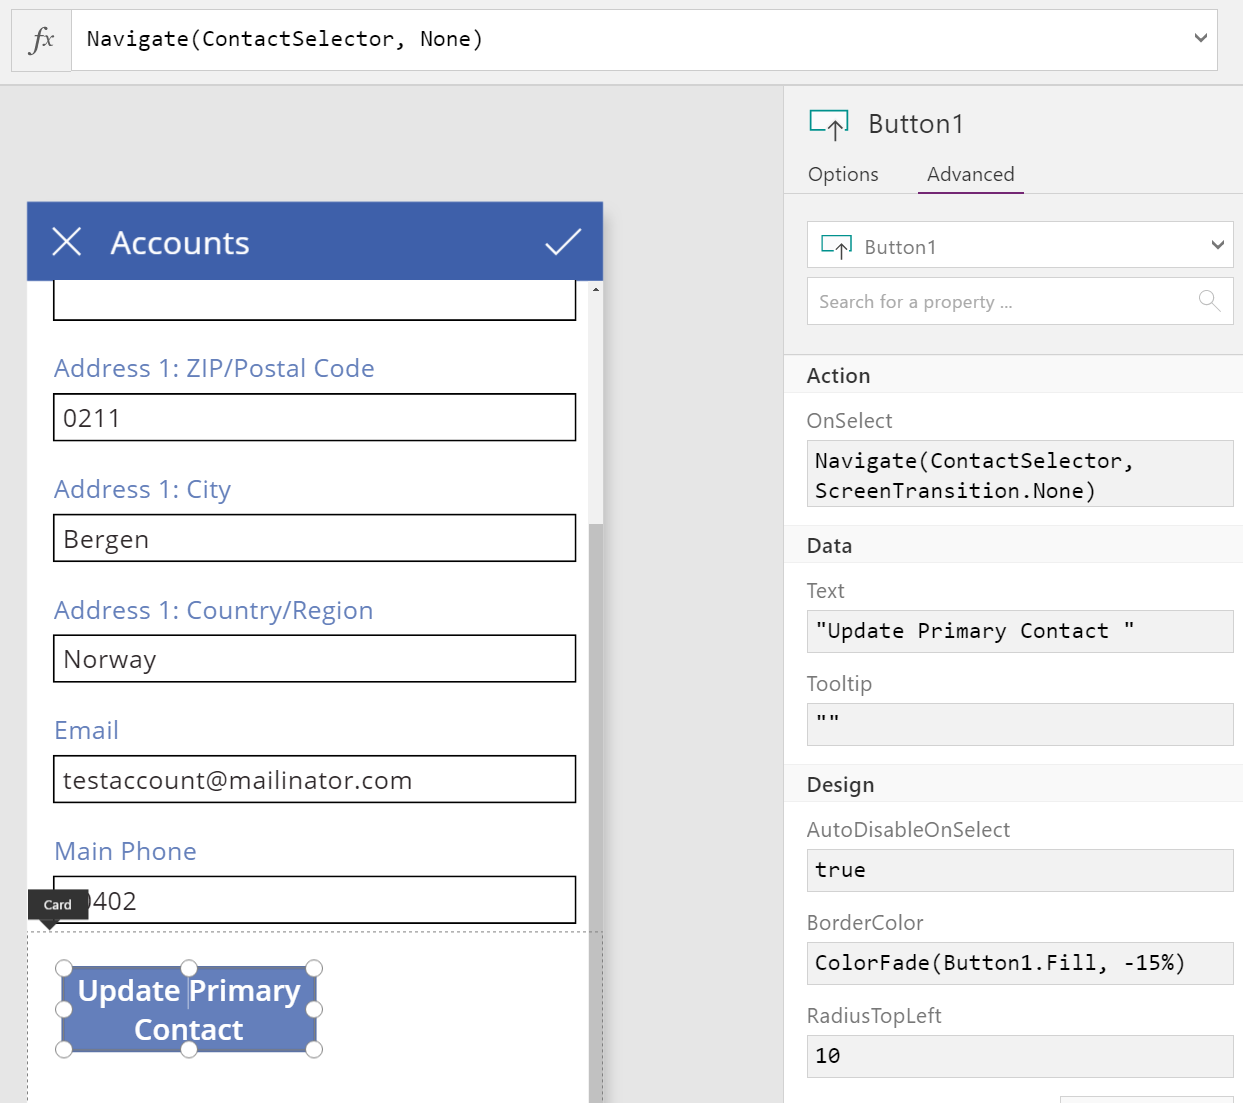
Now, as a power user I would love to be able to edit the primary contact of the customer without having to specify a Guid, I want a search window so that I can find the right one and add it to the account I'm looking at. The first thing I'll do is to add a new browse gallery screen, and then I add a new button on the edit form which navigates to the new screen:
Now, on the contactselector screen I want to show all active contacts. I'll start off by creating the same kind of formula as we did in the beginning of this blog post, but this time I'm just searching through the Contacts data source. My formula now looks like this:
SortByColumns(Search(Filter(Contacts, statecode = 0), TextSearchBox2.Text, "fullname"), "fullname", If(SortDescending1, SortOrder.Descending, SortOrder.Ascending))
Now the right arrow on each result will usually try to navigate to a details window, but we don't have that window here and we don't want to see the details either, we just want to add this contact as the primary contact to the account. So what we're going to do is to use the "patch" function in PowerApps. The Patch option allows you to edit items on an existing record, while the update function replaces an old record with a new one. Since we just want to update the contact I'm going ahead with the patch method. The syntax for the patch function is like this:
Patch(<data source>, LookUp(...), { field1: value1, field2: value2})
So we want to update the account we have selected in previous windows. In additon, we want to update the primary contact Id for that account. That means we have to do a formula like so:
Patch(Accounts, LookUp(Accounts, accountid = BrowseGallery1.Selected.accountid), { _primarycontactid_value: ThisItem.contactid})
This is starting to look pretty nice, but we also want to navigate away from this form after updating. To do that we simply add a semicolon after the Patch function, then call the Back() function to go to the previous window. What we end up with is a window that looks something like this:
So now we have a complete app that can search for Accounts, display related record information, and finally edit the fields and set a new primary contact. This should work just as well for all related records, but now you have a pretty good example to start out with.
Wrap-up
So as we've seen not everything in PowerApps is just point-and-click, but you don't have to be an advanced developer to find out this stuff on your own. The documentation for powerapps is decent, so you'll find plenty of examples you can experiment with on your own.
What I find very exciting is that not only can I create these simple apps very fast, I can also distribute them to other users in my organization so that it will be available from the
https://home.dynamics.com menu.
I've added a copy of the powerapp to to my public google drive so you can download it and use it as you want (
TestAccounts.msapp).
All you have to do is to go to the "Content" tab and add the data sources, you'll need "Accounts", "Contacts" and "Users", and then you're ready to go.