Creating a CRM Online instance (with Office365)
This blog post will go through the details of creating a new CRM Online trial subscriction.
It is one of the steps on my "February CRM roll" where I'm setting up CRM 2016 on-premises, going through a lot of configuration and migrating over to CRM Online, data, config plugins, the works!
This part is all about setting up Office365, and it's a lot simpler than you think, in large parts thanks to the guidance the office365 portal gives you.
This part is all about setting up Office365, and it's a lot simpler than you think, in large parts thanks to the guidance the office365 portal gives you.
Sign up for a new trial
First of all, head over to the trail website (Microsoft)
Click the Get Started button under "Self-Start Trial" to start the registration.
Step #1. They'll want to know a little about you, like the country you're in, name, phone, company, etc. I presume you'll know how to fill out these fields yourself.
Step #2. Create a user name and instance ID. The username will be the tenant administrator, and will be your login name. The tenant name will be appended to .onmicrosoft.com to generate a complete username. In my case it's: crmviking@crmviking.onmicrosoft.com

Step #3. Confirm your details by letting them text you a confirmation message, or receive an awkward, automated phone call. If you're interested about the other online products you can check the boxes for email, phone, etc.
Creating your account details will only take a minute or two, so don't run off yet!
Step #4. Log in with your new account details, and you'll be presented with a form to confirm some details like language, country and currency. REMEMBER! The currency cannot be changed later, so stick to the one you'll want as your base (additional currencies can be added, but the base will always be the same). I recommend that you choose the country you'll be working from, so you will get a tenant with the lowest possible latency.
It'll spend a few minutes creation your account, but when it's done you'll be presented with a link to your CRM environment.
Congratulations! You have your own CRM Online environment with a bit of sample data to play around with!
Add more services
Ok, so we have our new CRM Online environment up and running, and even though that's alluring we'll do some more housework first. If you head over to the Office365 portal you can get an overview of your services. If you're asked for a username and password it's the new one you just created:
username@instance.onmicrosoft.com

As you can see, you have 4 services available. CRM, Identity Service, Office365 portal and Social Engagement. These are all the default services that comes with CRM Online. That's fine, if CRM is all you need, but I'm want more services available so I can make use of all the cool functions CRM has to offer, like synchronization of email, contacts and tasks, as well as sharepoint and onedrive for business integration. And you won't be wrong to assume that I'll be doing a future post on powerbi integration with MSCRM Online either.
So, head over to the "Purchase Services" over on the left hand side. Don't worry, we'll just be adding trial services, so there's no credit card requirements or anything like that. So, we're currently running a CRM Online 30 day trail, but there are loads of additions to choose from. I recommend that you spend some time reading about the different products, like Dynamics Marketing and Parature. It might not be something you're interested in at this time, but they full of really cool features that you'll want to keep in mind as your business' digital needs evolve and expend.
As I mentioned earlier, I would like to add some integration features, so I've scrolled down to the Office365 E5 plan. The E3 plan is, by far, the more popular choice, but I want to show off how incredibly cool it is to integrate with Power BI.
So, just hover your mouse over the E5 plan, and click on the "Start free trial" option.
You'll be presented with a confirmation order and instrutions to assign licenses to your users. We'll be doing that a bit later, and I'll also go through adding new members and setting up some basic settings. When you return to the overview you'll see additional services available.

In my case you can see a warning about the Power BI service being degraded. I've expanded the warning which shows that the Microsoft techies have already located the error and are applying a fix. No matter which provider you choose as your cloud platform provider you will experiences issues from time to time, especially if you want to be on the fast-track for new, exciting features. I think this is a brilliant example on how Microsoft gives you the information up-front, with additional information in regards to what they are doing to remediate the issue. In this case, the issue was that some users could experience issues when importing excel files into Power BI, so it was not even a major issue but you're still getting the information so you know that it isn't your system that's the problem. This isn't something revolutionary, but being honest and proactive is a lot better than many other providers who just stamp their products with "Beta" or something like that and tell you that you're using their products at your own risk.
But enough with the preaching, head over to the "Users" section in the left hand navigation, and open up active users. Click on your user account and you can see the different options you have available. At this time, I'll be adding additional features to my user account, but I advice you not to do that in your production account. I would rather have that account as a dedicated administrator, without any licenses applied. Give the account an insanely difficult password, and activate multi factor authentication with the phone number to one of the stake holders in your company. That way, the tenant admin will be secure, and is not used for daily, mundane tasks that increases the risk of credentials being stolen or man-in-the-middle attacks that could give an attacker the opportunity to delete all your stuff, or even worse act on your behalf.
But as I said, in my case I'll just be adding licenses to the default user, because this is just a demo environment. Click on the "Edit" link on the right hand side under "Assigned licenses"

Check the box for E5 license license, and click the save button to continue. At this point a mailbox will be assigned to the user, as well as permissions to download the Office 365 suit for desktop and access to the other cool features (power bi, sharepoint online, etc).

Setting up your Office 365 portal
OK, so we've added CRM Online and the rest of the Office365 suite, as well as adding licenses to your user. What I recommend that you do is navigate through the Office365 Portal and get familiar with the options available and what you can do. I could probably do a a dozen blogposts just to cover all the possibilities, but that would be a bit pointless.
The next step, at least in this guide, is adding a domain and some users. I'm going to go through the "Setup" from the left hand navigation to complete these steps. It's an easy way to get your environment up and going. As you might see from the coming screenshots I've always taken the liberty of styling/theming my Office365 portal as well.
Click the "Start Setup" button to start the Offie365 setup. Just a quick tip early on, if you need to migrate mail content to your O365 portal then you should plan that before you go ahead. It's important that your users are aware of the transition and able to verify that they're able to access all the services they need after the migration is done. I don't have an environment to transfer from, so I'll just go ahead and select that option and push on through.
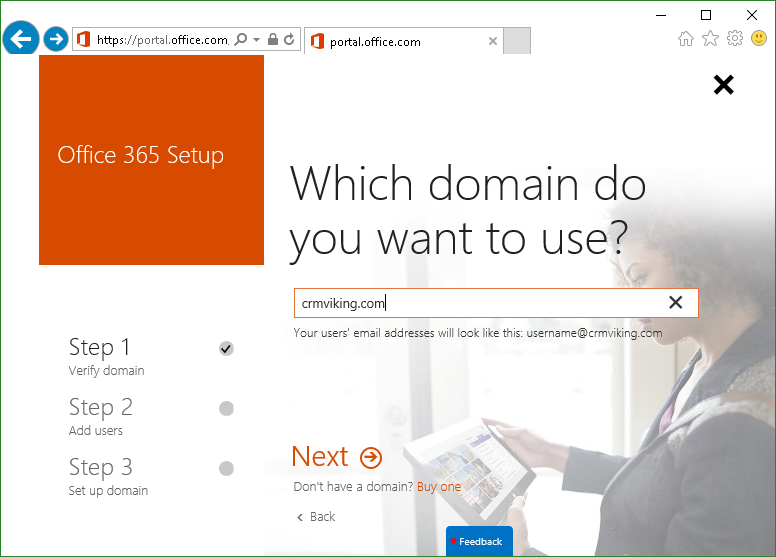
Now! The next step is to add domains to your deployment. I'm going to go ahead and add the crmviking.com domain, which will allow me to send and receive emails, as well as getting a more user friendly username. You are also able to buy a domain from this step, Microsoft will direct you to godaddy.com to complete the registration of a new domain if you choose to do so. In my case, I already own the crmviking.com and crmviking.no domain, so I'll just go ahead with the wizard.
You'll be provided with a request to add a txt record to verify your domain. It gives some straight forward instructions on how to do that, but you could also contact your domain provider and ask them to help you perform the required configuration changes. When the changes have taken effect, come back and verify your settings. if you've done everything correct you'll be presented with a success screen, and you can continue to updating user IDs.

I'm just going ahead and marking my only account for update, effectively switching usernames from "crmviking@crmviking.onmicrosoft.com" to "crmviking@crmviking.com". If you have several users you can select all for update, or just pick out a selection. If you don't want to update any users at this time you can go ahead and skip, else proceed to the success screen.
If you changed your own account, you'll have to sign out and sign in with the new account name to continue with step 3.

Now, if you had to go through this step, it might have required you to close the browser and try again. In that case, you'll be directed to your user start page in Office365. To get back to the administration site simply scroll down and click on the "Administration" tile.
Head back to the setup area and start the setup wizard again. The next step is adding additional users. I will be adding a dummy account and proceeding, but it's also possible to import a CSV file at this point to mass create users.

Next you will be presented with a screen with the new users created and a temporary password. You can use this to send your users their new account names and passwords, or you can reset the password for them later. Personally I don't like storing passwords, even temporary ones, so if I'm not distributing them straight away I'll just reset them later if need be. Proceed to the next and final step, adding DNS records to use your domain in Office365.
At this step you'll be prompted if you want to transfer DNS management to Office365. There are, of course, both pros and cons to doing this. If you change then you'll be changing the DNS servers you want to use to handle your domains DNS records. This makes everything available from the Office365 portal, which can be handy. On the other hand, you might be more comfortable using your existing DNS servers, in which case you can continue using them and just add the DNS records yourself. I'll be opting in to use my existing servers, because this is a demo environment and I like the domain registration I have at my current registrar.

On the next page, select which services you want to use in Office365 (which requires DNS records). I'll go ahead and select mail and Skype for Business, I do not want to manage my mobile for this demo, and head over to the next page. The next page lists all the DNS records which needs to be created.
Like instructed earlier, you can either update these yourself or ask your domain registrar for help.

That's quite a few, so do what you've got to do to get those registered, and get back to the setup and click next to verify the records. Now, there might be a trick to get the SRV-records to work. If you can't specify the service and protocol at your registrar's DNS settings, you have to specify _sip._tls.yourdomain.com as the service name. John White did a great blog post on this.
And now you're finished! Rate the service/experience, and rock on through back to the office portal.
Wrap-up
And there you have it, CRM Online with an Office365 Enterprise plan created and fully functional. I'll be doing more blogposts on this throughout February to show how you can administer users and licenses, as well as permissions and sharing content with groups. I will also be doing a migration from CRM 2016 On-Premises to CRM Online, with data migration, configuration, plugins. Stay tuned for more CRM goodness!
No comments:
Post a Comment