Arctic Cloud Developer Challenge was amazing

As you may know I was a judge during this years Arctic Cloud Developer Challenge (#acdc2019)
It was a fantastic event with a lot of great content created by the participants. This year was The Simpsons themed and all the teams did a great job creating solutions with a related branding. This year we had special categories for security vulnerability, ethical hacker and black hacker, which would give you negative or positive points. These categories were not overly used, though the Swedes managed to set everyone back 50 points at one time.
We also had one lightning challenge per judge, and while I outsourced mine to the fantastic Elaiza Benitez the other judges chose some really cool scenarios.
For this event we got some really cool MX Chips from Ben Vollmer, my favourite person in Microsoft, and we handed out 1 to each team so they could use them for the IoT category. All the teams were actually doing IoT stuff, which I think is really awesome. IoT is one of the things I believe will be part of everything in the future, in fact I think the abbreviation will disappear in time and we will just take it for a given that everything around us is connected, so I was very happy to see that all the teams made an effort.
We had 3 judging sessions over the three days, where we would give out points to each time in each category, and the winner of a category would get a crown to show off that they are “the ones to watch” for that category. On the second and third day we would collect the crowns and hand them out to the new winner. By the end of the second day the Three Eyed Fishes (Skill) were clearly in front with quite a few points, and I think a lot of the teams got nervous.
On the final day the teams went into full focus mode, and the mood was very intense for several hours. Unfortunately for the Three Eyed Fishes they lost 2 team members the last 24 hours due to family situations, so they had a huge handicap in terms of planning and redistributing responsibilities among the other members, and the competition did not slack off in the face of potential victory.
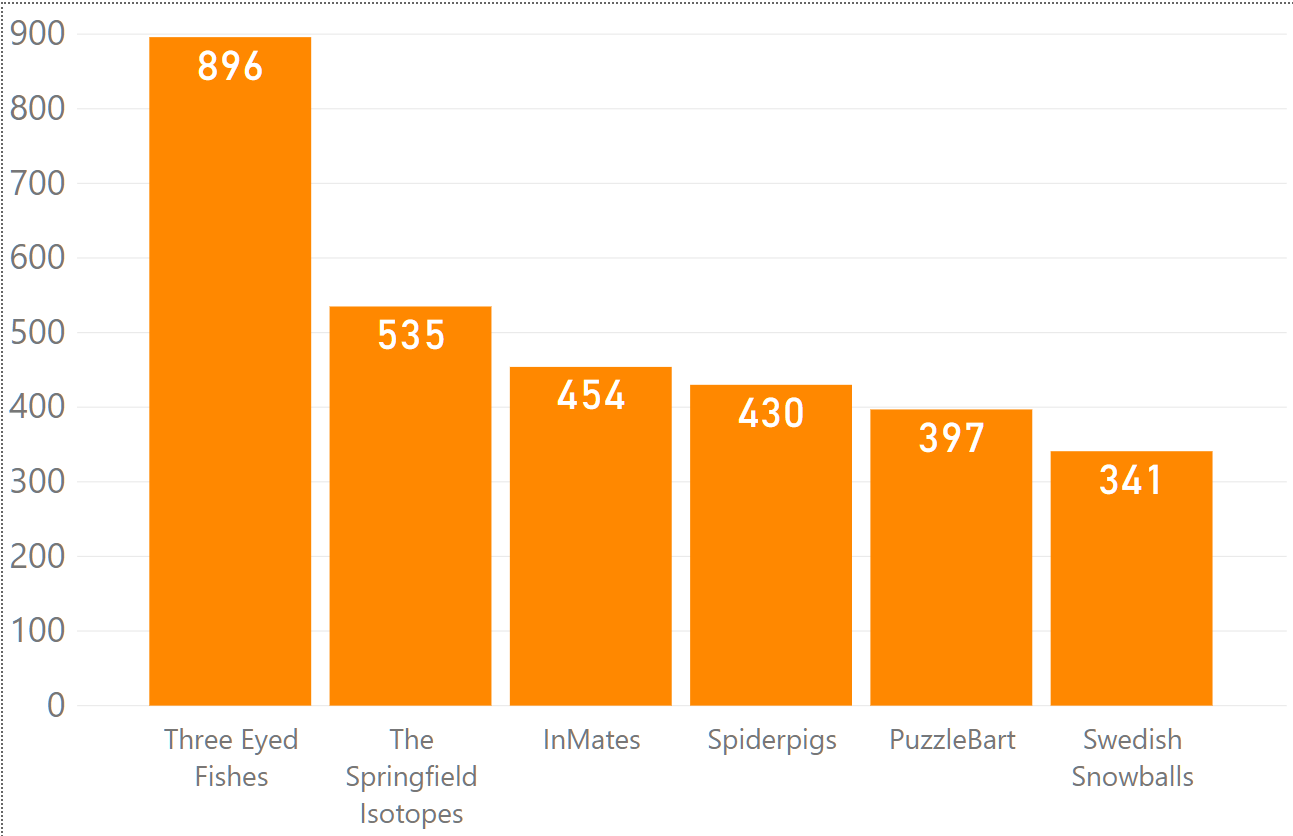
After the third and final judging the new team scores looked much more even, and the popular vote points could swing it any direction

The teams got 10 minutes to present their solution, and at the end all the attendees, judges, guests and organizers got to vote for their favourite. Each vote counted 15 points, and the teams could not vote for themselves (which would give them 15 minus points). It was really close, but in the end the Swedish Snowballs (DQC) brought home the victory by a margin of 55 points over the Three Eyed Fishes.

This was an amazing performance by the Swedish Snowballs, as they went from last place to first place in 24 hours. The big thing about the final day was that each crown was worth 100 points, so winning any category on the final day would not only give 100 points for the category, but an additional bonus of 100 for going home with the crown. The Swedish Snowballs managed to capture three crowns, and here’s a quick overview of which and why
- The Genesis Tub (IoT category): The first two days they struggled a lot with their devices, and they brought quite a few of them to the show. However, on the third they had worked through all their issues, and they had 3 working Raspberry Pi units placed around the venue with cameras, looking for Nelson to try and avoid him. The main thing that swayed the judges was the fact that they had experimented with facial recognition for a long time, and finally decided to move the processing off the pies and created an online service which did all the processing for them. This got the processing time down from well over 10 seconds to around 1 second, making it a much more fluid solution. This is a great demonstration of how IoT edge devices should not be assigned the responsibility of processing, but only do the work they were meant for (image capturing and motion detection in this case).
- Obey the Hypno Toad (UI+UX): The entire interface was built in react, which means it worked great on all devices when they first got it working. However, they made sure to go the extra mile by taking Simpsons sprites and animating them, and they created custom icons for picking a character. Additionally, they added an alert system which included audible and visual alerts, so you would get notification if Nelson was spotted on your path. They also considered that iOS removed alerts from their latest updates, so while platform alerts worked on Android and Windows, the iOS devices would get a visual notification on the top of their screen, which managed to be informative without getting in the way of the map navigation. In other words the UI was not only visually nice to look at, it was also designed in a way which would be possible to integrate into the display unit in a modern car without obstructing the navigation.
- Automated Teller Machineyolatrolamaton (business value): The reason for winning this was that they had several clear, understandable business scenarios for their solution. It was something they could use for Safari tours and parks to make sure that people could go where the animals were. It could also be used to warn people about dangerous animals in an area, to identify poachers, to create evacuation routes in a natural disaster situation, etc. Additionally, it was working and deployed to a public web site, so the product was ready for sale at the time we went around judging.
As judges we were very impressed with all of the solutions we were presented, and I oblige you as a reader to take a look at the Arctic Cloud Developer Challenge blogs to see what all the teams built. https://acdcblog.azurewebsites.net/
Finally a big shout out to the sponsors for making this event possible, it is probably the most awesome hackathon in the
Now I just have to cross my fingers and hope to be invited to this awesome event again