Sunday, October 30, 2016

Microsoft CRM + Azure Service Bus, part 3 (creating a relay service and endpoint)

Integrating Microsoft Dynamics CRM with Microsoft Azure Service Bus, using queues, topics, relays and the Event Hub

In this, third part of my blog series on using the Azure Service Bus capabilities I'm going to demonstrate how to set up a relay service and add the relay namespace as an endpoint in MSCRM.
Relaying allows us to have active listeners who can either just accept messages or accept and reply to them. This allows for business critical systems like ticket reservation and receipts to ensure we're working on updated and valid data.
Click here for part1
Click here for part2
Click here for part4

What is a relay service?

A relay service works by using the Service Bus like a kind of tunnel, in which the relay is an active listener at the other end. Unlike queues and topics, where the message is "dropped off", using a one-way or two-way (or REST) relay requires that somebody pick up the message immediately. With one-way the sender is happy as long as somebody accepts it, while in a two-way scenario the receiver has to return a value. In this post we'll start out with a one-way relay, but in the next one we'll look at how we can extend that into a two-way relay.

Creating a one-way relay

First off we write a service behavior class. This represents the code we're running whenever a message is received. I'm just going to write out something to the console.

[ServiceBehavior]
public class RemoteService : IServiceEndpointPlugin
{
    public void Execute(RemoteExecutionContext c)
    {
        Console.WriteLine(
            $"Entity: {c.PrimaryEntityName}, id: {c.PrimaryEntityId}");
    }
}

So nothing magical happening here. It's an extension of the IServiceEndpointPlugin, which writes the entity name and id to the console in it's execute method.
Next up we go to the main method and define a servicehost variable and a new endpoint behavior.

var sh = new ServiceHost(typeof(RemoteService));
var tcEndpointBehavior = new TransportClientEndpointBehavior(
    TokenProvider.CreateSharedAccessSignatureTokenProvider(
        AppSettings["SharedAccessKeyName"],
        AppSettings["SharedAccessKey"]
    )
);

OK, so here we've got ourselves a new servicehost variable, which we'll use to add a new service endpoint, with our newly created RemoteService service behavior as the type. Then there's the endpoint behavior. We create a new TransportClientEndpointBehavior, with a shared access signature as the token provider.
NB! In the SDK and the MSDN article this is specified as "Shared Secret Token Provider", but that's ACS and is no longer supported in Azure. You have to use Shared Access Signature (SAS) for authentication or it won't work.

sh
    .AddServiceEndpoint(
        typeof(IServiceEndpointPlugin), 
        new WS2007HttpRelayBinding(), 
        AppSettings["SBusEndpoint"]
    ).Behaviors.Add(tcEndpointBehavior);

Here we add a service endpoint to the host. The type is IServiceEndpointPlugin, which is what the CRM async service sends to the Service Bus. We use WS2007HttpRelayBinding to match the source system, and we collect the endpoint from the app.config (formatted like the following: https://yournamespace.servicebus.windows.net/yourpath/ ).
What's important to note here is that the path specified should not be the same as an existing path. If you have a queue or topic with the same path specified, it will be overridden and you cannot recreate it in the Azure Portal afterwards. This also means that it's up to you which path you want to use for the relay, which also means you can modify it dynamically using the web.config or in advanced integration scnearios.
Finally we add the endpoint behavior we created ealier.

sh.Open();
Console.WriteLine("OneWay-listener, press ENTER to close");
Console.ReadLine();
Close();

Finally, we open up the service host connection, which makes it start listening to new messages. This means we're ready to set up the service in the plugin manager and start sending messages.

Switching to relaying in MSCRM

First off we need to create a new shared access policy in Azure. It's the same as we did in part1, except that this time we create it on the bus itself instead of on a queue.
Then we head over to the plugin registration tool, connect to our organization and add a new service endpoint. This time it'll look kind of like this when it's filled in:
What's important to note here is the namespace address and path. The namespace address should be the complete path, and the path should just be a forward slash (the tool does not accept blank values). If you specify the path in the path box then it won't be able to find and connect to your relay service (that took me a while to figure out). In addition, this is an https endpoint, not an sb endpoint
Next up we go into CRM to edit our workflow (for more info see part2 of this blog series). The only thing we need to do here is deactivate and update the service endpoint. Then save and activate it again. I've kept the workflow running synchronously, just to be able to verify that it works as expected.
Now, just to demonstrate how it looks if you've specified the wrong endpoint, or if the relay isn't running, here's the error message you get. It is the same error you'll get if you specify the path in the path box instead of in the namespace box.

Now, for the fun part instead. Start your relay service and wait for the host to be ready. Then go into CRM and trigger the plugin. If you've done everything right then you'll see a command window looking something like this

And that means we've successfully posted a message from our MSCRM system, through our azure service bus and out of the relay service. This example isn't very exciting, but just think of the possibilities you get if you put this service out into Azure (or on a web server if you're still into that whole old school infrastructure stuff ;) ).

That's it for this blog post. In the next and (for now) final post in this series we'll look at how we can extend this into a two-way relay, as well as integrating with Azure Event Hub which is a service based on the ASB.

Wednesday, October 26, 2016

Microsoft CRM + Azure Service Bus, part 2 (creating a custom workflow and consuming service endpoints)

Integrating Microsoft Dynamics CRM with Microsoft Azure Service Bus, using queues, topics, relays and the Event Hub

In part two of this blog series we're going to look at how to create a custom workflow to post messages to the Azure Service Bus queue created in part1. I'm assuming that you have basic knowledge about the C# language and that you are familiar with the custom workflow step and plugin concepts in MSCRM.

Creating a workflow

First off, I have to give thanks to Jason Lattimer for all his contributions to all CRM developers and customizers everywhere. He has made available a free version of Dynamics CRM Developer Toolkit which makes building code and deploying stuff a breeze. Be sure thank him if you ever run into him.

[Input("ServiceEndpoint")]
[ReferenceTarget("serviceendpoint")]
[RequiredArgument]
public InArgument<EntityReference> ServiceEndpoint { get; set; }

First off I've just specified a simple input parameter for the workflow step. It takes an entityreference of type (logicalname) serviceendpoint, which is the type registered through the plugin registration tool.

protected override void Execute(CodeActivityContext executionContext) 
{
    var context = executionContext.GetExtension<IWorkflowContext>();
    var serviceEndpointNotifySvc = executionContext
        .GetExtension<
IServiceEndpointNotificationService>();
    serviceEndpointNotifySvc.Execute(

        ServiceEndpoint.Get(executionContext), context
    );
}

Next is the execution content of the workflow. As you can see there's no real magic here. I'm getting the workflow context and the service endpoint notification service from the codeactivitycontext. Then I use the Execute method of the notification service, which takes a service endpoint as an entity reference, and an ExecutionContext (here in the form of an IWorkflowContext) as input.
What the execute method does is posting the execution context to the provided service endpoint, which in turn means that the message received in the service bus queue contains a copy of the information contained in the execution context. This means you can add shared variables and images to supply additional information to whichever system will end up reading the message.
And that's it, you've got a working custom workflow step which can be built and uploaded to CRM.


Using workflows to send messages to ASB

The next step is to start using our new workflow step inside MSCRM. Just go into Settings -> Processes and hit New to create a new process. I like to start out with a synchronous one just to make sure that everything works, and then switch to background when I know it's OK. Even though you can run this step synchronously I wouldn't do it. The network latency alone is enough to make it a bad experience for users, so I would put much effort into using it as a background WF.

I've set the workflow to run on-demand, and then I add our custom workflow action as a step. On the properties-page, search for the service endpoint registered and add that as an input to the workflow step.

Now that we have configured a workflow, go ahead and save and activate it, and we're ready to start populating the ASB with messages.
I went ahead and triggered the workflow 5 times, and as you can see from my Azure portal there's messages ready to be processed.

Processing messages

Now that we have messages ready for processing we'll write a tiny application that allows us to read the messages posted. I've created a simple console-project in Visual Studio and added the CRM sdk through nuget (search for Microsoft.crmsdk)

var queue = MessagingFactory.CreateFromConnectionString(
    ConfigurationManager.AppSettings["ServiceBusPath"]);
var client = queue.CreateMessageReceiver(
    ConfigurationManager.AppSettings["EntityPath"], 
    ReceiveMode.PeekLock);
var message = client.Receive();
var context = message.GetBody<RemoteExecutionContext>();

The first thing I'm doing is creating a queue class using the ServiceBus sdk, and I've stored the connection string and queue path in the app settings. These strings are sensitive, so don't share them with anyone.
Next I'm instantiating up a new client class, using the queue connection and the entity path, and I've set the receive mode to PeekLock. This allows me to retrieve a message from the queue without deleting it, and then I can choose to delete (.Complete()) the message or return it to the queue (.Abandon()).
Then I use the receive method to get the next available (unlocked) message from the queue, and finally retrieve the message body. The message body is of type "RemoteExecutionContext", a Microsoft CRM SDK object which the notification service creates from the ICodeActivityContext.

If we put a breakpoint in our code we see that we have the familiar attributes available, like inputparameters, shared variables, parentexecutioncontext, primaryentityid, etc.
By utilizing the shared parameters we can add additional information in workflows or queues, which allows us to build complex logic in the queue listeners.

That's it for this post. In the next one we'll look into relaying with Azure Service Bus, which allows us to send replies back to MSCRM.

Sunday, October 23, 2016

Microsoft CRM + Azure Service Bus, part 1 (creating queues and adding service endpoints)

Integrating Microsoft Dynamics CRM with Microsoft Azure Service Bus, using queues, topics, relays and the Event Hub

Todays post is kind of a wrap up from the previous Oslo Dynamics 365 meetup which was held on October 17th. We'll look into the native support for Azure Service Bus (ASB) in MSCRM  and how we can use service endpoints inside our plugins and workflows. This post will focus on creating a bus, queue and access keys in Azure, and how to register the endpoint in MSCRM using the plugin registration tool.
Click here for part2

What is Azure Service Bus (ASB)

ASB is a service bus used for sending messages between different endpoints, which allows you to build and manage interconnected applications and systems without having to worry about the communication channel (within reasonable limits).
ASB supports several different destination types and communication protocols, and in this blog series I'll focus on the ones supported by Dynamics CRM.

Creating a queue and access key

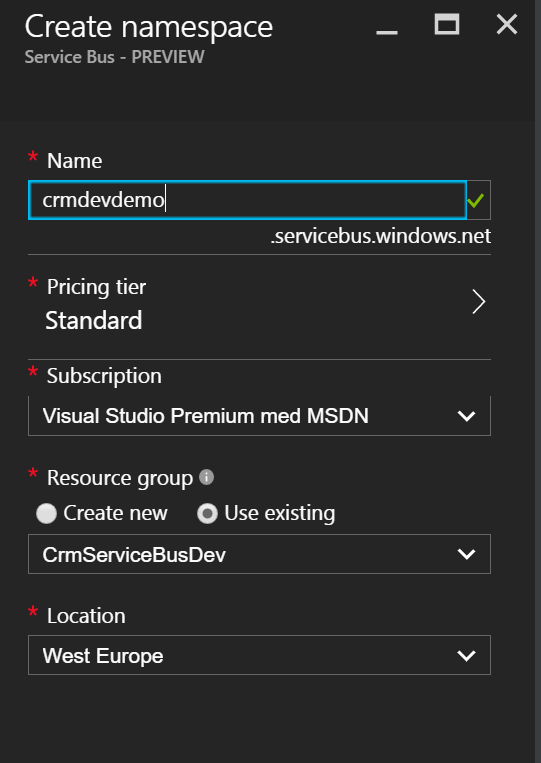
The first step to adding an ASB endpoint in MSCRM is to create it and generate access policies. We'll start by logging into the Azure Portal and adding a new resource. Simply search for Service Bus and you'll find the following available

Fill in the required information to create the new resource, and hit the create button to start provisioning your brand new queue.
TIP: If you're using CRM Online, optimize performance in MSCRM by creating the bus in the same location as your tenant. This will minimize latency and will be very helpful in scenarios where you use Event hub for advanced auditing or similar high-ouput situations.

Now that we have a brand new service bus, it's time to add a queue to it. Navigate to Queues in the left hand navigation box and click on the [+ Queue] button. Give it a name and hit "Create" to get started.
Please note that the size option is the storage size of the queue, not the message size. In my tests the messages typically were between 13 and 60kB, so a 1GB queue would hold between 16k and 77k. Even if that seems much (after all, messages are deleted after processing), remember to plan for system downtime and SLA response times. if you generate a total of 20k messsages per day then you could be looking at data loss before gets a chance to take a look at it. I highly recommend you read up on queues and how to build a robust system using ASB aside from this blog post. I'm just presenting you with a simple way to get it working, not a complete integration strategy.
Now, open up your queue and navigate to Shared Access Policies. By default there won't be any policies in a new queue (there is one for the parent bus, I'll come back to that in the post about relaying), so click Add to create a new Shared Access Policy. Now you'll be asked to specify the claims added for this policy, which are "send", "listen" and "manage". Manage automatically gives the other two, but you could add a "send" access policy without "listen", and the other way around. The claims are pretty self-explanatory. Listening allows an application to read and complete messages, sending allows an application to send messages to the queue, and manage allows an application to make changes to the queue itself. I recommend a least-access-policy, ie. create seperate keys for systems that will listen and send messages, and don't overuse the keys across multiple systems. For demo purposes, using a full access key or a send&listen key is good enough.
Now you have a service bus, a queue, and an access key. You're ready to integrate MSCRM with Azure Service Bus.

Adding a service endpoint to MSCRM

To add a new service endpoint to MSCRM we have to use the plugin registration tool. You'll find it inside the MSCRM SDK under tools. Run the PluginRegistration.exe file and connect to your MSCRM organization. Once connected you'll have a new tab for your organization with a set of actions you can perform. Click on the register button, and then on the "register new service endpoint" option. You'll be presented with two options, either entering a connection string or starting with a blank connection window. I recommend pasting in the connection string from the azure portal, giving you a completely filled out connection settings window.

Message format

You have three different formats to choose from; .NETBinary, JSON and XML. This is simply the data representation of the message content. If you're planning to integrate with websites or other non-.NET technologies, or if you don't want to be dependent on the CRM SDK in your processor applications then you can simply choose one of the other message formats. Just keep in mind that XML can be quite bloated when it comes to size, so if you expect to send messages near the size limit then I would go for JSON (or even better, .NETBinary)

Take note that you can also choose to send the UserId as a parameter as well. This allows for additional authorization checks in your processing steps, and can be very useful to help determine who did what.
Now hit save, and you're done! A new service endpoint registered and you're ready to go.

In the next post in this series I'll demonstrate how to write a custom workflow step to use the service endpoints.


I also recommend to read up on the technologies. I'm just giving you a simple demo on how to actually do this, but there's a lot more to know and understand in order to plan and implement this successfully in your environment.

MSDN article on integrating Azure with CRM (NB: the samples for relay listeners are outdated as of 2016-10-23)

Wednesday, February 24, 2016

Using and mocking OrganizationServiceProxy (part 1)

How to use the OrganizationServiceProxy with Dynamics CRM, and mocking it

This is a two-part blog series about how to use the OrganizationServiceProxy class with MSCRM. I'll demonstrate how to connect using explicit, hard coded credentials as well as using the service credentials. I'll finish up by giving some tips on mocking the OrganizationServiceProxy to simplify unit testing in your projects.
In part 1 we'll look at utilizing the OrganizationServiceProxy and creating some code which allows us to easily and flexibly integrate with MSCRM.

Prerequisites

To follow the steps described in this post you'll need to have a version of Microsoft Visual Studio as well as the Windows Identity Foundation framework added to your operating system.
Visual Studio is available in a free (community) version found here
Windows Identity Foundation can be activated with the methods described here

Using OrganizationServiceProxy

Set up the project

I'm going ahead and creating a new Web Application project in Visual Studio. I'm not worrying about hosting and which functions I'll need, so I'll just set up a simple MVC project with defaults. I'm also going ahead and creating a unit test project at the same time, which will be used to demonstrate mocking a bit later on.


When the project has been created, open up the nuget package manager and search for Microsoft.CrmSdk.CoreAssemblies. Add this package to both the MVC project and the Test project. You can also add it using the package manager console with the following commands:
Install-Package Microsoft.CrmSdk.CoreAssemblies

Next add a new, empty controller to your MVC project named CrmController. In the index method we're gonna start by defining a new OrganizationServiceProxy with values as described:

public class CrmController : Controller
{
    // GET: Crm
    public ActionResult Index()
    {
        var crmUrl = new Uri(@"https://crmviking.crm4.dynamics.com");
        var clientCredentials = new ClientCredentials();
        authCredentials.ClientCredentials.UserName.UserName = "username@domain.com";
        authCredentials.ClientCredentials.userName.Password = "password";

        var service = new OrganizationServiceProxy(uri: crmUrl, homeRealmUri: null, clientCredentials: authCredentials.ClientCredentials, deviceCredentials: null);
     
        return View();
    }

}

With just a few lines of code you've already got a working service context which can be used to send and retrieve from Dynamics CRM. I'll explain the different inputs to create a new organizationserviceproxy:
uri: This is the URL to your Dynamics CRM instance
homeRealmUri: This is the WS-TRUST URL to your secondary ADFS server, for example if you're federating across domains. I'm not using it in my case but it could be applicable in your case.
clientCredentials: This is the user credentials used to authenticate with CRM.
deviceCredentials: This is for when you generate device credentials for your service

Refactoring service generation

Now, the next logical step (to me) is moving this out into it's own class, so we can reuse for our other methods. What we're doing is generating new a new service context based on predefined values, so we'll refactor the into it's own CrmServiceFactory class. At the same time we'll extract the credentials values and put them into our web.config file (how to store and use your credentials is a discussion better left for another post, but out of two evils, I'd rather specify them in the web.config than hard coded in your class).
Add the following lines to your web.config, inside the "Configuration" namespace.
<appSettings>
  <add key="CrmUserName" value="name@domain.com" />
  <add key="CrmPassword" value="password" />
</appSettings>
<connectionStrings>
  <add name="CrmWebServer" connectionString="https://crmviking.crm4.dynamics.com" />
</connectionStrings>
<configSections>


Refactoring our code into a factory for generating a new OrganizationServiceProxy gives us the following factory-code:

public static OrganizationServiceProxy GetCrmService()
{
    var crmUrl = new Uri(ConfigurationManager.ConnectionStrings["CrmWebServer"].ConnectionString);
    var authCredentials = new AuthenticationCredentials();
    authCredentials.ClientCredentials.UserName.UserName = ConfigurationManager.AppSettings["CrmUserName"];
    authCredentials.ClientCredentials.UserName.Password = ConfigurationManager.AppSettings["CrmPassword"];

    var creds = new AuthenticationCredentials();
    var service = new OrganizationServiceProxy(uri: crmUrl, homeRealmUri: null, clientCredentials: authCredentials.ClientCredentials, deviceCredentials: null);

    return service;
}

Now we can change the implementation in our controller to simply:
var service = CrmServiceFactory.GetCrmService();


Using service credentials

If we want to use service credentials we start by specifying which credentials will be used to run our application. For an MVC application we do that by specifying the user account settings in the IIS Application Pool. More information about setting the service credentials in IIS is described here (technet).
Next we need to change our code implementation as follows:

public static OrganizationServiceProxy GetCrmService()
{
    var crmUrl = new Uri(ConfigurationManager.ConnectionStrings["CrmWebServer"].ConnectionString);
    var authCredentials = new AuthenticationCredentials();
    authCredentials.ClientCredentials.Windows.ClientCredential = CredentialCache.DefaultNetworkCredentials;

    var creds = new AuthenticationCredentials();
    var service = new OrganizationServiceProxy(uri: crmUrl, homeRealmUri: null, clientCredentials: authCredentials.ClientCredentials, deviceCredentials: null);

    return service;
}

As you can see, what we've changed is replacing the explicit declaration of the username and password and converted to using the credentials that our application is running with.
This way we won't be relying on hard coded values, and we don't risk "giving away" our credentials if somebody snatches up your source code.

Using the organizationserviceproxy

First of, technet has a lot of information and examples on how to use the CRM components, and I highly recommend that you spend a fair amount of time reading up on them. There's a lot more to coding against CRM than using classes in .Net. Here's the url to the OrganizationServiceProxy

Implementing a create method

OK. We'll just create a super simple class which will create an account. We'll name it AccountRepository.

public void Create()
{
    var service = CrmServiceFactory.GetCrmService();
    var account = new Entity(entityName: "account");
    account.Attributes["name"] = "Contoso";
    service.Create(account);
}

That was simple, good to go right? Not quite, if I left it at that the Marvelous Hosk would throw harsh words my way. We have some basic principles we should adhere to, mainly Dependency Injection. We'll modify our code to take in the service in the default constructor, and we'll take the name used to create the account as input for the "Create" method.

private readonly OrganizationServiceProxy service;
public AccountRepository(OrganizationServiceProxy service)
{
    this.service = service;
}
public Guid Create(string name)
{
    var account = new Entity(entityName: "account");
    account.Attributes["name"] = name;
    var accountId = service.Create(account);

    return accountId;
}


OK, that's a bit better, we can reuse the class in different projects without having to rewrite any logic, and we can create accounts with different names as well. In addition, we're returning the unique identity (Guid) of your newly created account, which is useful in a number of different scenarios.

Implementing a retrieve method

Implementing a retrieve method is really simple. We'll just add a method to our existing class as follows:

public Entity Retrieve(Guid id)

{

    var account = service.Retrieve("account", id, new ColumnSet(true));

    return account;

}

That's easy and self explanatory, but unfortunately it requires us to know the account id of the account we're retrieving, and I for one do not go around remembering the Guid of my accounts.
So what we'll do is that we'll change this implementation to querying CRM for an account based on the account name, because that's a value we'll remember. The only thing is, when we do a query we'll retrieve a list of entities. Querying for the account name will potentially give us multiple accounts as a result, so I think we'll go ahead and create a new method, named RetrieveByName.

public EntityCollection RetrieveByName(string name)
{
    var query = new QueryExpression("account");
    query.ColumnSet = new ColumnSet(true);
    query.Criteria.AddCondition(new ConditionExpression("name", ConditionOperator.Equal, name));

    var accounts = service.RetrieveMultiple(query);
    return accounts;
}

Now we're retrieving a collection of entities, if we wanted we could also just return a generic list of entities, but I would rather do that elsewhere in my code than implement logic here which makes the method more rigid and less reusable.

Implementing an update method

As you might expect, updating entities aren't much harder. I'll jump straight into implementing an Update method which an entity. It takes an Entity as input, which means we'll be doing the main manipulation in other classes. This might seem redundant in our example, because we're not doing anything that we couldn't do by just calling the OrganizationServiceProxy's Update method. For most deployments that's probably all you need as well, but for some scenarios you might want to do additional, mandatory manipulation every time an update is performed. You might want to whenever it's called, or you might want to implement a date field which is supposed to be updated whenever an update occurs. Additionally, I like to handle all my organization queries inside my repositories.

public void Update(Entity entity)
{
    service.Update(entity);
}

Easy peasy.

Implementing a status update method

Updating the status of a record is a bit special for Dynamics CRM. Instead of simply updating the state and status using the update method you have to send a SetStateRequest.
Here's the code we'll implement.

public void UpdateStatus(Guid id, int state, int status)
{
    var stateRequest = new SetStateRequest();
    stateRequest.EntityMoniker = new EntityReference("account", id);
    stateRequest.State = new OptionSetValue(state);
    stateRequest.Status = new OptionSetValue(status);

    service.Execute(stateRequest);
}

There's no magic in this code either, but as you might notice it is quite generic. We're already taking in the entity id, the state value and the status value. The only parameter missing is the entity logical name and we could reuse it across all entities, and that's exactly what we'll do. A point I want to make is that we'll be passing in four parameters, and to stay in Uncle Bob's good graces we'll create a model to pass as the input instead.

First off, here's our model

public class CrmStatusModel
{
    public Guid Id { get; set; }
    public string EntityName { get; set; }
    public int StateValue { get; set; }
    public int StatusValue { get; set; }
}


Next, it's our new, generic status update class. I went ahead and named it CrmStatusHandler. Like our repository, I'm going to pass in an organizationserviceproxy in the default constructor.

private readonly OrganizationServiceProxy service;
public CrmStatusHandler(OrganizationServiceProxy service)
{
    this.service = service;
}
public void UpdateStatus(CrmStatusModel model)
{
    var stateRequest = new SetStateRequest();
    stateRequest.EntityMoniker = new EntityReference(model.EntityName, model.Id);
    stateRequest.State = new OptionSetValue(model.StateValue);
    stateRequest.Status = new OptionSetValue(model.StatusValue);

    service.Execute(stateRequest);
}


Now we can use this handler to update the status for all our entities, and we've also got a model instead of four separate parameters.

Create additional entity repositories

Now we've seen how to implement a repository for the account entity. I'm gonna go ahead and create another repository for the contact entity. I'll implement the same methods as we did in the account repository, with the same input parameters, except for the query by name.

private OrganizationServiceProxy service;

public ContactRepository(OrganizationServiceProxy service)
{
    this.service = service;
}
public Guid Create(string name)
{
    var contact = new Entity("contact");
    contact.Attributes["name"] = name;
    var contactId = service.Create(contact);

    return contactId;
}

public Entity Retrieve(Guid id)
{
    var contact = service.Retrieve("contact", id, new ColumnSet(true));
    return contact;
}

public void Update(Entity entity)
{
    service.Update(entity);
}


As you can see, it's pretty much the same as the account, only for the contact entity. In addition, I'll create two methods for querying by values instead. I'll create one method for querying by first name, and one method for querying by last name.

public EntityCollection RetrieveByFirstName(string name)
{
    var query = new QueryExpression("contact");
    query.ColumnSet = new ColumnSet(true);
    query.Criteria.AddCondition(new ConditionExpression("firstname", ConditionOperator.Equal, name));

    var contacts = service.RetrieveMultiple(query);
    return contacts;
}

public EntityCollection RetrieveByLastName(string name)
{
    var query = new QueryExpression("contact");
    query.ColumnSet = new ColumnSet(true);
    query.Criteria.AddCondition(new ConditionExpression("lastname", ConditionOperator.Equal, name));

    var contacts = service.RetrieveMultiple(query);
    return contacts;
}

Create an adapter

Lastly, we'll create an adapter to utilize our repositories. I'm going to simulate a situation where we'll always create a contact whenever an account is created, and we'll create a method to deactivate a company when a contact is deactivated. These aren't necessarily methods you'd want to implement in an actual useful environment, but it's a good example of where you'd want to utilize an adapter pattern to combine the usage of several repositories.

public void CreateCustomers(string accountName, string contactName)
{
    var service = CrmServiceFactory.GetCrmService();
    var accountRepository = new AccountRepository(service);
    var contactRepository = new ContactRepository(service);

    var accountId = accountRepository.Create(accountName);
    var contactId = contactRepository.Create(contactName);


    var contactId = contactRepository.Retrieve(contactId);
    contact.Attributes["parentcustomer"] = new EntityReference("account", accountid);
    contactRepository.Update(contact);
}

public void DeactivateCustomers(Guid contactId)
{
    var service = CrmServiceFactory.GetCrmService();
    var accountRepository = new AccountRepository(service);
    var contactRepository = new ContactRepository(service);
    var statusHandler = new CrmStatusHandler(service);

    var contact = contactRepository.Retrieve(contactId);
    var accountReference = (EntityReference)contact.Attributes["parentcustomer"];

    var contactStatus = new CrmStatusModel()
    {
        EntityName = "contact",
        Id = contactId,
        StateValue = 1,
        StatusValue = 2
    };
    var accountStatus = new CrmStatusModel()
    {
        EntityName = "account",
        Id = accountReference.Id,
        StateValue = 1,
        StatusValue = 2
    };

    statusHandler.UpdateStatus(contactStatus);
    statusHandler.UpdateStatus(accountStatus);
}

The first thing you might notice is that these two methods have some redundant code. That already gives you an inclination that there potential for refactoring and improvement. There's some immediate changes we could make, mainly the number of instantiated classes and yet again breaking the dependency injection rules. The first thing we'll do to reduce the redundancy and get better DI is that we'll add the OrganiationServiceProxy as an input for the public constructor for our adapter. Then, in the public constructor we'll set up our repositories as private readonly properties, so they're available to both of our methods inside the adapter. Another thing to note is that the second method also uses the status update handler we created earlier. Creating a new class instance is cheap, especially when we've already got the OrganizationServiceProxy for our adapters, so I'm going to instantiate the status handler in the constructor as well, even though we might not even use it for a particular instance of the adapter class.

private readonly AccountRepository accountRepository;
private readonly ContactRepository contactRepository;
private readonly CrmStatusHandler statusHandler;

public CustomerAdapter(OrganizationServiceProxy service)
{
    accountRepository = new AccountRepository(service);
    contactRepository = new ContactRepository(service);
    statusHandler = new CrmStatusHandler(service);
}


As you can see this hasn't reduced the amount of lines mentionably, but we've got control of the instances at the top of our class declaration, and we can easily change or manipulate them in the future without changing the values inside each method. We'll do some more with our code in the next part, which is Unit Testing our new classes using Moq, so if you've got objections to the changes just made I'd check that out first.

Disposing your objects

Remember that the OrganizationServiceProxy creates new network connections, and you should always call the dispose method when you're done (or instantiate it in a using statement). The network connections aren't part of the CLR, so even in your MVC/web api project where your controllers are instantiated and thrown away in milliseconds the connections will stay open until the idle time out occurs.

Wrap-up

In this part we've looked at how we can utilize the OrganizationServiceProxy to integrate with Microsoft Dynamics CRM. We've created some repositories, a generic status handler and mixed all of our classes into a nice, extensible adapter class. In part 2 we'll look at unit testing these classes, and mocking the OrganizationServiceProxy using Moq. To do that we need to take a look at interfaces, and you'll understand the decisions made in this part even better.


Until then, happy CRM-ing! 

Wednesday, February 10, 2016

CRM 2016 Sales Module Overview

The Dynamics CRM 2016 sales module

Dynamics CRM is split into several different predefined modules. The modules were represented as a vertical navigation area in CRM 2011 and was reworked into a horizontal, partly collapsible navigation bar in CRM 2013. Starting with CRM 2015 SP1, which was only available online, and now in CRM 2016 the horizontal navigation bar now expands to reveal both areas as well as related entities.

Today I'll go through the sales module and what's included out-of-the-box. I won't be doing a thorough walk through of each entity and all it's possibilities, but I'll touch on what I find the most useful features and how they are intended to use.

Dashboards, dashboards, dashboards

I've always been a big fan of dashboards, and like previous versions MSCRM comes with a bunch of them available straight out of the box. The predefined dashboards are based on common use patterns and include several useful views and charts. In fact, many users find that these dashboards fits to their established work pattern and don't even bother to customize them. Though I find that thought alluring, I think most will gain from looking into views and filtering to make it a perfect fit for them. After all, customizing CRM when you get used to it is both easy and fun, because it shows you the results right away and has snap-to styling which alleviates the need for design.

Now I'm an idealist, so I believe that users will find the best way for them to work with a system given time and familiarity with the applications, but MSCRM is huge so it's important to give them the best possible baseline to work from. Having the same baseline also helps when another user has to step in when someone is on sick leave or taking a holiday, as well as designing help and training materials for new employees.
That's why I like dashboards, because it enables you to design a work space for your users that will give them immediate access to the items they work on, whether they're looking into leads, opportunities or sales orders, with the tedious searching and sorting already taken care of. This puts responsibility on the stake holders to invest the time and resources needed to find out how the users of your company works, and analyzing those behaviors and habits to design a system which helps them be more effective, without having to force everyone to do everything the same way.

I recommend that you take some time to check out the dashboards that exist, and maybe write down which parts of the dashboards catches your eye the most. By analyzing which views and charts gives you actual insight and which ones that are more "eye candy-ish" you'll be well on your way to start designing your own. I will be doing a whole blog post, or maybe even a series of blog posts, on designing dashboards and defining use cases.

What's new


What's new is a list of the most recent posts. Posts are wall entities that are connected to activity records, and can be manually or automatically created. Automatic creation happens through autopost rules which can be configured. I will be going through this in my customization posts in the (hopefully) new features.
It can be embedded both into entity forms through the social pane and directly in dashboards, so if this is something which is relevant to your company you might want to consider integrating it.

Account and contact

This is usually the basis for all of your CRM content. In most cases all parts of CRM is either supposed to be connected directly to one of these, or designed to support the use of them. Whether it's sales orders, support cases or SLA's it's all based around a customer base consisting of accounts and contacts.
Many retail customers decide to use only contacts or only accounts, deciding either to connect everything to contacts or customizing the account entity to support retail customer information. I usually recommend persons are created as contacts, and if you're retailing then create a retail account for your contact and add a custom option set to the account which indicates whether it's a company or a person. This is simply because personal details are "flimsy". People change their name, phone number(s), address, email, etc. Using accounts for orders and cases and so on allows you to check if a seemingly new customer might have existing orders, cases or whichever other entities you use. Contacts often get duplicated, and you'll often get new leads based on email addresses they haven't used before or missing middle names etc. Not to mention, people have the same names, so using this technique allows you to have similar names for contacts, which most likely is the field you'll be using in your views/lists, but with unique account names.

I just want to underline that this in no way is a de facto standard, and there are probably many who will disagree with this design, but I'm sticking to "my beliefs" until someone convinces me otherwise. I'd also like to point out that in CRM, both Account and Contacts will be available in the "Customer" lookup, but that's also the reason for my recommendation.

Many retail customers decide to use only contacts or only accounts, deciding either to connect everything to contacts or customizing the account entity to support retail customer information.
I strongly advice to use accounts and contacts as intended, which is exactly as they are described. If you're retailing and customers need to open an account, and they can add several members to that account (for example family members), then you add both contacts and accounts. You could add a option set to the account to specify whether it's a "company" or an account for a customer.
This is particularly true for Dynamics365, which is right around the corner (at the time of writing).

Lead

Here is one of the first steps where implementations starts to deviate from the proposed and even advised usage. A lead is an unqualified opportunity. That's all there is to it. No ifs or buts, it's just a potential, but you haven't qualified the potential at all. It could be someone who's registered on your homepage or a tip from another customer, but it's nothing more than an unqualified opportunity. You can create a new contact and/or account from a lead, and then you can either qualify or disqualify it for an opportunity. There could be a question about what qualifies a lead, you might not want to add a person who has subscribed to your company blog as a lead, but if someone contacts your company and says "I want to buy product X" then that's already past a lead, that's already at the opportunity stage or even order stage in the case of many retail customers.

You might wonder why that's important, and that's simply because Microsoft is designing a lot of functionality around the in-built entities, so if you start using leads, opportunities or anything else for things they weren't designed for then you might miss out on cool new features when the next update comes around.

Opportunity

The opportunity entity is used for working on a proposal for a customer. It could be a qualified lead or it could be a raw opportunity created from the overview. What's important to know about the opportunity is that it should be qualified, meaning that it could only be won or lost. That's the only status options available, and the only possible outcomes if you use the opportunity like it's designed. For example, "I have an opportunity to sell this company my products or services, either they'll buy from me or they won't. They might come back later or request multiple quotes, but it's either a sale or not." If you think about it this way then an opportunity can only be won or lost, and losing an opportunity does not necessarily have anything to do with the performance of the seller.
During the opportunity phase you present the customer with one or more quotes, and if the customer decides to buy then you convert the quote(s) to a sales order, and at that time you close the opportunity (when the last order is placed). When an order is placed you have won the opportunity, whether it's actually paid or not.
Please note that MSCRM is just that, a customer relations management system, it is not meant as an accounting system. There are other, great Dynamics products which can solve your accounting needs, as well as other providers that can be integrated with CRM.

When working on an opportunity it is often recommended to use a business process flow (BPF), a feature introduced in CRM 2013 (and largely improved since then). I will be doing a future blog post on best practices and possibilities for using BPFs in your CRM system. I will also be going more in-depth in regards to using opportunity, with focus on developing, proposing and identifying factors like competitors, stake holders, etc.

Competitor

Competitor is pretty self-explanatory. It's an entity used to create competitor records that can be used in opportunities to identify who you're competing with.

Quote

Quotes are used to present a customer with a solution. It is tightly integrated with both opportunities and order lines. You add a number of order lines, costs and description inside a quote, present it to a customer (for example through automated emails), and if the customer accepts that quote you can convert it directly into a sales order. When a quote is created you can add information like address, order lines, discount, etc. When the quote is finished and ready to be presented you click the button to activate it, and at this point you're not allowed to rework it. This is a way to make sure that a quote does not get worked on from the moment it is presented to the customer and until you either retract it or get a request for revision from the customer. At this point you can simply click the revise button to edit the quote details and/or order lines, and present it again.
Do note that closing a quote also allows you to create a new, revised quote.
If the customer accepts the quote you can create a sales order directly from the toolbar, which will include all the details that originally was in the quote.
Here's one of the points about what I mentioned earlier about what won means in Dynamics CRM. When you choose to convert the quote to a sales order you can set the opportunity to Won at the same time. This is because as far as CRM is concerned, a sales order means a sale has occurred, which also underlines how quotes and sales orders are supposed to be used. Do not create a sales order before the customer has confirmed that the quote will be purchased.

The quote has a lot of different features, and I highly recommend using it. I will be doing several posts on customizing the sales area to fit customer needs, where I'll go more in-depth into the quote and sales order entity.

Sales order (or just order) and invoice

You can think of the sales order as an extension of the quote, and invoice as an extension of a sales order. They both contain the same information as the quote, and has the same connections as the quote.
Remember not to fulfill an order before all the invoices have been paid. Even partial fulfillment will close the order, and at that time you can't go back to open (without cheating, but we're not gonna go into that in this post).
That's another reason for closing an opportunity when an order is created. Because the order should be active until all invoices are paid there's no need to keep the opportunity open, because it has been won and you're finished with it. For many companies there will even be different teams working on opportunities and sales orders, so just close that opportunity as soon as possible after the order is created and start working on your next prospect!

Also take note that you can, and should, lock the pricing. This is because as soon as an order is placed you've probably agreed to the price, and at that time you shouldn't allow the price to be changed through recalculation when the unit price changes or the currency conversion rate changes.

Product

The product entity has a lot of capabilities, and needs to be thoroughly thought through and planned before you start implementing any. There's a lot of possibilities, among them bundling products, product properties, price lists and on it goes. That's why I'm saving it for another post to keep the length of this one manageable. 

Sales literature

The sales literature is an entity for creating a wide range of different sales literature. It has many predefined types, like spreadsheets, general sales literature, price sheets and manuals. Sales literature should have attachments that could be used by your sales people to read up on, or product manuals that you can attach to emails and provide your customers with.
It's also connected with competitors and products, because sales literature will probably be directly relevant to either a single or a series of products, and you might have competitors who provide the same or similar product.
The usage of sales literature varies a lot from company to company, but it is a great way to gather information about your products and offer a way to give your sales people the newest presentations and general news for your products. Combine this with mobile clients and they'll be able to answer customer requests on the go, or even directly in meetings if the need arises.

You could also create sales literature for a campaign you're running, for example price sheets, or products you're only offering for a limited time, and specify an expiration date. You can also set an expiration date to products that for whichever reason aren't available anymore, in case you still want the literature available.
If you have literature for products that your own employees either have created or have the main responsibility for then you can set up an employee contact. This gives your users an easy way to find the correct contact person when they have a question about the manual or suggestions for revision.


The wrap-up

You made it to the end! The sales module is quite large, and we only covered the entities primarily used for sales in this post. There are several others, like goals, quick campaigns and alerts that are used across several of the modules in Dynamics CRM.
Using the sales module the way Microsoft has designed it allows you to work effectively with a work surface you're already familiar with. I think it's a great product, and hopefully this post has made you feel the same way if you didn't already.

Stay tuned for more posts on Dynamics CRM, in February I'll be doing several posts on configurations in CRM On-Premises and Online, and I'll finish strong with some posts on migrating from the former to the latter.

Until next time, happy CRM-ing!