Integrating Microsoft Dynamics CRM with Microsoft Azure Service Bus, using queues, topics, relays and the Event Hub
Todays post is kind of a wrap up from the previous Oslo Dynamics 365 meetup which was held on October 17th. We'll look into the native support for Azure Service Bus (ASB) in MSCRM and how we can use service endpoints inside our plugins and workflows. This post will focus on creating a bus, queue and access keys in Azure, and how to register the endpoint in MSCRM using the plugin registration tool.
Click here for part2
Click here for part2
What is Azure Service Bus (ASB)
ASB is a service bus used for sending messages between different endpoints, which allows you to build and manage interconnected applications and systems without having to worry about the communication channel (within reasonable limits).
ASB supports several different destination types and communication protocols, and in this blog series I'll focus on the ones supported by Dynamics CRM.
Creating a queue and access key
The first step to adding an ASB endpoint in MSCRM is to create it and generate access policies. We'll start by logging into the Azure Portal and adding a new resource. Simply search for Service Bus and you'll find the following available

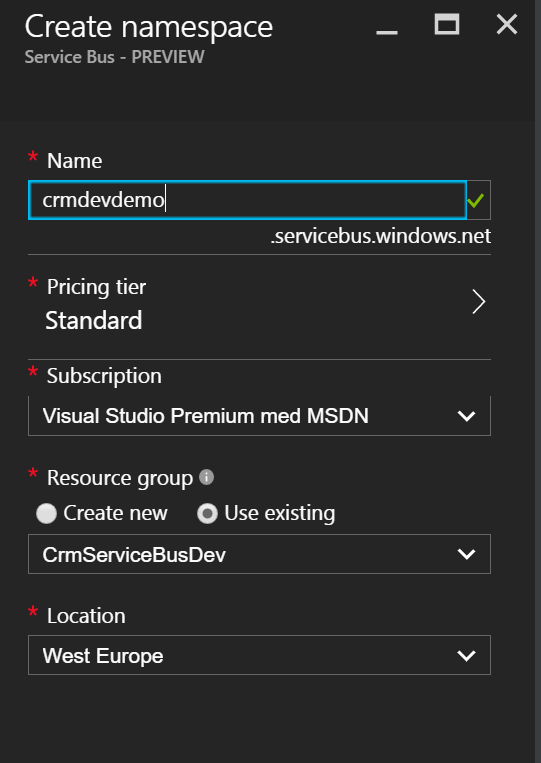
Fill in the required information to create the new resource, and hit the create button to start provisioning your brand new queue.
TIP: If you're using CRM Online, optimize performance in MSCRM by creating the bus in the same location as your tenant. This will minimize latency and will be very helpful in scenarios where you use Event hub for advanced auditing or similar high-ouput situations.
Now that we have a brand new service bus, it's time to add a queue to it. Navigate to Queues in the left hand navigation box and click on the [+ Queue] button. Give it a name and hit "Create" to get started.
Please note that the size option is the storage size of the queue, not the message size. In my tests the messages typically were between 13 and 60kB, so a 1GB queue would hold between 16k and 77k. Even if that seems much (after all, messages are deleted after processing), remember to plan for system downtime and SLA response times. if you generate a total of 20k messsages per day then you could be looking at data loss before gets a chance to take a look at it. I highly recommend you read up on queues and how to build a robust system using ASB aside from this blog post. I'm just presenting you with a simple way to get it working, not a complete integration strategy.
Now, open up your queue and navigate to Shared Access Policies. By default there won't be any policies in a new queue (there is one for the parent bus, I'll come back to that in the post about relaying), so click Add to create a new Shared Access Policy. Now you'll be asked to specify the claims added for this policy, which are "send", "listen" and "manage". Manage automatically gives the other two, but you could add a "send" access policy without "listen", and the other way around. The claims are pretty self-explanatory. Listening allows an application to read and complete messages, sending allows an application to send messages to the queue, and manage allows an application to make changes to the queue itself. I recommend a least-access-policy, ie. create seperate keys for systems that will listen and send messages, and don't overuse the keys across multiple systems. For demo purposes, using a full access key or a send&listen key is good enough.
Now you have a service bus, a queue, and an access key. You're ready to integrate MSCRM with Azure Service Bus.
Adding a service endpoint to MSCRM
To add a new service endpoint to MSCRM we have to use the plugin registration tool. You'll find it inside the MSCRM SDK under tools. Run the PluginRegistration.exe file and connect to your MSCRM organization. Once connected you'll have a new tab for your organization with a set of actions you can perform. Click on the register button, and then on the "register new service endpoint" option. You'll be presented with two options, either entering a connection string or starting with a blank connection window. I recommend pasting in the connection string from the azure portal, giving you a completely filled out connection settings window.

Message format
You have three different formats to choose from; .NETBinary, JSON and XML. This is simply the data representation of the message content. If you're planning to integrate with websites or other non-.NET technologies, or if you don't want to be dependent on the CRM SDK in your processor applications then you can simply choose one of the other message formats. Just keep in mind that XML can be quite bloated when it comes to size, so if you expect to send messages near the size limit then I would go for JSON (or even better, .NETBinary)
Take note that you can also choose to send the UserId as a parameter as well. This allows for additional authorization checks in your processing steps, and can be very useful to help determine who did what.
Now hit save, and you're done! A new service endpoint registered and you're ready to go.
In the next post in this series I'll demonstrate how to write a custom workflow step to use the service endpoints.
I also recommend to read up on the technologies. I'm just giving you a simple demo on how to actually do this, but there's a lot more to know and understand in order to plan and implement this successfully in your environment.
MSDN article on integrating Azure with CRM (NB: the samples for relay listeners are outdated as of 2016-10-23)
No comments:
Post a Comment