Showing posts with label deployment manager. Show all posts

Sunday, October 30, 2016

Microsoft CRM + Azure Service Bus, part 3 (creating a relay service and endpoint)

Integrating Microsoft Dynamics CRM with Microsoft Azure Service Bus, using queues, topics, relays and the Event Hub

In this, third part of my blog series on using the Azure Service Bus capabilities I'm going to demonstrate how to set up a relay service and add the relay namespace as an endpoint in MSCRM.
Relaying allows us to have active listeners who can either just accept messages or accept and reply to them. This allows for business critical systems like ticket reservation and receipts to ensure we're working on updated and valid data.
Click here for part1
Click here for part2
Click here for part4

What is a relay service?

A relay service works by using the Service Bus like a kind of tunnel, in which the relay is an active listener at the other end. Unlike queues and topics, where the message is "dropped off", using a one-way or two-way (or REST) relay requires that somebody pick up the message immediately. With one-way the sender is happy as long as somebody accepts it, while in a two-way scenario the receiver has to return a value. In this post we'll start out with a one-way relay, but in the next one we'll look at how we can extend that into a two-way relay.

Creating a one-way relay

First off we write a service behavior class. This represents the code we're running whenever a message is received. I'm just going to write out something to the console.

[ServiceBehavior]
public class RemoteService : IServiceEndpointPlugin
{
    public void Execute(RemoteExecutionContext c)
    {
        Console.WriteLine(
            $"Entity: {c.PrimaryEntityName}, id: {c.PrimaryEntityId}");
    }
}

So nothing magical happening here. It's an extension of the IServiceEndpointPlugin, which writes the entity name and id to the console in it's execute method.
Next up we go to the main method and define a servicehost variable and a new endpoint behavior.

var sh = new ServiceHost(typeof(RemoteService));
var tcEndpointBehavior = new TransportClientEndpointBehavior(
    TokenProvider.CreateSharedAccessSignatureTokenProvider(
        AppSettings["SharedAccessKeyName"],
        AppSettings["SharedAccessKey"]
    )
);

OK, so here we've got ourselves a new servicehost variable, which we'll use to add a new service endpoint, with our newly created RemoteService service behavior as the type. Then there's the endpoint behavior. We create a new TransportClientEndpointBehavior, with a shared access signature as the token provider.
NB! In the SDK and the MSDN article this is specified as "Shared Secret Token Provider", but that's ACS and is no longer supported in Azure. You have to use Shared Access Signature (SAS) for authentication or it won't work.

sh
    .AddServiceEndpoint(
        typeof(IServiceEndpointPlugin), 
        new WS2007HttpRelayBinding(), 
        AppSettings["SBusEndpoint"]
    ).Behaviors.Add(tcEndpointBehavior);

Here we add a service endpoint to the host. The type is IServiceEndpointPlugin, which is what the CRM async service sends to the Service Bus. We use WS2007HttpRelayBinding to match the source system, and we collect the endpoint from the app.config (formatted like the following: https://yournamespace.servicebus.windows.net/yourpath/ ).
What's important to note here is that the path specified should not be the same as an existing path. If you have a queue or topic with the same path specified, it will be overridden and you cannot recreate it in the Azure Portal afterwards. This also means that it's up to you which path you want to use for the relay, which also means you can modify it dynamically using the web.config or in advanced integration scnearios.
Finally we add the endpoint behavior we created ealier.

sh.Open();
Console.WriteLine("OneWay-listener, press ENTER to close");
Console.ReadLine();
Close();

Finally, we open up the service host connection, which makes it start listening to new messages. This means we're ready to set up the service in the plugin manager and start sending messages.

Switching to relaying in MSCRM

First off we need to create a new shared access policy in Azure. It's the same as we did in part1, except that this time we create it on the bus itself instead of on a queue.
Then we head over to the plugin registration tool, connect to our organization and add a new service endpoint. This time it'll look kind of like this when it's filled in:
What's important to note here is the namespace address and path. The namespace address should be the complete path, and the path should just be a forward slash (the tool does not accept blank values). If you specify the path in the path box then it won't be able to find and connect to your relay service (that took me a while to figure out). In addition, this is an https endpoint, not an sb endpoint
Next up we go into CRM to edit our workflow (for more info see part2 of this blog series). The only thing we need to do here is deactivate and update the service endpoint. Then save and activate it again. I've kept the workflow running synchronously, just to be able to verify that it works as expected.
Now, just to demonstrate how it looks if you've specified the wrong endpoint, or if the relay isn't running, here's the error message you get. It is the same error you'll get if you specify the path in the path box instead of in the namespace box.

Now, for the fun part instead. Start your relay service and wait for the host to be ready. Then go into CRM and trigger the plugin. If you've done everything right then you'll see a command window looking something like this

And that means we've successfully posted a message from our MSCRM system, through our azure service bus and out of the relay service. This example isn't very exciting, but just think of the possibilities you get if you put this service out into Azure (or on a web server if you're still into that whole old school infrastructure stuff ;) ).

That's it for this blog post. In the next and (for now) final post in this series we'll look at how we can extend this into a two-way relay, as well as integrating with Azure Event Hub which is a service based on the ASB.

Thursday, February 4, 2016

Handling CRM 2016 organizations (and a tuning tip)

Handling organizations in MSCRM 2016

This post is about handling organizations in Dynamics CRM 2016 using the Deployment Manager tool and SQL Server Management studio. Just a heads up, this will be along one, but there's lots of pictures too.

What is an organization?

An organization is... well, an organization! You can think of it as an instance in your CRM deployment. Multiple organizations can exist in the same deployment of CRM services, but they are completely separated from each other. The benefit of having multiple organizations is mainly for enterprise size companies, who have large organizations with almost completely different needs in regard to customization and work methologies. When this is the case you can create multiple organizations with it's own set of customizations and web parts.
In addition, if you have multiple developer teams working on different things in your CRM environment then each team can get their own organization to deploy their changes in, and it doesn't require multiple servers with CRM and SQL Server, dozens of AD groups, etc.

An organization is actually just a SQL Server database, as we will see later in this post, and that is part of the reason why you are required to have unique organization names.

Organization overview and deployment administrators

To get an overview of your organizations you can simply open up the Deployment Manager from a CRM Server with the "Deployment Server" roles installed. One caveat is that you'll have to be added as a deployment administrator first, and you need login permissions on the SQL Server where the organization and configuration database is stored, and permissions to the MSCRM_CONFIG database. If you try to open the deployment manager without these permissions first then you'll get the following error message
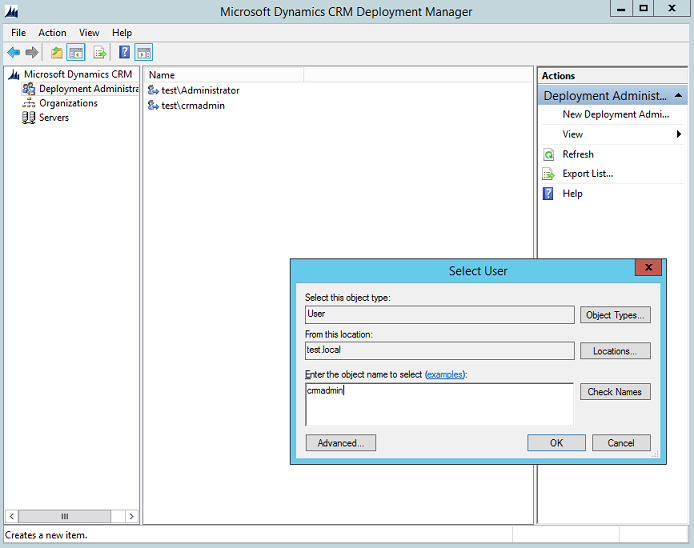
To add new deployment administrators, log on with the user account used to install MSCRM, and open up the deployment manager tool. Navigate to "Deployment Administrators" and click on the "Add Deployment Administrator" link on the right hand side. Type in the name of the user you want to add, and click OK.


Now, to find your organizations simply navigate to "Organizations" on the left hand menu, and you'll get a list of all the connected organizations in your environment, both active and disabled (but not deleted, more on that in a little while). The overview lets you see the name (this is the unique name), display name, status, version and update availability of all your organizations.


You can also right click the organization to open up the properties for it

Adding organizations

Next let's step through the process of adding a new organization. From the organization overview simply hit the "New organization" link on the right hand side. This will give you the "New Organization Wizard", which collects the basic information needed to create a new organization.
Now, here are a few steps to complete, starting with display name and unique database name. Remember _MSCRM is appended to the unique database name, so it will look like this in SQL Server: myorganization_MSCRM. The display name is the name visible in the navigation bar beneath your name on the right hand side (depending on your screen resolution).

Next choose the base currency. Remember! None of the settings below "Unique Database Name" can be changed after the organization has been created. 
If you click the browse button and find your country from the list it will automatically fill in the currency code, name, symbol and precision.
Now, here's a pro tip: If you install additional language packs on the server then you're able to deploy multiple organization with different base languages. There are a lot of people who think that once the base language is chosen you have to uninstall to change it, but you really just have to deploy a new organization (which suddenly becomes a problem if you've already added tons of data to the old one, but lets hope you spot the mistake early on).
OK, last one out, the SQL Collation. Make sure you choose the same collation as the default one in your SQL Server. If you don't know which collation it has, ask your DBA. But just to be nice, here's how you do that yourself using tsql:
SELECT CONVERT (varchar, SERVERPROPERTY('collation'));

Next, select the SQL Server you want to store that databases on (it automatically fills in the same server as the MSCRM_CONFIG database is stored on), and the reporting URL. The slightly negative thing about the reporting URL is that it won't check which URLs the other environments use, it will just pick the SQL Server name and add HTTP:// to the front and /ReportServer at the back. So if you want to be sure you're using the correct SSRS server then you can copy that from the details about one of your other organizations (see the part about organization overview).
Please note that adding a new organization and importing existing organizations requires the SRS Data Connector to be installed beforehand. See my previous blog post for more information on installing this component.

Now, rock on through to the summary screen, and hopefully it will be one warning accompanied/succeeded by two green flags. The warning is for data encryption which will be activated, and that you should backup you encryption key.

Just a heads up, it is not unusual for the creation to take a long time during the "Microsoft.Crm.Tools.Admin.ImportDefaultDataAction" and similar screens. I've seen these take well over 30 minutes before so just get yourself a decent cup of coffee and come back later (or stare at it intensively, that's always fun)

When the creation is complete the new organization will be visible in the Organizations overview in the Deployment Manager


Deleting an organization

In this section we'll go through how to delete an organization. I'll show you some related topics along the way like editing the organization settings and the overview in SQL Server.

First off, to delete an organization you need to start with disabling it. Simply right click the organization from the overview in the Deployment Manager, and click disable. After you've done this, right click it again to delete it from the deployment. Please be aware that this does NOT delete the database, it simply removes it from the "organizations" table in the MSCRM_CONFIG, the database is still present and online in SQL Server. One thing you might notice when you've disabled the organization is that a new option is available; edit organization. This allows you to specify new values for an existing organization.


Importing an organization

This chapter explains how to import an organization. This typically happens when you want to clone your production environment into test or migrate from one server environment to another.
Start in the "Organizations" overview in Deployment Manager, and click the "Import organization" link on the right hand side.
This will bring up the "Import Organization Wizard", which automatically lists the organizations available for import on the SQL Server specified. Organizations that already exists in the deployment will not be listed.


Next you'll be able to edit both the display name and the unique database name. Editing the unique organization name does not actually edit the database name, it only edits the unique name stored in the database tables, which is appended to Internet Facing Deployment URLs.

Next specify the SSRS server URL you'll be using for this organization, and proceed to the next screen. Now, the installation will ask you for user mappings. This is for mapping the users in the organization to AD user accounts, and you can either choose automatic mappings or manual mappings. Automatic mapping is best when you're importing into the same active directory domain as it previously was. Manual mapping allows you to to specify all users manually, or create an import schema which you can edit in Excel.


I'll stick to automatic, because there's only one user in the organization.
To proceed with the import you have to map the current logged in user to a system administrator in the organization. If you try to continue without mapping this user you will be presented with the following error message

When this is done you'll be ready to import the organization, and you'll be presented with the familiar CRM process bar. Please note that if you've imported an older database, for example CRM 2015 or a previous update rollup, the database schema will be updated during import


And you're done! Organization imported and everything is (hopefully) nice and dandy. If you go into SQL Server you should be able to see that the databases are present, and the name of your organization has not been edited

Bonus round

Parallelism in SQL Server

A good tip I can't give often enough is the Max Degree of Parallelism (MAXDOP) setting in SQL Server. Some years ago in the "Best practices" documentation for CRM 2011 it was adviced to set MAXDOP to 1, meaning only one thread per SQL statement. This can cause horrible performance problems in CRM, because almost all queries rely on joins and filtering based on those joins, and that requires a lot of work if you can't execute it in parallel. Subsequently, this recommendation was removed, but the practice has continued with many consultants and IT Pros (this could also be because MAXDOP 1 is an actual best practice for Microsoft SharePoint).
So my tip: set MAXDOP to 0, and set threshold for parallelism to 4 or 1/4 of the number of processor cores on your SQL Server (whichever is higher). This is a generic recommendation, so do keep in mind that YMMV.

Developer resources in CRM

One of my favorite new things in the new CRM navigation is the improvements to the Developer Resources, available from Settings -> Customization

This new page gives you a lot of great information, starting with useful links for devlopers, the new WEP API available per instance, the organization id and the unique name, as well as the new discovery web api (and the old SOAP api, but SOAP is like, totally so 2009).


That's it for today, I hope you found this post useful.
Tomorrow I'll do a post on how to create an Office365 tenant and activate the CRM feature.
With the Deploying Microsoft Dynamics CRM Online exam it is increasingly important to know your way around the Office365 instance.
Until then, happy CRM-ing!