Integrating Microsoft Dynamics CRM with Microsoft Azure Service Bus, using queues, topics, relays and the Event Hub
In part two of this blog series we're going to look at how to create a custom workflow to post messages to the Azure Service Bus queue created in part1. I'm assuming that you have basic knowledge about the C# language and that you are familiar with the custom workflow step and plugin concepts in MSCRM.
Creating a workflow
First off, I have to give thanks to Jason Lattimer for all his contributions to all CRM developers and customizers everywhere. He has made available a free version of Dynamics CRM Developer Toolkit which makes building code and deploying stuff a breeze. Be sure thank him if you ever run into him.
[Input("ServiceEndpoint")]
[ReferenceTarget("serviceendpoint")]
[RequiredArgument]
public InArgument<EntityReference> ServiceEndpoint { get; set; }
[ReferenceTarget("serviceendpoint")]
[RequiredArgument]
public InArgument<EntityReference> ServiceEndpoint { get; set; }
First off I've just specified a simple input parameter for the workflow step. It takes an entityreference of type (logicalname) serviceendpoint, which is the type registered through the plugin registration tool.
protected override void Execute(CodeActivityContext executionContext)
{
var context = executionContext.GetExtension<IWorkflowContext>();
var serviceEndpointNotifySvc = executionContext
.GetExtension<IServiceEndpointNotificationService>();
serviceEndpointNotifySvc.Execute(
ServiceEndpoint.Get(executionContext), context
);
}
{
var context = executionContext.GetExtension<IWorkflowContext>();
var serviceEndpointNotifySvc = executionContext
.GetExtension<IServiceEndpointNotificationService>();
serviceEndpointNotifySvc.Execute(
ServiceEndpoint.Get(executionContext), context
);
}
Next is the execution content of the workflow. As you can see there's no real magic here. I'm getting the workflow context and the service endpoint notification service from the codeactivitycontext. Then I use the Execute method of the notification service, which takes a service endpoint as an entity reference, and an ExecutionContext (here in the form of an IWorkflowContext) as input.
What the execute method does is posting the execution context to the provided service endpoint, which in turn means that the message received in the service bus queue contains a copy of the information contained in the execution context. This means you can add shared variables and images to supply additional information to whichever system will end up reading the message.
And that's it, you've got a working custom workflow step which can be built and uploaded to CRM.
Using workflows to send messages to ASB
The next step is to start using our new workflow step inside MSCRM. Just go into Settings -> Processes and hit New to create a new process. I like to start out with a synchronous one just to make sure that everything works, and then switch to background when I know it's OK. Even though you can run this step synchronously I wouldn't do it. The network latency alone is enough to make it a bad experience for users, so I would put much effort into using it as a background WF.
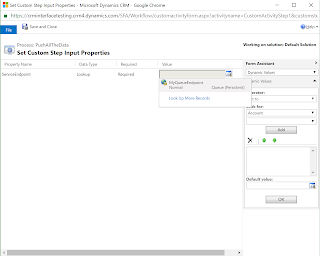
I've set the workflow to run on-demand, and then I add our custom workflow action as a step. On the properties-page, search for the service endpoint registered and add that as an input to the workflow step.
Now that we have configured a workflow, go ahead and save and activate it, and we're ready to start populating the ASB with messages.
I went ahead and triggered the workflow 5 times, and as you can see from my Azure portal there's messages ready to be processed.
Processing messages
Now that we have messages ready for processing we'll write a tiny application that allows us to read the messages posted. I've created a simple console-project in Visual Studio and added the CRM sdk through nuget (search for Microsoft.crmsdk)
var queue = MessagingFactory.CreateFromConnectionString(
ConfigurationManager.AppSettings["ServiceBusPath"]);
var client = queue.CreateMessageReceiver(
ConfigurationManager.AppSettings["EntityPath"], ReceiveMode.PeekLock);
var message = client.Receive();
var context = message.GetBody<RemoteExecutionContext>();
The first thing I'm doing is creating a queue class using the ServiceBus sdk, and I've stored the connection string and queue path in the app settings. These strings are sensitive, so don't share them with anyone.
Next I'm instantiating up a new client class, using the queue connection and the entity path, and I've set the receive mode to PeekLock. This allows me to retrieve a message from the queue without deleting it, and then I can choose to delete (.Complete()) the message or return it to the queue (.Abandon()).
Then I use the receive method to get the next available (unlocked) message from the queue, and finally retrieve the message body. The message body is of type "RemoteExecutionContext", a Microsoft CRM SDK object which the notification service creates from the ICodeActivityContext.
If we put a breakpoint in our code we see that we have the familiar attributes available, like inputparameters, shared variables, parentexecutioncontext, primaryentityid, etc.
By utilizing the shared parameters we can add additional information in workflows or queues, which allows us to build complex logic in the queue listeners.
That's it for this post. In the next one we'll look into relaying with Azure Service Bus, which allows us to send replies back to MSCRM.


Thanks for sharing Marius, i will make sure to show this to my CRM developers in the future ;)
ReplyDelete