Saturday, February 6, 2016

Create CRM 2016 Online instance

Creating a CRM Online instance (with Office365)

This blog post will go through the details of creating a new CRM Online trial subscriction.
It is one of the steps on my "February CRM roll" where I'm setting up CRM 2016 on-premises, going through a lot of configuration and migrating over to CRM Online, data, config plugins, the works!
This part is all about setting up Office365, and it's a lot simpler than you think, in large parts thanks to the guidance the office365 portal gives you.

Sign up for a new trial

First of all, head over to the trail website (Microsoft)
Click the Get Started button under "Self-Start Trial" to start the registration.

Step #1. They'll want to know a little about you, like the country you're in, name, phone, company, etc. I presume you'll know how to fill out these fields yourself.

Step #2. Create a user name and instance ID. The username will be the tenant administrator, and will be your login name. The tenant name will be appended to .onmicrosoft.com to generate a complete username. In my case it's: crmviking@crmviking.onmicrosoft.com

Step #3. Confirm your details by letting them text you a confirmation message, or receive an awkward, automated phone call. If you're interested about the other online products you can check the boxes for email, phone, etc.

Creating your account details will only take a minute or two, so don't run off yet!

Step #4. Log in with your new account details, and you'll be presented with a form to confirm some details like language, country and currency. REMEMBER! The currency cannot be changed later, so stick to the one you'll want as your base (additional currencies can be added, but the base will always be the same). I recommend that you choose the country you'll be working from, so you will get a tenant with the lowest possible latency.
It'll spend a few minutes creation your account, but when it's done you'll be presented with a link to your CRM environment.

Congratulations! You have your own CRM Online environment with a bit of sample data to play around with!

Add more services

Ok, so we have our new CRM Online environment up and running, and even though that's alluring we'll do some more housework first. If you head over to the Office365 portal you can get an overview of your services. If you're asked for a username and password it's the new one you just created:
username@instance.onmicrosoft.com

As you can see, you have 4 services available. CRM, Identity Service, Office365 portal and Social Engagement. These are all the default services that comes with CRM Online. That's fine, if CRM is all you need, but I'm want more services available so I can make use of all the cool functions CRM has to offer, like synchronization of email, contacts and tasks, as well as sharepoint and onedrive for business integration. And you won't be wrong to assume that I'll be doing a future post on powerbi integration with MSCRM Online either.

So, head over to the "Purchase Services" over on the left hand side. Don't worry, we'll just be adding trial services, so there's no credit card requirements or anything like that. So, we're currently running a CRM Online 30 day trail, but there are loads of additions to choose from. I recommend that you spend some time reading about the different products, like Dynamics Marketing and Parature. It might not be something you're interested in at this time, but they full of really cool features that you'll want to keep in mind as your business' digital needs evolve and expend.
As I mentioned earlier, I would like to add some integration features, so I've scrolled down to the Office365 E5 plan. The E3 plan is, by far, the more popular choice, but I want to show off how incredibly cool it is to integrate with Power BI.
So, just hover your mouse over the E5 plan, and click on the "Start free trial" option.
You'll be presented with a confirmation order and instrutions to assign licenses to your users. We'll be doing that a bit later, and I'll also go through adding new members and setting up some basic settings. When you return to the overview you'll see additional services available.

In my case you can see a warning about the Power BI service being degraded. I've expanded the warning which shows that the Microsoft techies have already located the error and are applying a fix. No matter which provider you choose as your cloud platform provider you will experiences issues from time to time, especially if you want to be on the fast-track for new, exciting features. I think this is a brilliant example on how Microsoft gives you the information up-front, with additional information in regards to what they are doing to remediate the issue. In this case, the issue was that some users could experience issues when importing excel files into Power BI, so it was not even a major issue but you're still getting the information so you know that it isn't your system that's the problem. This isn't something revolutionary, but being honest and proactive is a lot better than many other providers who just stamp their products with "Beta" or something like that and tell you that you're using their products at your own risk.

But enough with the preaching, head over to the "Users" section in the left hand navigation, and open up active users. Click on your user account and you can see the different options you have available. At this time, I'll be adding additional features to my user account, but I advice you not to do that in your production account. I would rather have that account as a dedicated administrator, without any licenses applied. Give the account an insanely difficult password, and activate multi factor authentication with the phone number to one of the stake holders in your company. That way, the tenant admin will be secure, and is not used for daily, mundane tasks that increases the risk of credentials being stolen or man-in-the-middle attacks that could give an attacker the opportunity to delete all your stuff, or even worse act on your behalf.
But as I said, in my case I'll just be adding licenses to the default user, because this is just a demo environment. Click on the "Edit" link on the right hand side under "Assigned licenses"


Check the box for E5 license license, and click the save button to continue. At this point a mailbox will be assigned to the user, as well as permissions to download the Office 365 suit for desktop and access to the other cool features (power bi, sharepoint online, etc).

Setting up your Office 365 portal

OK, so we've added CRM Online and the rest of the Office365 suite, as well as adding licenses to your user. What I recommend that you do is navigate through the Office365 Portal and get familiar with the options available and what you can do. I could probably do a a dozen blogposts just to cover all the possibilities, but that would be a bit pointless.
The next step, at least in this guide, is adding a domain and some users. I'm going to go through the "Setup" from the left hand navigation to complete these steps. It's an easy way to get your environment up and going. As you might see from the coming screenshots I've always taken the liberty of styling/theming my Office365 portal as well.
Click the "Start Setup" button to start the Offie365 setup. Just a quick tip early on, if you need to migrate mail content to your O365 portal then you should plan that before you go ahead. It's important that your users are aware of the transition and able to verify that they're able to access all the services they need after the migration is done. I don't have an environment to transfer from, so I'll just go ahead and select that option and push on through.
Now! The next step is to add domains to your deployment. I'm going to go ahead and add the crmviking.com domain, which will allow me to send and receive emails, as well as getting a more user friendly username. You are also able to buy a domain from this step, Microsoft will direct you to godaddy.com to complete the registration of a new domain if you choose to do so. In my case, I already own the crmviking.com and crmviking.no domain, so I'll just go ahead with the wizard.
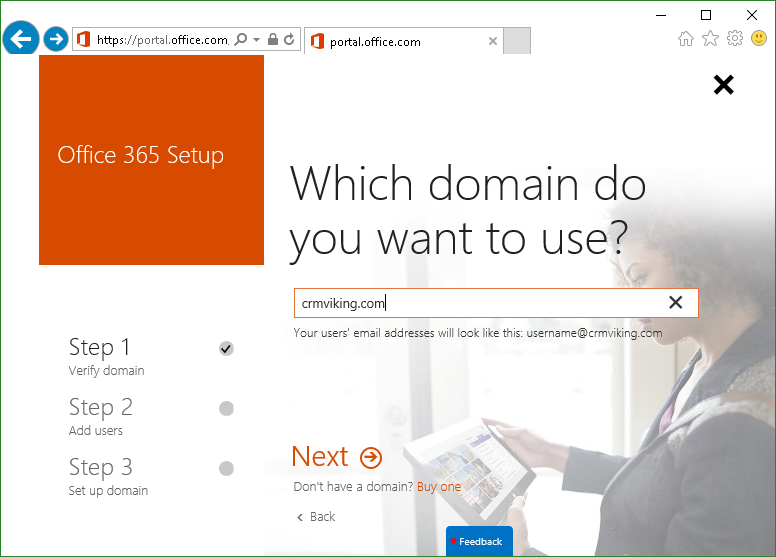
You'll be provided with a request to add a txt record to verify your domain. It gives some straight forward instructions on how to do that, but you could also contact your domain provider and ask them to help you perform the required configuration changes. When the changes have taken effect, come back and verify your settings. if you've done everything correct you'll be presented with a success screen, and you can continue to updating user IDs.

I'm just going ahead and marking my only account for update, effectively switching usernames from "crmviking@crmviking.onmicrosoft.com" to "crmviking@crmviking.com". If you have several users you can select all for update, or just pick out a selection. If you don't want to update any users at this time you can go ahead and skip, else proceed to the success screen.
If you changed your own account, you'll have to sign out and sign in with the new account name to continue with step 3.

Now, if you had to go through this step, it might have required you to close the browser and try again. In that case, you'll be directed to your user start page in Office365. To get back to the administration site simply scroll down and click on the "Administration" tile.
Head back to the setup area and start the setup wizard again. The next step is adding additional users. I will be adding a dummy account and proceeding, but it's also possible to import a CSV file at this point to mass create users.

Next you will be presented with a screen with the new users created and a temporary password. You can use this to send your users their new account names and passwords, or you can reset the password for them later. Personally I don't like storing passwords, even temporary ones, so if I'm not distributing them straight away I'll just reset them later if need be. Proceed to the next and final step, adding DNS records to use your domain in Office365.
At this step you'll be prompted if you want to transfer DNS management to Office365. There are, of course, both pros and cons to doing this. If you change then you'll be changing the DNS servers you want to use to handle your domains DNS records. This makes everything available from the Office365 portal, which can be handy. On the other hand, you might be more comfortable using your existing DNS servers, in which case you can continue using them and just add the DNS records yourself. I'll be opting in to use my existing servers, because this is a demo environment and I like the domain registration I have at my current registrar.

On the next page, select which services you want to use in Office365 (which requires DNS records). I'll go ahead and select mail and Skype for Business, I do not want to manage my mobile for this demo, and head over to the next page. The next page lists all the DNS records which needs to be created.
Like instructed earlier, you can either update these yourself or ask your domain registrar for help.

That's quite a few, so do what you've got to do to get those registered, and get back to the setup and click next to verify the records. Now, there might be a trick to get the SRV-records to work. If you can't specify the service and protocol at your registrar's DNS settings, you have to specify _sip._tls.yourdomain.com as the service name. John White did a great blog post on this.
And now you're finished! Rate the service/experience, and rock on through back to the office portal.


Wrap-up

And there you have it, CRM Online with an Office365 Enterprise plan created and fully functional. I'll be doing more blogposts on this throughout February to show how you can administer users and licenses, as well as permissions and sharing content with groups. I will also be doing a migration from CRM 2016 On-Premises to CRM Online, with data migration, configuration, plugins. Stay tuned for more CRM goodness!

Thursday, February 4, 2016

Handling CRM 2016 organizations (and a tuning tip)

Handling organizations in MSCRM 2016

This post is about handling organizations in Dynamics CRM 2016 using the Deployment Manager tool and SQL Server Management studio. Just a heads up, this will be along one, but there's lots of pictures too.

What is an organization?

An organization is... well, an organization! You can think of it as an instance in your CRM deployment. Multiple organizations can exist in the same deployment of CRM services, but they are completely separated from each other. The benefit of having multiple organizations is mainly for enterprise size companies, who have large organizations with almost completely different needs in regard to customization and work methologies. When this is the case you can create multiple organizations with it's own set of customizations and web parts.
In addition, if you have multiple developer teams working on different things in your CRM environment then each team can get their own organization to deploy their changes in, and it doesn't require multiple servers with CRM and SQL Server, dozens of AD groups, etc.

An organization is actually just a SQL Server database, as we will see later in this post, and that is part of the reason why you are required to have unique organization names.

Organization overview and deployment administrators

To get an overview of your organizations you can simply open up the Deployment Manager from a CRM Server with the "Deployment Server" roles installed. One caveat is that you'll have to be added as a deployment administrator first, and you need login permissions on the SQL Server where the organization and configuration database is stored, and permissions to the MSCRM_CONFIG database. If you try to open the deployment manager without these permissions first then you'll get the following error message
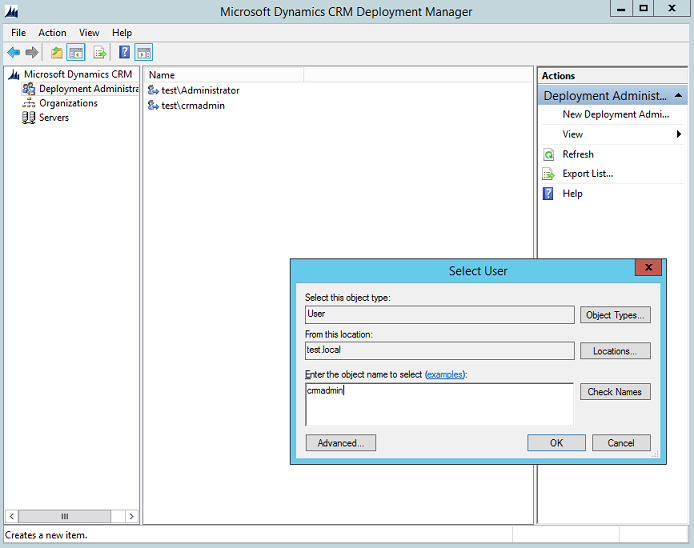
To add new deployment administrators, log on with the user account used to install MSCRM, and open up the deployment manager tool. Navigate to "Deployment Administrators" and click on the "Add Deployment Administrator" link on the right hand side. Type in the name of the user you want to add, and click OK.


Now, to find your organizations simply navigate to "Organizations" on the left hand menu, and you'll get a list of all the connected organizations in your environment, both active and disabled (but not deleted, more on that in a little while). The overview lets you see the name (this is the unique name), display name, status, version and update availability of all your organizations.


You can also right click the organization to open up the properties for it

Adding organizations

Next let's step through the process of adding a new organization. From the organization overview simply hit the "New organization" link on the right hand side. This will give you the "New Organization Wizard", which collects the basic information needed to create a new organization.
Now, here are a few steps to complete, starting with display name and unique database name. Remember _MSCRM is appended to the unique database name, so it will look like this in SQL Server: myorganization_MSCRM. The display name is the name visible in the navigation bar beneath your name on the right hand side (depending on your screen resolution).

Next choose the base currency. Remember! None of the settings below "Unique Database Name" can be changed after the organization has been created. 
If you click the browse button and find your country from the list it will automatically fill in the currency code, name, symbol and precision.
Now, here's a pro tip: If you install additional language packs on the server then you're able to deploy multiple organization with different base languages. There are a lot of people who think that once the base language is chosen you have to uninstall to change it, but you really just have to deploy a new organization (which suddenly becomes a problem if you've already added tons of data to the old one, but lets hope you spot the mistake early on).
OK, last one out, the SQL Collation. Make sure you choose the same collation as the default one in your SQL Server. If you don't know which collation it has, ask your DBA. But just to be nice, here's how you do that yourself using tsql:
SELECT CONVERT (varchar, SERVERPROPERTY('collation'));

Next, select the SQL Server you want to store that databases on (it automatically fills in the same server as the MSCRM_CONFIG database is stored on), and the reporting URL. The slightly negative thing about the reporting URL is that it won't check which URLs the other environments use, it will just pick the SQL Server name and add HTTP:// to the front and /ReportServer at the back. So if you want to be sure you're using the correct SSRS server then you can copy that from the details about one of your other organizations (see the part about organization overview).
Please note that adding a new organization and importing existing organizations requires the SRS Data Connector to be installed beforehand. See my previous blog post for more information on installing this component.

Now, rock on through to the summary screen, and hopefully it will be one warning accompanied/succeeded by two green flags. The warning is for data encryption which will be activated, and that you should backup you encryption key.

Just a heads up, it is not unusual for the creation to take a long time during the "Microsoft.Crm.Tools.Admin.ImportDefaultDataAction" and similar screens. I've seen these take well over 30 minutes before so just get yourself a decent cup of coffee and come back later (or stare at it intensively, that's always fun)

When the creation is complete the new organization will be visible in the Organizations overview in the Deployment Manager


Deleting an organization

In this section we'll go through how to delete an organization. I'll show you some related topics along the way like editing the organization settings and the overview in SQL Server.

First off, to delete an organization you need to start with disabling it. Simply right click the organization from the overview in the Deployment Manager, and click disable. After you've done this, right click it again to delete it from the deployment. Please be aware that this does NOT delete the database, it simply removes it from the "organizations" table in the MSCRM_CONFIG, the database is still present and online in SQL Server. One thing you might notice when you've disabled the organization is that a new option is available; edit organization. This allows you to specify new values for an existing organization.


Importing an organization

This chapter explains how to import an organization. This typically happens when you want to clone your production environment into test or migrate from one server environment to another.
Start in the "Organizations" overview in Deployment Manager, and click the "Import organization" link on the right hand side.
This will bring up the "Import Organization Wizard", which automatically lists the organizations available for import on the SQL Server specified. Organizations that already exists in the deployment will not be listed.


Next you'll be able to edit both the display name and the unique database name. Editing the unique organization name does not actually edit the database name, it only edits the unique name stored in the database tables, which is appended to Internet Facing Deployment URLs.

Next specify the SSRS server URL you'll be using for this organization, and proceed to the next screen. Now, the installation will ask you for user mappings. This is for mapping the users in the organization to AD user accounts, and you can either choose automatic mappings or manual mappings. Automatic mapping is best when you're importing into the same active directory domain as it previously was. Manual mapping allows you to to specify all users manually, or create an import schema which you can edit in Excel.


I'll stick to automatic, because there's only one user in the organization.
To proceed with the import you have to map the current logged in user to a system administrator in the organization. If you try to continue without mapping this user you will be presented with the following error message

When this is done you'll be ready to import the organization, and you'll be presented with the familiar CRM process bar. Please note that if you've imported an older database, for example CRM 2015 or a previous update rollup, the database schema will be updated during import


And you're done! Organization imported and everything is (hopefully) nice and dandy. If you go into SQL Server you should be able to see that the databases are present, and the name of your organization has not been edited

Bonus round

Parallelism in SQL Server

A good tip I can't give often enough is the Max Degree of Parallelism (MAXDOP) setting in SQL Server. Some years ago in the "Best practices" documentation for CRM 2011 it was adviced to set MAXDOP to 1, meaning only one thread per SQL statement. This can cause horrible performance problems in CRM, because almost all queries rely on joins and filtering based on those joins, and that requires a lot of work if you can't execute it in parallel. Subsequently, this recommendation was removed, but the practice has continued with many consultants and IT Pros (this could also be because MAXDOP 1 is an actual best practice for Microsoft SharePoint).
So my tip: set MAXDOP to 0, and set threshold for parallelism to 4 or 1/4 of the number of processor cores on your SQL Server (whichever is higher). This is a generic recommendation, so do keep in mind that YMMV.

Developer resources in CRM

One of my favorite new things in the new CRM navigation is the improvements to the Developer Resources, available from Settings -> Customization

This new page gives you a lot of great information, starting with useful links for devlopers, the new WEP API available per instance, the organization id and the unique name, as well as the new discovery web api (and the old SOAP api, but SOAP is like, totally so 2009).


That's it for today, I hope you found this post useful.
Tomorrow I'll do a post on how to create an Office365 tenant and activate the CRM feature.
With the Deploying Microsoft Dynamics CRM Online exam it is increasingly important to know your way around the Office365 instance.
Until then, happy CRM-ing!

Wednesday, February 3, 2016

Backup and restore strategies for CRM 2016

Backup and restore strategies for Dynamics CRM 2016

This post is all about backup and restore. I'll be going into some strategies for backing up and restoring your MSCRM-environment. A common misconception is that backing up the database is all you need, and I'll explain why that isn't the case.

Prerequisites

I'm assuming that you know your server names and have a basic understanding of how to back up files and SQL Server databases. I also assume that you have a way to back up encryption keys and passwords (for example KeePass (official site) ).
I also assume that the user account you're using is part of the "PrivUserGroup" AD group.

Backup routines

Backup your SQL Server Reporting Services encryption key

This isn't CRM! Well no, it isn't strictly CRM, but if you want to be able to restore your magnificent, custom tailored, beautiful SSRS reports then you might want to have the encryption key used by SSRS to connect to it's database. You only have to back this up whenever it changes, which typically is whenever you migrate to a new environment or set up a new SSRS-server, so there's no need to keep doing this on a regular schedule. You should do it atleast once, though.
Log on to your SSRS server and open up the "SQL Server 2014 Reporting Service Configuration Manager" (assuming you're running SQL 2014). Select the report server instance you want to configure, which is the one you specified for CRM during installation (please note that the SSRS instance does not necessarily have the same name as the SQL Server instance CRM uses).

Navigate to "Encryption Keys" on the left hand side, and click the "Backup" button. You'll get a new window asking you where to store the key and to choose a password for it. Now, the key is a file you'll have to save somewhere safe. Now, I'm not going to promote practically free and safe storage in Microsoft Azure, but I would definitely put it in a secure storage area in Azure. The password specified for the file should be stored in your password management system, and if you happen to use MICROSOFT AZURE then you'll have a nice URL you can add to the password entry.</plug>

Backup the CRM encryption key

Now for some good old myth busting... kind of. When CRM 2013 first came around the option to encrypt certain tables in the database was introduced. To be able to use server-side-synchronization and specify passwords for mailboxes required you to enable encryption first, and to enable encryption you would have to connect over HTTPS (well, unless you changed those settings with the orgdborgsettings tool). In CRM 2015, encryption is turned on by default, with a long, automatically generated key, and in CRM 2016 it's no different.
Because of this there are some CRM administrators out there who don't know that CRM2015 and newer will have encryption turned on by default, so if you migrated to a new SQL Server then you'd just import the database and everything would be "fine and dandy". That's not the case anymore, you have to backup the encryption key to be able to do that.
So how do you get the key when you aren't using HTTPS in your CRM environment? If you open up CRM and navigate to Settings -> Data Management and open up data encryption you will get this error:

So I'm going to guide you through how to get past this limitation without having to restarting anything.
What you want to do add an additional binding to your CRM website, an HTTPS binding with a self-signed certificate. Head into Internet Information Services (IIS) and highlight the server, then open up Server Certificates from the home screen.
Open this feature, and on the right hand side click the "Create Self-Signed Certificate..." link, and you'll get a new "Create Self-Signed Certificate" wizard. Fill in the name of this certificate and click OK (both personal and web hosting will work).

Now navigate to the Microsoft Dynamics CRM site in IIS from the left hand side, under "Sites". Click on the "Bindings..." link on the right hand side to get the site bindings configuration window. In this window, you will probably just have one binding beforehand, so click the "Add" button to add a new binding. Choose https as the type, the default port will be fine, and select the newly created self-signed certificate for use.
Click OK, then close, and from the right hand side just click the "Browse *:443 (https)" link to open up CRM with SSL encryption enabled. You will be presented with a warning screen which tells you that the certificate isn't trusted for this site, but that's OK because you just created this certificate yourself, and it's just for this purpose you're using it. Click on the red shield with the text "Continue to this website (not recommended)".

From the navigation bar, find Setting -> Data Management. Click on the "Data Encryption" option to open up the Data Encryption settings. And voila! You have the option to show and change the encryption key. The existing key will probably have alot of foreign characters (depending on your native language), and it's fine to keep it that way, or you can change to a new one. I often just generate a new Guid from powershell and add some additional special characters inside it, but as I said the default encryption key is pretty great considering that it's already all special characters. For this installation I'm going to change it into something that is NOT SAFE!

Now, you might get an error saying you're not part of the PrivUserGroup, if you did get this message then that means you'll have to add your user account to the PrivUserGroup corresponding to your organization, or find someone who can grant you that group membership.

Beware, though, if you have multiple CRM deployments you will have several PrivUserGroup AD groups. To find the one you need to be added to, open up powershell and type in the following two commands:
add-pssnapin Microsoft.Crm.Powershell
Get-CrmOrganization | fl Id

This will list your organization(s) and give you the ID which succeeds "PrivUserGroup" in the group name.


Now, put that encryption key into your password management system (btw: Have you considered using Azure Key Vault for storing stuff like this? Feel free to contact me if you have any questions regarding Azure Key Vault and storing encrypted data).
Finally, go back into IIS and remove the binding that we added earlier. Just follow the same procedure as provided above, except remove instead of add. If you don't want to keep the self-signed certificate (which you shouldn't), then just go to the "manage server certificates" window as described earlier and remove the certificate from the list.

Back up CRM data

This is the easy part, this is simply a SQL Server backup as long as you're following the Microsoft best practices (not changing any system files, not putting any plugins into the GAC/filesystem, etc). Just do your normal SQL Server backups and keep them available for restoration. I would also recommend that you do a new backup of the Master database, because if you environment fail and you restore the databases to a new system then the Master will include information about user permissions and also be allowed to read from the encrypted tables.
If you don't know how to do SQL Server backups then you probably shouldn't do that on your own, and if you want to learn I heartily suggest you check out the work of Ola Hallengren, the king of maintenance jobs on SQL Server.

Restore strategies

Restoring CRM isn't that big of a deal, actually, so I'm going to give you a very quick, 101 on how to restore a failed CRM environment. You will find information on how to do these steps in my previous blog posts and in this one. I recommend that you design your strategy based on your environment, maybe create a shiny step-by-step guide by actually performing the steps in a QA environment.
Remember, having a backup/restore strategy is not the same as knowing how to perform the actions needed when your system fails. Make sure that you've been through the ropes atleast once, and repeat them when necessary. If you're going to be doing alot of development in your environment then I can recommend that you try it out whenever you're cloning production back to development/test/QA. That way you're sure to remember what to do if disaster strikes in production.

  1. Restore your most recent backups of the CRM Databases
  2. Restore the user/group permissions on the SQL Server instance (if necessary). I won't go into the details because you should be aware of what you're doing when you're messing around in SQL Server, and this post would get too lengthy if I included DBA training in it.
  3. Restore the ReportingServices database
  4. Open up reporting services configuration manager (as described earlier in this post). Choose to attach to an existing database, and import the encryption key you've backed up and stored the password for.
  5. Install Microsoft CRM 2016 on an application server, in the server installation choose to connect to an existing instance instead of creating a new deployment. Point to the database server where the MSCRM_CONFIG-database is located
  6. Import the existing organization databases into CRM through the Deployment Manager (only if the databases have been moved to a new server)
  7. Add the https-bindings to your CRM site in IIS as described in the backup steps, open up CRM and navigate to Settings -> Data Management -> Encryption. Enter the encryption key you've backed up in your password management system or similar.
  8. Remove the https-bindings. Make sure that everything works as expected and shabang, your done!

So that's it for today, it's quite the lengthy post (again), so you're entitled to some cake and an extra good cup of coffee.
In tomorrows post I will demonstrate how to add manage organizations in the deployment manager tool and how to get access to them. I will also include some great tips for performance on the SQL Server side (nothing too fancy, mind), so I'm considering that a level200 topic.

Tuesday, February 2, 2016

Basic post installation tasks for CRM 2016

Post installation tasks for Microsoft Dynamics CRM 2016

This post will be all about post installation tasks for Dynamics CRM 2016. It's a collection of tips and tricks I've learned and used over the years. I'm assuming that you've already installed CRM 2016 on your servers, but in case you haven't and need some tips check out my previous post.

Prerequisites

As mentioned, I'm assuming you already installed MSCRM 2016 on your servers, in addition I assume you have some basic understanding of the related technologies. Because I've been a newbie and know how frustrating it can be to look up related information I've included links to good resources for learning the technologies as we bump into them.
I also assume that you will be actually reading this post, because you won't necessarily understand the context and ramifications if you cherry pick answers from inside the document.

Software

SQL Server Reporting Services data connector

In yesterday's post I went through the installation of a single server CRM 2016 deployment, and finished off on installing the actual CRM Server application. The first part today will be to install the SRS Connector for Dynamics CRM 2016.
To install this package you need to locate your installation media and copy the folder named "SrsDataConnector" over to the server running SQL Server Reporting Services (SSRS).


Run the SetupSrsDataConnector.exe file to start the installation, and head through the steps:

  1. I recommend getting the updates for the Dynamics CRM installation. If there's any bugs in the installation then you might get updated installation files that fixes these. 
  2. Read throught the important license requirements and rock on through. The first selection is which SQL Server is used to store the MSCRM_CONFIG database, if you can't find it on the list then it's either because SQL Server Browser isn't running or some port exclustions.
  3. On the next screen you choose which SSRS Instance you want to use. Remember that SRS Data Connector can only be installed ONCE on each Windows Server, so even if you have multiple SSRS instances on one server you can only install the connector for one deployment.
  4. You arrive at the system check screen, which is all greens (if not, check the next step). Hit next and install that connector.
  5. If you receive the following error it means that SSRS isn't running in the context of a service account. Perform the steps described in this article (technet) and retry the installation.

CRM Trace viewer (PFE CRM Trace Tool)

Now this isn't strictly required or needed, but if you have to enable tracing in the future then I strongly advice using a good tool to read the trace logs. Trace logs are typically large and include a long call stack. Even the most seasoned developer can miss vital clues in large text files, so having a reader which allows you to filter and sort information can shorten an arduous debugging session by hours, or even days.
Head over to codeplex and get this viewer, used by Microsoft's MVPs when they're out on a mission.

Internet Information Services (IIS)

By default, MSCRM only installs the bare minimum services needed to run. If this is a development/test environment then you'll probably want to add some additional features to the webserver. Head over to server management and hit the Add Roles button to get the "Add Roles and Features Wizard". Rock on through until you get to the Server Roles window, and add the features you want to add. Heres a collection of features I like to add in addition to the default ones:
  • Web Server (IIS)
    • Web Server
      • Health and Diagnostics
        • HTTP Logging (great for debugging infrastructure-related issues, slow loading modules, etc
        • Logging tools
        • Request Monitor (do not use this in production without checking if you have consent. Monitoring user activity might infringe on privacy laws)
        • Tracing (great for getting deep-down into the specific requests and performance related issues)
    • Management Tools
      • IIS Management Scripts and Tools (I love to do stuff in powershell, it allows me to save those little snippets and reuse them later. Also, more and more documentations and how-to guides gives you powershell commands to fix issues, so you might want to have IIS snappin available)

Configuration changes

Now over to the good stuff, configuration changes that I have found to help out quite a bit. I'll go into the simple configuration tips I've learned and give some details into what you should read up on if you're unsure about the settings and tools used. Performance tuning is reserved for another post, because that a whole chapter in itself.

Internet Information Services (IIS)

Didn't we just do this one? Well yes, but that was only additional features to the web server role, now we're gonna look at specific configuration options in IIS. Open up the IIS admin console (either from Start or run "inetmgr.exe").
  1. First out, we're gonna go check the recycling settings. Navigate to the application pools on your server, find the one called CRMAppPool and select it. Click on the "recycling" link on the right hand side to bring up the recycling settings.
  2. In the recycling settings, uncheck the box marked with "regular time intervals (in minutes)". This is the default IIS setting, which means the application pool will recycle every 29 hours. You probably don't want the application pool to recycle in the middle of the work day, and that will eventually happen with an odd-numbered time interval. I prefer to set it at night, maybe 2 or 3 AM. Just make sure you're not gonna have any integrations depending on the CRM Web Services running at the same time. Rock on through and complete the wizard.
  3. Next up, click the "advanced settings..." link found just beneath the recycling setting in step #1. Locate the settings for "Idle Time-out (minutes)". This setting specifies how long the worker process, that is the process CRM is running in, can be idle before it gets terminated. The CRM installation has set this to 1500 minutes, or 25 hours. That means the worker process will be terminated if there are no activity in the specified timespan. You can leave it at this value, but I would recommend you set it to 0 (never) and rather restart the application pool manually if need be (recycling and restarting an application pool is not the same thing by the way).
  4. If you want to you can repeat these steps for the deployment application pool as well, but you probably won't be using that service that much so it's fine to leave it with the defaults, unless you need to integrate with these services regularly (for example if your developers use it alot or if you intend to integrate with FIM)
  5. Head over to "Sites" when you're done, and look at the list of sites available. For each of the sites (you might just have the one), navigate into it and locate the "Bindings..." link on the right hand side.
  6. Open up the bindings and look for any TCP port 808 bindings. If you have any of those: delete them. The CRM services depend on this port number to work as expected, especially if you have sandbox plugins. If there are specific applications which need to have this port number, they should not be hosted on your CRM servers (or vice versa)

Antivirus settings

To make sure that CRM performs at it's best, you should exclude some directories from the antivirus scanning/monitoring. I won't be going into details for each possible antivirus application how to do this, I can only advice you to google (or bing) "<your antivirus application> add exclusions"
There's an excellent blog post from crminthefield on msdn regarding antivirus exclusions for Dynamics CRM found here (msdn).
The article is somewhat dated, but the information is still valid.
If you plan to/suspect you have to enable tracing in the future, you should also exclude the trace folders (configurable from powershell, but that's for another session called debugging).


The wrap-up

This started to get kind of lengthy, so I stopped at the simple configurations you can do to make your CRM environment run smoothly. The CRM installation has grown a lot since 2011 was introduced (first edition on IIS7+), and you no longer need to enable "authpersistnonntlm" og stuff like that. There's still a few options that can be done to tune the system, but you're pretty much done right now.
I'll be writing another, lengthy blog post on optimization/tuning in the future, so be sure to come back and check it out.

Tomorrow I'll be doing a blog post on backup/restore of your CRM environment, and for all you cowboys out there; it's more than just backing up a database.

Monday, February 1, 2016

Installing Dynamics CRM 2016

Installing Microsoft Dynamics CRM 2016

How to install MSCRM 2016 on a Windows Server 2012R2 with SQL 2014

MSCRM 2016 is here, and it's time to take a look at the installation to see what, if any, parameters and configurations have changed.
Spoiler: Nothing's changed, if you know how to install CRM 2013 or CRM 2015 then you know how to install all three. One thing to notice is that the setup has become more intelligent over the years, and now it will give the vss writer service account the correct permissions, and it will add the SPNs needed automatically (gived that you have the necessary permissions).
It does not, however, fix the performance log access the async and application service account needs, so you still have to add those manually.

Environment

I've set up a Hyper-V host with Windows Server 2012R2 with Active Directory and SQL Server 2014. Since it's all in one box I might have to cheat a bit, but I'll make sure to highlight it if it's relevant.
I've created an organizational unit in the root of my forest named "CRM" to use for the different groups.

Some tips:
  • If you're just setting up a dev box then these are the only roles needed for SQL Server:
    • Database Engine Services
      • Full-Text and Semantic Extrations for Search
    • Reporting Services - Native
  • If you want to create the service accounts using powershell, add the ad ds command line tools from Roles and Features
  • CRM will give you an error message if SQL Server Reporting Services isn't running with a domain user credentials, so if you've installed with local users I advice to switch accounts before CRM installs. Here's how (technet)
  • Add the Asynchronous Processing service account and the Application service account to the performance log users before installation, just to save yourself the red ring of death that is the summary error!

Service accounts

I've pre-created the service accounts needed to install. I just use a short powershell command to generate accounts with the same password:

("svc-crmapp", "svc-crmdeploy", "svc-crmasync", "svc-crmvss", "svc-crmmon", "svc-crmsandbox") | foreach {New-ADUser -Name $_ -Confirm -AccountPassword (ConvertTo-SecureString -Force -AsPlainText "Secret123") -CannotChangePassword $true -ChangePasswordAtLogon $false -PasswordNeverExpires $true -Path "OU=ServiceAccounts,DC=test,DC=local" -Enabled $true }


Installation time!

  1. It starts out like usual, asking to download updates for the installation only. I recommend that you do, because the installation could have bugs that have been fixed in newer updates.
  2. License key: you know what to do (but in case you don't, here's the trial license key: WCPQN-33442-VH2RQ-M4RKF-GXYH4)
  3. Read carefully through the lengthy terms, then proceed and hit install to download and install the necessary prerequisites (I'll add a future blog post on how and where to download these prerequisites manually, to enable installing on systems that are not connected to the internet)
  4. If you see the following screen that means you'll have to restart (manually) and retry the setup. Geez Microsoft, it's been 5+ years since 2011 came out, can't you add a "restart now" button </lazy>
  5. We're back! And it's time to decide on the installation path and which roles to add. In my case I'll be using defaults, and I'll add all roles. I'll be adding a future bloggpost with guidelines for multi-server deployments, be sure to check it out!
  6. Next specify the SQL Server you want to use. If you're using SQL Server HA then you'll have to go through some ardous steps to configure CRM to use this post-installation. I hoped it would be easier in 2016, but they still haven't fixed native, UI support for HA listeners yet. Want to know how? Well here's how (technet)
  7. Select the OU where you want to create the CRM groups. CRM 2016 (and the previous three versions) create 4 groups used for various purposes. If you want to create them manually you'll have to specify them in a config-file used for installation. I'll add some words of wisdom regarding unattended installation in a future blogpost, including what to do with those pesky encryption keys. In the meantime, here's the doc for the xml config (technet)
  8. Next, specify the service accounts used for CRM, domain\username followed by passwords. Still the same 6 service accounts as in CRM 2013 and 2015
  9. Next select which website you will use. I personally prefer to use a new website, and just edit the bindings in IIS later. The reason for this is that the MSCRM setup didn't use to remove the IIS default settings for the default website, so you got a lot of port bindings that you didn't need or want (like :808 which causes problems with the sandbox service and fetch based reports). More info on port numbers found here (technet). I'll be using the default this time, it's just for demoing anyway.
  10. Specify the server used for the email router if you already know which one that is. Hopefully you'll be using the server-side-synchronization for emails, in which case just leave this field blank.
  11. Now it's time to specify the defaults for your first organization. If you're using a multi-server deployment with only a few roles you won't get this screen. Remember! You can't change these settings later, so make sure you know which settings you want. The display name is the display name of the organization (metadata is important too!). The unique name is used in combination with a pre-defined text to create a database name (also, IFD uses this name appended to your URL to create public facing URLs). example_mscrm will be my organization.
    Also, make sure that you use the same collation as the SQL Server instance you're using, to prevent unnecessary translations in the db engine.
  12. Specify the reporting services URL, this is the normal user accessible URL to your reporting services server, not the admin URL. By default the installation will suggest the same address as to your SQL Server, which isn't necessarily the case.
  13. Next, you choose whether you want to be part of the customer experience program. I would check no, unless it's OK to send anonymous data to Microsoft about how you use the CRM application.
  14. Finally, you're at the system verification check. If you're lucky you've done everything right, and it's all green (except for the data encryption, which you should fix post installation. See my future post for more information regarding encryption keys)
  15. If you receive this screen you have to give the service accounts for the application role and asynchronous processing service permissions to the performance log. Use the following command to add each of them
    net localgroup "Performance Log Users" /add test\svc-crmasync
  16. YOU'RE DONE! Let the installation run to completion and you're ready to start on the post installation tasks.

Wrap-up

As you can see, installing CRM 2016 is simple, simple as pie. Just follow these steps and you'll be done in no-time.
Tomorrow I'll go through the post-installation steps, be sure to check in!

Tuesday, October 8, 2013

Errors in CRM for Outlook 2011 when connecting to CRM

I recently had a customer who upgraded their Dynamics CRM 2011 system from update roll-up 11 to roll-up 14, and due to strict policies in the production environment they wanted to test the roll-up 14 for the Outlook client on a pilot group before rolling it out to all users.

After using CRM with the newest rollup for several weeks they suddenly encountered an error where Outlook clients no longer could connect to the servers, and it happened to a lot of users in a short amount of time. When checking the error messages we found that the clients had issues trying to synchronize with the servers (normal synchronization, offline mode disabled), and we found out that they recently imported a new version of their solution during the weekend. All the users who experienced the problem could connect to CRM in their web browser, and a quick check on the servers did not show any errors in the event log. Needless to say this points to an issue with the client.

Proceed to default troubleshooting procedures:
We found a test client we could use, booted up the same image the customer use on their clients with the same version of software and updates, and tried to connect to CRM through Outlook. Like the rest of the users this gave us the following error:


08:56:44|  Error| Exception : Must specify valid information for parsing in the string.    at System.Enum.EnumResult.SetFailure(ParseFailureKind failure, String failureMessageID, Object failureMessageFormatArgument)

   at System.Enum.TryParseEnum(Type enumType, String value, Boolean ignoreCase, EnumResult& parseResult)

   at System.Enum.Parse(Type enumType, String value, Boolean ignoreCase)

   at Microsoft.Crm.Platform.ConvertHelper.EnumFromXmlString(Type enumType, String mask)

   at Microsoft.Crm.Metadata.AttributeDescription.FillPropertiesFromXml(XmlNode node, Boolean throwIfIdsMissing)

   at Microsoft.Crm.Metadata.NonSharableMetadataCacheLoader.<>c__DisplayClass7.<LoadDescriptionsFromXml>b__6(IFillableMetadataDescription description, XmlNode node, Boolean newIterator)

   at Microsoft.Crm.Metadata.NonSharableMetadataCacheLoader.LoadDescriptionsFromXml(String name, MetadataContainer container, CounterList counter, IEnumerable`1 navs, IEnumerable`1 paths, LoadDescriptionFromXmlDelegate LoadDescriptionFromXmlDelegate)

   at Microsoft.Crm.Metadata.NonSharableMetadataCacheLoader.LoadDescriptionsFromXml(String name, MetadataContainer container, CounterList counter, IEnumerable`1 navs, String[] paths)

   at Microsoft.Crm.Metadata.NonSharableMetadataCacheLoader.LoadDescriptionsFromXml(String name, MetadataContainer container, CounterList counter, XPathNavigator nav, String path)

   at Microsoft.Crm.Metadata.NonSharableMetadataCacheLoader.BuildContainerFromXml(XmlDocument xmlDocument, LoadMasks masks, CounterList counter)

   at Microsoft.Crm.Metadata.NonSharableMetadataCacheLoader.LoadCacheFromXml(XmlDocument xmlDocument, LoadMasks masks, CounterList counter)

   at Microsoft.Crm.Metadata.DynamicMetadataCacheFactory.LoadCacheFromWebService(DynamicMetadataCacheLoader loader, LoadMasks masks, IOrganizationContext context, Boolean writeCacheToLocalFile, CounterList counter)

   at Microsoft.Crm.Metadata.DynamicMetadataCacheFactory.LoadCacheForRichClient(LoadMethod loadMethod, DynamicMetadataCacheLoader loader, LoadMasks masks, IOrganizationContext context, CounterList counter)

   at Microsoft.Crm.Metadata.DynamicMetadataCacheFactory.LoadMetadataCache(LoadMethod method, CacheType type, IOrganizationContext context)

   at Microsoft.Crm.Metadata.MetadataCache.LoadCache(IOrganizationContext context, Boolean fileOnlyIfExists)

   at Microsoft.Crm.Metadata.MetadataCache.GetInstance(IOrganizationContext context)

   at Microsoft.Crm.Application.Outlook.Config.OutlookConfigurator.InitializeMapiStoreForFirstTime()

   at Microsoft.Crm.Application.Outlook.Config.OutlookConfigurator.Configure(IProgressEventHandler progressEventHandler)
   at Microsoft.Crm.Application.Outlook.Config.ConfigEngine.Configure(Object stateInfo)

At this point we decided to turn on tracing and collected the error from the trace log as well (English and Norwegian error message):


>Error occurred while refreshing registry cache, cache has been cleared. Exception: System.IO.IOException: Det er ikke mer data tilgjengelig.
>Error occurred while refreshing registry cache, cache has been cleared. Exception: System.IO.IOException: No more data is available

These error messages made me suspect that the issue was content in the new solution which was not supported by the older roll-up version on the client, so we updated the client to update rollup 14 and tried again. As suspected this fixed the issues and allowed the client to successfully connect and synchronize with the servers.

At this point I would like to say that we informed our customer about the dangers of running different versions of the software on the server and client, and we highly recommended installing the updated client on all computers as soon as possible. However, after testing this in their staging environment without any errors they decided to proceed with a prolonged pilot group in production.

On the positive side, update roll-up 12 (and newer) includes some great improvements in the Outlook client which makes it a less chatty, so the users will be able to enjoy a faster, smoother CRM experience with the newest roll-up on both the servers and the client.