Wednesday, January 30, 2019

The judge is in!

 Arctic Cloud Developer Challenge 2018


Arctic Cloud Developer Challenge 2019 is just 1 month away (February 28th - March 2nd, you're signed up aren't you?), and I've been lucky enough to be picked as a judge another year!
For those of you who don't know, Arctic Cloud Developer Challenge (formerly knows as Arctic SharePoint Challenge) is a 3 day hackathon on the outskirts of snowy Oslo, Norway, on top of VoksenÄsen. This is without a doubt the most awesome hackathon I've ever attended (and judged) in my time, and it's something I look forward to every year.

Apart from the astounding venue and location, what makes it stand out is the incredible team spirit shown each and every year. Whether a team has 9 participants or 2, everyone is having an awesome time, sharing knowledge and experience, and despite meeting their "fiercest" rivals from the industry everyone has smiling and having fun for the social parts.

How we got here

Arctic SharePoint Challenge started a bunch of years ago, a community project initiated by people with more than average interest in SharePoint and technology. As the years passed and the cloud started to take over our infrastructure the event expanded and evolved. It went through a phase with badges awarded to teams for completing predefined challenges (man how I loved badge sniping) to predefined categories which would award participants points, and crowns (all aboard the GoT bandwagon!). It started out with "just SharePoint" but over the years more technologies have been included, and a few years ago Dynamics CRM was included as its own category, with the amazing Scott Durow as a judge. Last year the Dynamics category changed into business applications, or more correct Varys Rolodex because of the GoT theme. It was part of the shift to not only SharePoint anymore, it was all of the Office 365 portfolio, and instead of having Dynamics as a separate category we added all bizapps, and we had several teams with a strong BA focus while delivering awesome code and integration solutions over the 3 days.

What's happening this year

This year is going to be incredibly awesome. The judges lineup is fantastic (Laura Kokkarinen, Chris Huntingford, Seb Matthews, Erwin van Hunen, are you kidding me?!), the theme is awesome (the long overdue Simpsons theme), and it's looking to be a lot of great teams joining us.
One of the changes we're doing this year is stop putting products into categories (well, kinda), instead we're giving points in a category depending on the total solution, and if you decide to use Connected Field Services then that's IoT points for you, it's not some glorified Dynamics category.
So without further ado, let me present this years categories:

Willy's shed
Power users love tools and flexibility, so why not show them some

Obey the hypnotoad
Everything is so pretty, I can't take my eyes away

The genesis tub
All the tiny things, connected and online. Bring your IoT to the science fair!

Automated Teller Machineyolatrolamaton
Cash is king, and nothing says cash like great business value

Bite my shiny metal ass
Use non-MS tech in meaningful ways, or just out of spite

Come bowling!
Be a happy camper, spread the love, amazing team spirit!

What about the nerd factor?

This year we're also going a bit back to our roots, so we're going to have more lightning challenges and competitions which require hardcore developer skills. These will probably not be enough to win the challenge (but being a hackathon you should bring at least 1 developer), but they will give bragging rights and make your competition run salty.
Additionally, because Microsoft have been awesome to us, we are handing out one MXChip IoT DevKit to each team to use in whichever way they want (BIIIIG shoutout to Ben Vollmer).
We're also doing secret sessions (but no pushups, we're not that silly) and suprises, and I think it's going to bring some great flavor to the competition.

The goal is to make sure that if you want to just "plug in" and code away for 3 days, or if you want to take drone shots of the venue and use them in promo videos, or you're a happy camper wanting learn as much as you can from a bunch of awesome people, or if you're a security nerd looking to discovery everyone's dirty secrets there's a place for you at #ACDC2019

HAPPY HACKING!

Wednesday, April 4, 2018

Dynamics 365 S2S OAuth authentication with certificates

After participating in a recent thread on the Microsoft Dynamics 365 community on Facebook I decided to write up a blog post how to do S2S OAuth2.0 authentication with Dynamics 365 using certificates.
image

Prerequisites

  • AzureRM PowerShell modules (specifically AzureRM.Resources)
  • Azure Active Directory administrative access
  • Optional: Download/clone my repo

Creating a self-signed certificate

Disclaimer: Most of the scaffolding of the certification code is copied from other blog posts. There are some tweaks that are my own.
I’ve created/modified a PowerShell script which creates a new self signed certificate with a 1 year validity starting from the date you run the script. You could increase this is you want, but I recommend using a certificate rollover strategy instead of relying on certificates with infinite period of validity. When you’ve got a proper certificate strategy it doesn’t really matter if it’s 1 year, 2 years, 3 months, or whatever, it’s something that should be automated and easy to maintain. The steps to the script are as follows:
  1. Specify an FQDN, and use something descriptive (“MSDYN365 cert” is not really descriptive)
  2. Enter a password used to encrypt exported certificate PFX
  3. Enter path to store exported PFX
  4. Enter desired AAD App name
  5. Enter desired AAD App homepage Uri (does not have to be a valid address)
  6. Enter desired AAD App identifier Uri (does not have to be a valid address)
  7. Log in to AAD with administrative credentials (need to have permissions to create an AAD app)
  8. Verify that login is successful.

At this point the following things have happened:

There is a new certificate stored in the personal store ([Win] + [R], type MMC, [CTRL] + [M], select Certificates and add, choose Computer Account, choose local computer, expand Certificates => Personal => Certificates. Here is the new self-signed certificate created
image
The certificate has been exported to the folder you entered during the script execution
image
Now, as an addition, I’m adding the certificate to my personal store just for this test. Just right click that pfx and choose install, and place it in the personal store of your user account.

Adding an application user in Dynamics 365

Now we go into Dynamics 365, then go to Settings and Security, and finally open Users.
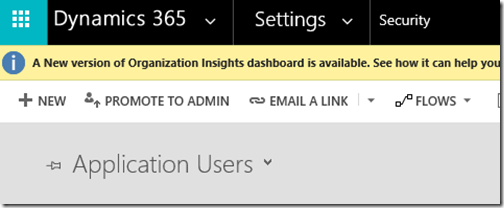
Change the default view to Application Users, then select New from the ribbon.
image
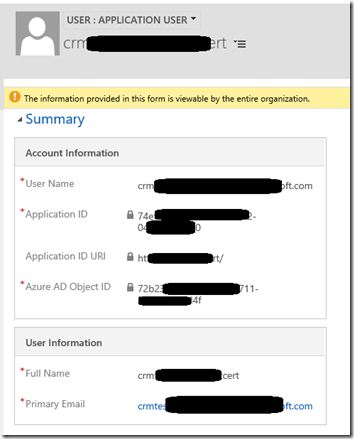
Add a username and the application id of the newly created AAD application (you can find this through the Azure Portal as well). Additionally add a name and email address. More information about creating application users are found in the Microsoft Docs. When you save the user, the rest of the information will be filled out, which lets you know that it found the application and managed to load the application details from Azure AD.
image
Finally, give it a security role so it has permissions to do stuff.

Log in to Dynamics 365 using the newly created certificate

The complete code for this is available on my public github repo found here.
First of all, you need to collect the application id and the reply url from the azure ad application registered earlier. Additionally, you have to get the organization URL for your Dynamics 365 organization, and you need to get the certificate thumbprint from the certificate generated in the first step.

Don’t know how to find the signature?

Open opp MMC ([Win]+[R], type MMC and hit ok). Now add the certificate snap-in ([CTRL]+[M], add certificate, choose “My User Account”, hit Finish and OK). Expand personal certificates and find the name of the self signed certificate. Open the certificate information, go to the details tab and scroll down to the bottom where you find the signature. It should look something like this
image

CODE ALL THE THINGS!

Create a new .net framework console project in visual studio (or just copy/clone my repo), then do the following:
  • Add nuget package, search for microsoft.crmsdk.xrmtooling.coreassembly
    image
  • Open app.config, add the following code into it (inside the <configuration></configuration> section)

    <appSettings>
      <add key="CertificateThumbPrint" value="certificate thumbprint here" />
      <add key="ClientId" value="application id from AAD app"/>
      <add key="RedirectUri" value="redirecturl from AAD app"/>
      <add key="DynamicsUrl" value="https://<organizationname>.crmX.dynamics.com/"/>
    </appSettings>
    
  • Add the values that you collected at the beginning of this section into the app config you just created
  • Add a reference to System.Configuration in your project
Awesome! You’re now one step closer to Certificateville, which is either a lot safer or a lot less safe than you think!
Now, if you haven’t cloned or copied my code already, copy the contents of this CS-file into your Program.cs
Add a breakpoint at the end of the code, then hit F5 and watch all good things come to fruition:

So what if I have a certificate file?

So the overloaded method to use certificates are missing somewhat in documentation (as of now). If you load a certificate from disk or similar, use certificate as an input. If you load it from the store, use the store and the thumbprint as an input. If you have a "physical" certificate then the 'storename' and the 'thumbprint' can be any value (storename is an enum so you have to have something other than null, but thumbprint can be null). See the code for a concrete example.

The wrap-up

Certificate authentication works like a charm with Dynamics 365 Online. If you combine this with certificate storage in Azure Key Vault then you can securely authenticate and integrate with Dynamics365 without having to worry about app user credentials and password expiration (you still have to worry about certificates though, which isn’t really trivial).
We might see support for managed service accounts in the future, but for now this is a decent way to prevent the whole password management scheme of application users.

Friday, February 2, 2018

Use reference tables for previews in Power BI

In my quest to provide customers with awesome reports I’ve been looking at why the performance in Power BI can be so slow at times. As I pointed out in earlier posts the OData.Feed can be quite the resource hog depending on the endpoint, so I’ve started to fall back on Json.Document to get much better preview times (but not without it’s drawbacks, like record count, connected tables and option set labels).

Just because I’m kinda new to this I like to perform a lot of the logic using M in the query editor, then I sew it all together with relationships and measures inside the reports I build. I noticed that the previews kept getting slower the more I logic I added, so get the ultimate magic tool and looked at what was happening.

First step: Json.Document(Web.Contents(“https://<org>.api.crm4.dynamics.com/api/data/v8.2/opportunities”))

image

OK, so it makes a request to Dynamics and retrieves the data in 3.435 seconds. That’s not fantastic, but it’s not bad.

Second step: = Source[value]

image

OK, no requests made. That’s what I would expect from it

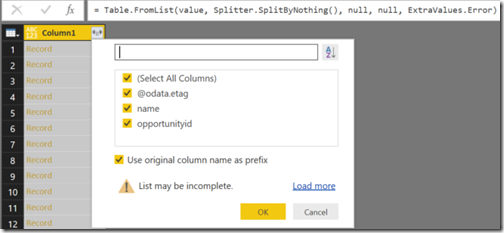
Third step: = Table.FromList(value, Splitter.SplitByNothing(), null, null, ExtraValues.Error)

image

Still no requests made, that’s great

Fourth step: = Table.ExpandRecordColumn(#"Converted to Table", "Column1", {"actualclosedate", "actualvalue", "budgetamount", "estimatedclosedate", "estimatedvalue", "name", "opportunityid", "pzl_countryregion", "statuscode"}, {"Column1.actualclosedate", "Column1.actualvalue", "Column1.budgetamount", "Column1.estimatedclosedate", "Column1.estimatedvalue", "Column1.name", "Column1.opportunityid", "Column1.pzl_countryregion", "Column1.statuscode"})

Guess what? Still no requests.

Fifth step: = Table.TransformColumnTypes(#"Expanded Column1",{{"Column1.estimatedclosedate", type date}})

No requests. Great, so we only make 1 request per step, as long as we don’t merge in more columns? Not quite.

Refresh preview

image

Wait what? 5 requests, that’s 1 request per step. That makes the loading time increase from the original 3+ seconds into well over 15 seconds. I don’t have the answer for why it makes a new request for each and every step, but let me show you the consequence of this when you use OData.Feed instead of Json.Document

These are the steps taken:

  1. = OData.Feed(https://<org>.api.crm4.dynamics.com/api/data/v8.2/opportunities)
  2. = Table.SelectColumns(Source,{"actualclosedate", "actualvalue", "budgetamount", "createdon", "estimatedclosedate", "estimatedvalue", "name", "new_calculatedrevenue", "new_product", "opportunityid", "pzl_countryregion"})
  3. = Table.TransformColumnTypes(#"Removed Other Columns",{{"createdon", type datetime}})

image

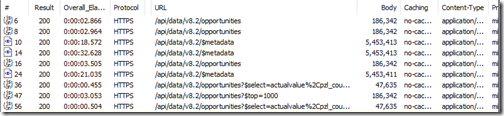
Now that should be enough to make you think twice before reporting on Dynamics data in Power BI. As you can see it’s the metadata documents which takes the longest, but for some reason there are 4 requests to the “all opportunities” endpoint and the metadata endpoint, while there are 3 requests to the opportunity endpoint with reduced number of columns (fields). Also, there is one top=1000 request which completes before the last two. This tells me that when you refresh the data, the requests are made in sequence for each step, but the steps are performed in parallel. It almost smells like premature optimization.

So let’s break this down and do it step by step.

Step 1

image

OK, great, one request for the opportunities and one for the metadata, finally one to get the top 1000 records for the preview.

Step 2

image

Now we see that it makes the same three requests as it did in the previous step, but it also performs another set of requests against “all opportunities” and metadata before it performs a request against opportunities with reduced number of columns (fields).

Step 3

image

Finally, it does all the requests from previous steps, but it also adds another duplicate for this current step (which only converts the type, and doesn’t require collecting more data from the source system).

The magic workaround

Just by pure luck, when I tested this originally I got 4 duplicates of the “all opportunities”+select requests, and I couldn’t figure out where the 4th duplicate came in. Turns out, because I made a reference from this opportunity query into a new query, and the data is refreshed in all referenced queries as well as the parent(s).

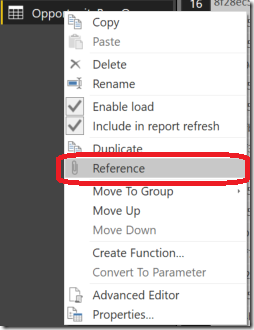
That made me test one final thing. I created a new reference query after I had done all my logic in the main query.

image

Then I refreshed the data while in the reference query.

Step 1: = Query1

image

VoilĂ ! Only one set of requests, even though it’s technically the fourth step.

This means I just saved myself many duplicate requests, and the data loads much faster than for each subsequent step. This was only for 3 steps, imagine how much this will matter if you have 10, or 20 steps in your queries.

The wrap up

So in summary, when you refresh the preview for a query in a Power BI, all the requests are are repeated and added on for each step you have in that query. It’s an exponential growth of data gathering, and can make everything slow as nothing else.

Creating new queries with references removes the need to duplicate all the requests, and you can keep working with and massaging the data without having to worry about minutes of data reloading.

Wednesday, January 31, 2018

How to retrieve OData v4 fast in Power BI

I recently blogged about how Power BI has a bug which ignores the select statements when querying an OData v4 endpoint. Even though the columns would include any data, it still bugged me so much that I wanted to find a way around it.

Turns out that’s much easier than you would expect.

I recently explored some of the different data loading capabilities in PBI, and it turns out that there’s a Json.Document function which allows you to handle OData at an even lower level.

So what I did was take my original uri and query string: https://<org>.api.crm4.dynamics.com/api/data/v8.2/opportunities?$select=name

Then I put it into a Json.Document(Web.Contents())

And voila, this is the result

image

Navigating into that list, you can then right click the column and select “To Table”. This will present you with a table of records ready to be exploded:

image


So, time to do a little speed testing

Using: = OData.Feed("https://<org>.api.crm4.dynamics.com/api/data/v8.2/opportunities?$select=name")

Screenshot_20180131-160714

Using: = Json.Document(Web.Contents("https://<org>.api.crm4.dynamics.com/api/data/v8.2/opportunities?$select=name"))

Screenshot_20180131-160738


Enough said?

PowerBI desktop ignores select statements in OData v4

I’ve been working a bit with Power BI and Dynamics the last few weeks, and I’ve encountered an issue which I at first thought was because of the Dynamics REST OData service. Turns out this is an issue with Power BI.
The issue is, when you specify a select statement in the query URL Power BI ignores it, and retrieves ALL the fields/columns instead.
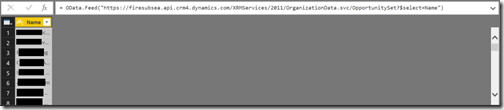
To demonstrate the issue, here is what happens when I use the old OData service from Dynamics CRM
image
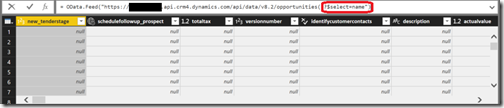
And here is what happens when I use the modern REST service
image
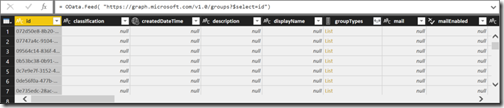
This is what happens when I try to use the graph api
image
So as you can see, when we use OData v4 endpoints the select statement is ignored, and the consequence is that all fields/columns are included. However, the columns does not include any data, so it is much faster than retrieving all columns with data.

So what can we do about it?

Nothing, for now, but if you vote for my idea to fix it we can get something soon (hopefully). Unfortunately, the Power BI community forum doesn’t integrate with Microsoft Services, so you have to create a new account (if you don’t already have one). I BEG of you to please take the time to vote
http://community.powerbi.com/t5/Issues/Select-query-in-odata-v4-is-ignored/idi-p/348974

Monday, January 29, 2018

Dynamic option sets in PowerBI

I recently had a requirement from a customer who needed to filter reports based on global option sets. The kicker for this requirement was that the option set would change rapidly for some time (don’t ask), so they needed a dynamic way to retrieve the labels and use them in a report.
Now, there are several solutions out there to retrieve the option set data, and I got some tips from the talented Ulrik “Why is he not an MVP yet” Carlsson. While his solutions work, I don’t want a static transformation in PBI, I don’t want a custom entity to store information already in the system, and I don’t want to use fetchxml as a source. Are those unreasonable demands? Maybe. Is that going to stop me? Never.
So to start with, I checked the global option set definitions for my organization, found from the following URL
https://<org>.crm4.dynamics.com/api/data/v8.2/GlobalOptionSetDefinitions
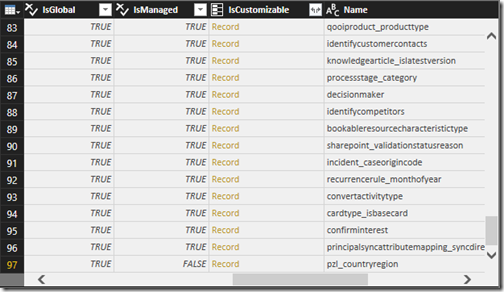
Sure enough I found all the option sets in the system, so I tried to add that url as a source in PowerBI to see if I can get the option set values. After waiting some time for it to load I can see that there are no lists or subsets to load that gives me anything useful.
image
So I try to load up the direct url for the option set in question, using the metadata id of the option set. The url looks like this:
https://<org>.crm4.dynamics.com/api/data/v8.2/GlobalOptionSetDefinitions(bd3519cf-3d67-43f2-8a94-d6849872f615)
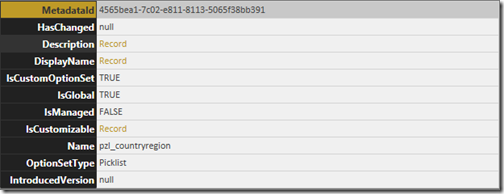
While this does give me a result, it’s not anything I can use.
image
So I load the URL into chrome to look at the data. Here I can clearly see all of the option sets, complete with locales and values. That means that the data is available, but I am not getting it in the format I want.

Alternative 1, parse the content as a JSON document

Instead of using an OData.Feed to load the data, I can just take the specific optionset metadata and load it into a Json.Document instead. To do this, create a new blank query, then paste the following value
= Json.Document(Web.Contents("https://<org>.crm4.dynamics.com/api/data/v8.2/GlobalOptionSetDefinitions(bd3519cf-3d67-43f2-8a94-d6849872f615)
This will provide you with “Options” as an attribute which contains a list of records. You can then click on the List to navigate to it.
image
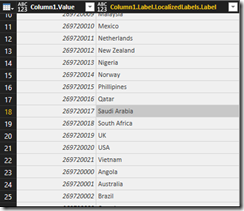
You now get a list of records, where you can right click the column and select “To Table”. This will convert the list into a table, and from here you can expand the columns. I chose to expand Value and Label, as that will give me the option set int value and the label string. The label is a record itself, so you have to expand it to get more options. The choices here is LocalizedLabels and UserLocalizedLabel. The difference being that the LocalizedLabels contains all the labels for all the localizations defined in your system, while the UserLocalizedLabel contains only the label for the user’s language.
image

UserLocalizedLabel

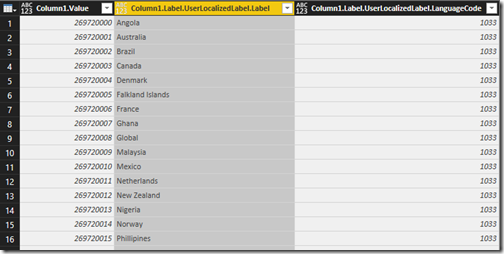
Expanding the UserLocalizedLabel gives us a new record, which we then can expand to Label, LanguageCode, and other additional metadata attributes. I’ve chosen to expand the first two, and we now have a useable table with both int values as well as label strings in the user’s language
image
You can now rename the columns and use them to join with the primary records in your PBI report.

LocalizedLabels

Expanding the LocalizedLabels will give us lists of labels for each value. You can’t expand a list to new columns straight away, so you will have to expand the table with new rows. If you have additional languages, which is probably why you’re doing this, then you will duplicate the integer values for all option set values that have several language definitions.
In my example I’ve just duplicated the table because I don’t have multiple languages enabled, so don’t worry about duplicate values, it’s on purpose.
image
So the next step is to right click the Column1.Value column, and select group by. Give the new column a sensible name (I named mine labels), then choose operation “Max” and select the label column as the column. This is just to get a basis for the grouping.
Now, in the next stage, the formula should look somewhat like this:
= Table.Group(#"Appended Query", {"Column1.Value"}, {{"Labels", each List.Max([Column1.Label.LocalizedLabels.Label]), type text}})
You need to change it so it looks like this instead:
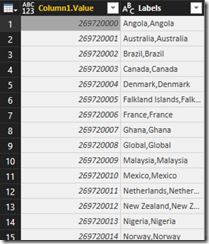
= Table.Group(#"Appended Query", {"Column1.Value"}, {{"Labels", each Text.Combine([Column1.Label.LocalizedLabels.Label], ","), type text}})
The result will look something like this:
image
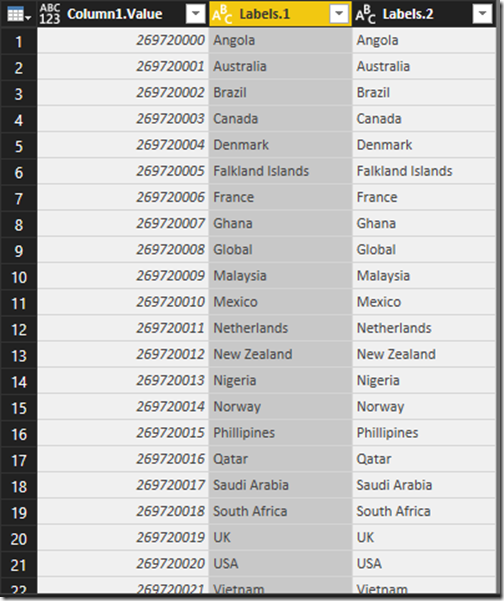
Now, right click the Labels column and select “Split Columns” –> “By delimiter”. Choose to split each occurrence. The resulting table now looks like this:
image
You can now give the columns sensible names and use them in your PBI report.

Alternative 2, add query options to get the list of labels

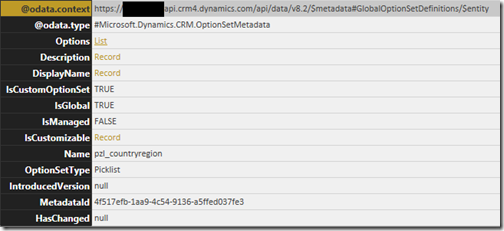
The other solution to retrieve the odata feed is to add additional columns. As we saw earlier the OData.Feed(… just gave us metadata about the entity, but none of the options. This is because the options, which includes data, is excluded by default. To include them in the query simply change the source definition from this:
= OData.Feed(https://<org>.crm4.dynamics.com/api/data/v8.2/GlobalOptionSetDefinitions(4565bea1-7c02-e811-8113-5065f38bb391))
To this:
= OData.Feed(https://<org>.crm4.dynamics.com/api/data/v8.2/GlobalOptionSetDefinitions(4565bea1-7c02-e811-8113-5065f38bb391), null, [MoreColumns = true])
The “null” is for additional headers, while the second is a PBI record which states that MoreColumns should be true (default false). All the available options are specified in the following article https://msdn.microsoft.com/en-us/library/mt260868.aspx
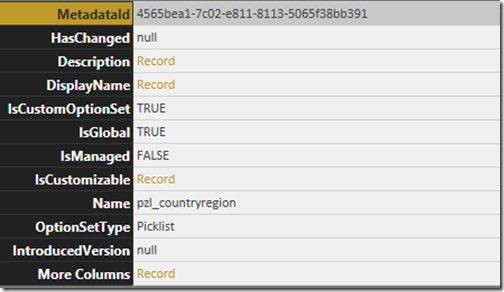
The result of this is the following screen.
image
We now have an attribute named “More Columns”. Clicking on that will navigate into the record, which is a list of records. Right click the column and choose “To Table”. You will now have a table where you can expand the columns just like specified in alternative 1.

Wrap up

Getting option set labels isn’t obvious when you’re creating reports in Power BI thanks to how attributes and attribute metadata is defined in Dynamics 365. Luckily there are ways to retrieve additional data in a dynamic way which allows us to utilize the system in awesome ways.
Until next time!

Tuesday, January 9, 2018

Dynamics 365 App for Outlook stops working after URL change

I encountered an error where the Dynamics 365 App for Outlook stopped working for a customer after we changed the URL for his instance.

As you might already know, as a D365 administrator you can go to the Dynamics Admin Portal to change the organization settings, and one of those settings is the organization URL. When we did this for a customer who was going live with a Dynamics 365 v9 organization the App for Outlook stopped working.

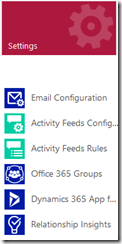
To fix this simply go to Settings –> Dynamics 365 App for Outlook

image

Even thought the app isn’t working the status will say “Added to Outlook”. To fix this simply select the users with the app, then click the “ADD APP TO OUTLOOK” (or “ADD APP FOR ALL ELLIGIBLE USERS”) button to re-publish the app to the users. After a few minutes the app was, again, available and working for all users.

image