Showing posts with label authentication. Show all posts

Wednesday, April 4, 2018

Dynamics 365 S2S OAuth authentication with certificates

After participating in a recent thread on the Microsoft Dynamics 365 community on Facebook I decided to write up a blog post how to do S2S OAuth2.0 authentication with Dynamics 365 using certificates.
image

Prerequisites

  • AzureRM PowerShell modules (specifically AzureRM.Resources)
  • Azure Active Directory administrative access
  • Optional: Download/clone my repo

Creating a self-signed certificate

Disclaimer: Most of the scaffolding of the certification code is copied from other blog posts. There are some tweaks that are my own.
I’ve created/modified a PowerShell script which creates a new self signed certificate with a 1 year validity starting from the date you run the script. You could increase this is you want, but I recommend using a certificate rollover strategy instead of relying on certificates with infinite period of validity. When you’ve got a proper certificate strategy it doesn’t really matter if it’s 1 year, 2 years, 3 months, or whatever, it’s something that should be automated and easy to maintain. The steps to the script are as follows:
  1. Specify an FQDN, and use something descriptive (“MSDYN365 cert” is not really descriptive)
  2. Enter a password used to encrypt exported certificate PFX
  3. Enter path to store exported PFX
  4. Enter desired AAD App name
  5. Enter desired AAD App homepage Uri (does not have to be a valid address)
  6. Enter desired AAD App identifier Uri (does not have to be a valid address)
  7. Log in to AAD with administrative credentials (need to have permissions to create an AAD app)
  8. Verify that login is successful.

At this point the following things have happened:

There is a new certificate stored in the personal store ([Win] + [R], type MMC, [CTRL] + [M], select Certificates and add, choose Computer Account, choose local computer, expand Certificates => Personal => Certificates. Here is the new self-signed certificate created
image
The certificate has been exported to the folder you entered during the script execution
image
Now, as an addition, I’m adding the certificate to my personal store just for this test. Just right click that pfx and choose install, and place it in the personal store of your user account.

Adding an application user in Dynamics 365

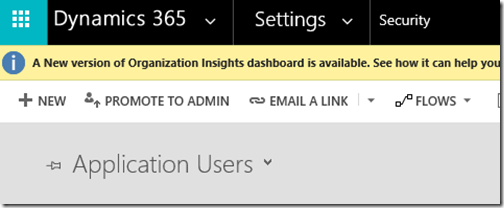
Now we go into Dynamics 365, then go to Settings and Security, and finally open Users.
Change the default view to Application Users, then select New from the ribbon.
image
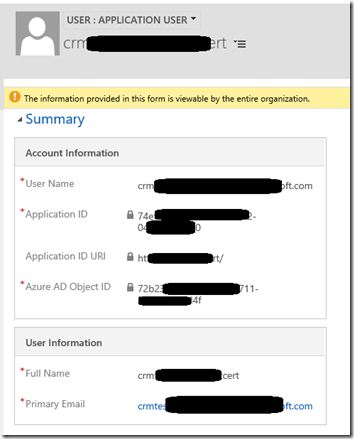
Add a username and the application id of the newly created AAD application (you can find this through the Azure Portal as well). Additionally add a name and email address. More information about creating application users are found in the Microsoft Docs. When you save the user, the rest of the information will be filled out, which lets you know that it found the application and managed to load the application details from Azure AD.
image
Finally, give it a security role so it has permissions to do stuff.

Log in to Dynamics 365 using the newly created certificate

The complete code for this is available on my public github repo found here.
First of all, you need to collect the application id and the reply url from the azure ad application registered earlier. Additionally, you have to get the organization URL for your Dynamics 365 organization, and you need to get the certificate thumbprint from the certificate generated in the first step.

Don’t know how to find the signature?

Open opp MMC ([Win]+[R], type MMC and hit ok). Now add the certificate snap-in ([CTRL]+[M], add certificate, choose “My User Account”, hit Finish and OK). Expand personal certificates and find the name of the self signed certificate. Open the certificate information, go to the details tab and scroll down to the bottom where you find the signature. It should look something like this
image

CODE ALL THE THINGS!

Create a new .net framework console project in visual studio (or just copy/clone my repo), then do the following:
  • Add nuget package, search for microsoft.crmsdk.xrmtooling.coreassembly
    image
  • Open app.config, add the following code into it (inside the <configuration></configuration> section)

    <appSettings>
      <add key="CertificateThumbPrint" value="certificate thumbprint here" />
      <add key="ClientId" value="application id from AAD app"/>
      <add key="RedirectUri" value="redirecturl from AAD app"/>
      <add key="DynamicsUrl" value="https://<organizationname>.crmX.dynamics.com/"/>
    </appSettings>
    
  • Add the values that you collected at the beginning of this section into the app config you just created
  • Add a reference to System.Configuration in your project
Awesome! You’re now one step closer to Certificateville, which is either a lot safer or a lot less safe than you think!
Now, if you haven’t cloned or copied my code already, copy the contents of this CS-file into your Program.cs
Add a breakpoint at the end of the code, then hit F5 and watch all good things come to fruition:

So what if I have a certificate file?

So the overloaded method to use certificates are missing somewhat in documentation (as of now). If you load a certificate from disk or similar, use certificate as an input. If you load it from the store, use the store and the thumbprint as an input. If you have a "physical" certificate then the 'storename' and the 'thumbprint' can be any value (storename is an enum so you have to have something other than null, but thumbprint can be null). See the code for a concrete example.

The wrap-up

Certificate authentication works like a charm with Dynamics 365 Online. If you combine this with certificate storage in Azure Key Vault then you can securely authenticate and integrate with Dynamics365 without having to worry about app user credentials and password expiration (you still have to worry about certificates though, which isn’t really trivial).
We might see support for managed service accounts in the future, but for now this is a decent way to prevent the whole password management scheme of application users.

Thursday, August 17, 2017

Using Dynamics365 Customer Engagement admin API with PowerShell, part3

In part1 and part2 of this blog series we looked at scaffolding and building an authentication helper which we can use in a commandlet class. In this part we're going to build our own HTTP message handler and perform some queries against the adminapi.
The code in it's entirety is available on this Github repository.

Creating a custom HTTP message handler

As we saw previously we now have a valid bearer token which we can use to query the adminapi. We can now create a HTTP request and send it to the API to get a result back. But instead of starting from scratch we're going to reuse the code from the Microsoft docs and create our own custom message handler which will instantiate and propagate everything we need, as well as injecting the token into the request.
Go into the AuhtenticationHelper class, and append the following code to the end of the class (inside the AuthenticationHelper declaration).

class OAuthMessageHandler : DelegatingHandler
{
    AuthenticationHelper _auth = null;
    public OAuthMessageHandler(AuthenticationHelper auth, HttpMessageHandler innerHandler) : base(innerHandler)
    {
        _auth = auth;
    }
    protected override Task<HttpResponseMessage> SendAsync(HttpRequestMessage request, CancellationToken cancellationToken)
    {
        request.Version = HttpVersion.Version11;
        request.Headers.Authorization = new AuthenticationHeaderValue("Bearer", _auth.AuthResult.AccessToken);
        request.Headers.AcceptLanguage.Add(new StringWithQualityHeaderValue("NORWEGIAN-VIKING"));
        return base.SendAsync(request, cancellationToken);
    }
}
This class inherits from the delegation handler, which takes care of all the basic stuff for us. It has an AuthenticationHelper property which we set in the public constructor, as well as a HTTPMessageHandler which is sent to the base constructor.
Please notice the AcceptLanguage header that has been set. This is not necessary for the GET requests (at the time of writing), but it is required for the POST requests. As you might notice I haven't specified a valid language, and what happens then is that it defaults to english.
If, however, I was to specify nb-NO then the response would be in Norwegian, so there's a nice trick for you.
Next we override the SendAsync method to inject our headers. What we've done here is get the Access token from the AuthResult in the AuthenticationHandler. What this means is the following:

  1. When the AuthResult property is retrieved it triggers the Authorize() method which uses the AuthContext property.
  2. When the AuthContext property is retrieved it instantiates a new AuthenticationContext object with the Authority property.
  3. When the AuthorityProperty is collected the DiscoveryAuthority method is triggered, which retrieves the 401 challenge which gives us the resource and authority based on the service URL set in the public constructor of the AuthenticationHelper class.
This means that everything we need is instantiated and propagated just by setting this one authorization header and accept-language, and it's easy to follow the flow of the code.

Finally we add a public property which will return a new instance of the handler. The handler will be disposed when we complete the request, so we need to make sure that we're instantiating a new one whenever we get it.

public HttpMessageHandler Handler
{
    get
    {
        return new OAuthMessageHandler(this, new HttpClientHandler());
    }
}

We are finally ready to actually perform some requests against the admin API.

Sending requests to the adminapi

To send a request we must first add some code to our commandlet. Add the following lines to the end of the ProcessRecord method to perform the request, and then print the response to the console.

using (var httpClient = new HttpClient(auth.Handler))
{
    var result = httpClient.GetStringAsync(serverUrl).Result;
    Console.WriteLine(result);
    Console.ReadLine();
}
Because we're doing this in a script we're not bothering with async requests. We want the result at once, and we're not doing anything before the response is returned.
Once entered, hit [F5] to start debugging. Log in with the credentials of an MSDYN365 admin, and log in.
If this is the first time you've logged in with that user then you will be presented with the following window which you need to approve
This simply says that it will use your authenticated credentials to perform actions on your behalf, and read the directory information (needed to pass claims to MSDYN365).
It looks more severe than it really is, if you're running code that asks you for credentials then this is not the thing you should be worried about.

Once the request is completed the output to your PowerShell window should look like this:
Congratulations! You're using the new adminapi!

Reusing the connection in additional commandlets

When we extend this project to include more commandlets we should try to reuse our connection. To do this we should make a few changes changes to our commandlet.

[Cmdlet(VerbsCommon.Get, "DynamicsInstances")]
public class GetDynamicsInstances : PSCmdlet
{
    [Parameter(Mandatory = true)]
    [ValidateSet("NorthAmerica", "SouthAmerica", "Canada", "EMEA", "APAC", "Oceania", "Japan", "India", "NorthAmerica2", "UnitedKingdom", IgnoreCase = true)]
    public string Location;

    private AuthenticationHelper _auth = null;

    protected override void ProcessRecord()
    {
        base.ProcessRecord();
        Enum.TryParse(Location, out DataCenterLocations tenantLocation);
        var serverUrl = UrlFactory.GetUrl("admin.services", tenantLocation, "/api/v1/instances");

        if (SessionState.PSVariable.Get("auth") != null)
        {
            _auth = SessionState.PSVariable.Get("auth").Value as AuthenticationHelper;
        }
        else
        {
            _auth = new AuthenticationHelper(serverUrl);
        }

        using (var httpClient = new HttpClient(_auth.Handler))
        {
            var result = httpClient.GetStringAsync(serverUrl).Result;
            Console.WriteLine(result);
            Console.ReadLine();
        }

        SessionState.PSVariable.Set("auth", _auth);
    }
}
As you can see we've now added a private _auth property to the cmdlet.
In addition we put an if clause that checks whether there is an existing PSVariable named "auth". If that's the case then it is assigned to the _auth property.
If it is not present we instantiate a new AuthenticationHelper object and assign that to the property.

At the end of the class we've added a line which sets a PSVariable named "auth", and we set the object to our AuthenticationHelper object. This will store the instantiated AuthenticationHandler object in the PowerShell session, so we can reuse it while in the same session.

To demonstrate this copy the content of this class, and create a new class named GetDynamicsInstaceTypeInfo.
Paste the code in the new class, and change the following lines:
  • Change the cmdlet decoration to say "DynamicsInstanceTypeInfo"
  • Change the class name to GetDynamicsInstanceTypeInfo
  • Change the trailing part of the serverUrl to "/api/v1/instancetypeinfo"
Next go into the properties of the project, and change the command line arguments to the following

-NoLogo -Command "Import-Module '.\MSDYN365AdminApiAndMore.dll'; Get-DynamicsInstances -Location EMEA; Get-DynamicsInstanceTypeInfo -Location EMEA"
Now, start a new debug session, and log in as you did previously. You will get the same list of instances as you did before, but if you hit return then it will perform a new request to get instance types. This request will complete without re-asking for your credentials, which means we're successfully storing and retrieving the PSVariable in our session.

Extending the authentication class to support MSDYN365 data API

Our authentication helper works great, but we make it even greater by making it able to handle normal MSDYN365 auhtentication as well. The problem we face with this is that to get the WWW-Authenticate headers from the MSDYN365 Customer Engagement API we need to use a different URL path than for the admin services.
Where the admin services uses "/api/aad/challenge", the data API uses "/api/data". This means that we'll have to modify the AuthenticationHelper class to take the complete discovery URL as an input in the public constructor. To do this, we're changing the private _endpoint variable to be of type Uri instead of string, and in the Authority property we just pass in the _endpoint instead of the _endpoint and the path.
The result should look like this:

private Uri _endpoint = null;
private string _resource = null;
private string _authority = null;
private AuthenticationContext _authContext = null;
private AuthenticationResult _authResult = null;

public AuthenticationHelper(Uri endpoint)
{
    _endpoint = endpoint;
}

public string Authority
{
    get
    {
        if (_authority == null)
        {
            DiscoverAuthority(_endpoint);
        }
        return _authority;
    }
}

Now, go into the UrlFactory-class and add a new enum named ApiType, and add Admin and CustomerEngagement as values.

public enum ApiType
{
    Admin,
    CustomerEngagement
}
Next add a new static method named GetDiscoveryUrl which takes an Uri and an ApiType enum as input, and returns a Uri.

public static Uri GetDiscoveryUrl(Uri serviceUrl, ApiType type)
{
    var baseUrl = serviceUrl.GetLeftPart(UriPartial.Authority);
    if (type == ApiType.Admin)
    {
        return new Uri(baseUrl + "/api/aad/challenge");
    }
    else if (type == ApiType.CustomerEngagement)
    {
        return new Uri(baseUrl + "/api/data");
    }
    else
    {
        throw new Exception($"Enum with name {type.ToString()} does not have discovery address configured");
    }
}
This allows us to extend with additional APIs in the future, for example for Operations or Financials.

Now, go back into our commandlet classes and modify the else clause to look like this:

else
{
    var discoveryUrl = UrlFactory.GetDiscoveryUrl(serverUrl, ApiType.Admin);
    _auth = new AuthenticationHelper(discoveryUrl);
}
Then change the AuthenticationHelper instantiation to take the discoveryUrl as a parameter instead of the serviceUrl. Remember to change this in both of the commandlets.
Finally, change the PSVariable name from just "auth" to "adminauth", remember to do it for both commandlets, in both when you get and set the variable.

We now have an even more flexible project which can support multiple APIs, and store the authenticated connection in the PowerShell session.

Testing MSDYN365 Customer Engagement

To test our new capabilities, add a new class file to the project named "GetDynamicsWhoAmI", and paste in the following code.

[Cmdlet(VerbsCommon.Get, "DynamicsWhoAmI")]
public class GetDynamicsWhoAmI : PSCmdlet
{
    [Parameter(Mandatory = true)]
    public string Organization;

[Parameter(Mandatory = true)]
[ValidateSet("NorthAmerica", "SouthAmerica", "Canada", "EMEA", "APAC", "Oceania", "Japan", "India", "NorthAmerica2", "UnitedKingdom", IgnoreCase = true)] public string Location; protected override void ProcessRecord() { base.ProcessRecord(); Enum.TryParse(Location, out DataCenterLocations tenantLocation); var customerEngagementUrl = UrlFactory.GetUrl(Organization, tenantLocation, "/XRMServices/2011/organization.svc/web"); AuthenticationHelper customerEngagementAuth = null; if (SessionState.PSVariable.Get("customerengagementauth") != null) { customerEngagementAuth = SessionState.PSVariable.Get("customerengagementauth").Value as AuthenticationHelper; } else { var customerEngagementDiscovery = UrlFactory.GetDiscoveryUrl(customerEngagementUrl, ApiType.CustomerEngagement); customerEngagementAuth = new AuthenticationHelper(customerEngagementDiscovery); } var client = new OrganizationWebProxyClient(customerEngagementUrl, false) { HeaderToken = customerEngagementAuth.AuthResult.AccessToken, SdkClientVersion = "8.2" }; var whoAmI = client.Execute(new WhoAmIRequest()); foreach (var att in whoAmI.Results) { Console.WriteLine($"{att.Key}: {att.Value}");
        }
        Console.ReadLine();

        SessionState.PSVariable.Set("customerengagementauth", customerEngagementAuth);
    }
}

What this does is to get a service and discovery URL for the MSDYN365 Customer Engagement URL for the organization specified. Then it instantiates a new AuthenticationHelper based on the discovery URL.
Then, instead of using a normal HTTP request we instantiate a new OrganizationWebProxyClient, and we inject the OAuth token into the HeaderToken. This means we can do Organization requests against the API, and we can use early bound classes if we've created them (did anyone mention XrmToolBox).
Next we send a new WhoAmIRequest to the service, and we print the values returned to the console.
In addition, we're getting and setting the value as a PSVariable, so we can reuse that as well.

Open up the properties for the project, and inside the debug section change the command line arguments to the following. Remember to change YourOrganizationNameHere to your actual organization name (the X in https://X.crm.dynamics.com), and eventually the location)

-NoLogo -Command "Import-Module '.\MSDYN365AdminApiAndMore.dll'; Get-DynamicsInstances -Location EMEA; Get-DynamicsInstanceTypeInfo -Location EMEA; Get-DynamicsWhoAmI -Organization YourOrganizationNameHere -Location EMEA;"
This will run all of the commandlets we have created so far, so save the changes and hit [F5] to run it.

When it starts it will ask you for credentials just like last time. Provide that and wait for the instance response. When the instances are printed to the console, hit return to start the next query. Now it will not ask you for credentials, it will simply take a few seconds and then return the instance type codes. Hit return again, and now you will get a new window asking you for credentials. This is when the Customer Engagement authentication is instantiated. Fill in the credentials like before, and wait for the response.
If you've done everything correct, you will see the following output in your terminal

Congratulations! You now have the basis for automating almost everything related to your MSDYN365 Customer Engagement environment. Just hit return to end the processing.

The wrap up

So, we now have a new awesome API (with more functions to come), and we have an awesome project which will allow us to write easy-to-use commandlets which can be used to simplify administration (especially for those admins who aren't familiar with the interface) and automate mundane tasks.
So what are we missing from this project now?
Exception handling and unit tests. There really should be more exception handling to this, but I leave that in your capable hands to figure out (or I will update the project later).
In addition, make sure you take a look at Jordi Montana's Fake Xrm Easy for easy unit testing with MSDYN365 Customer Engagement

Using Dynamics365 Customer Engagement admin API with PowerShell, part2

In my first post in this series we looked at scaffolding a new commandlet project. In this part we're taking a deep dive into how to do OAuth authentication against the new admin API. I'm going to document the process like I did it (without all the mistakes) to explain how I work when I try to figure things out. If you're just interested in the code then feel free to scroll down to the bottom or check out the last post in this series.

Also, check out part3 here.

Authenticating with the admin API using OAuth

The tools I've used for this module is Visual Studio (I'm using enterprise edition, community should suffice), PowerShell and Fiddler.

We're going to start where we left yesterday with fleshing out our AuthenticationHelper class with some more content. We are not going to play hackers from the 90's, so we're starting out with the documentation from Microsoft on how to authenticate against the new admin API.
This sample is pretty good, it works excellent for the admin services, especially in a web project or native app with background processing. We, on the other hand, are making a commandlet, so we are going to do things synchronously.
The first thing to do is to specify some connection details first. To be able to authenticate using OAuth we need to register an application in Azure AD first, and then we need the Application Id and a reply url in our application.
You don't need Azure AD premium for this, so feel free to create a free subscription to do this.

Registering an application in Azure AD

Navigate to the azure portal, and then go to Azure Active Directory, and the App Registrations blade. Click the + New application registration button to register a new app.
Enter a descriptive name for your app, and then select Native as the application type.
For the redirect Uri, specify the following (this has become a standard for multi-tenanted oauth applications):
urn:ietf:wg:oauth:2.0:oob


Next we go into the app settings, choose Required permissions, and then click the + Add button to add a new permission to the application.
From the Application Permissions choose Dynamics CRM Online (yes, they should update this name), and for permissions select Access CRM Online as organization users.
As you can see, this permission does not require admin approval, which means that for multi-tenant apps, a user can choose to use this app without requiring the approval of an AAD admin.


Finally, click the Grant Permission button to actually grant the permissions specified. If you don't do this then the permissions will not go into effect.

Adding configuration values to the project

Now that we've created an AAD App we can add the configuration variables to the AuthenticationHelper class. Add two static strings at the top of your class, one for App Id (clientid) and one for reply url (redirectUrl). In addition, we're adding a variable for the service resource and the authentication authority. The attributes should now look like this

private static string _clientId = "b954ae2b-8130-4b0e-a45a-d91ef9faec59";
private static string _redirectUrl = "urn:ietf:wg:oauth:2.0:oob";

private string _endpoint = null;
private string _resource = null;
private string _authority = null;

Next up we are going to create a method to identify the authentication Authority and the resource address. We could add these statically since we know which addresses we are going to use, but in part3 we will look at how to reuse this helper for the MSDYN365 Customer Engagement data api. Most of the method is a copy of the sample provided by Microsoft, but I've done a couple of tweaks to it to make it work better with our commandlet.

private string DiscoverAuthority(Uri discoveryUrl)
{
    try
    {
        Task.Run(async () =>
        {
            AuthenticationParameters ap = await AuthenticationParameters.CreateFromResourceUrlAsync(discoveryUrl);
            _resource = ap.Resource;
            _authority = ap.Authority;
        }).Wait();
        return _authority;
    }
    catch (HttpRequestException e)
    {
        throw new Exception("An HTTP request exception occurred during authority discovery.", e);
    }
    catch (Exception e)
    {
        throw e;
    }
}
What we're doing here is sending a web request to a discovery URL, which will return a 401 challenge which includes WWW-Authenticate headers (more information on Microsoft docs). These headers include the resource URL as well as the authority URL. The authority URL tells us which service URL we have to query to authenticate, and the resource is simply which resource we're requesting a valid token for.
Add the following line to the end of the ProcessRecord method in your cmdlet class to instantiate a new AuthenticationHelper object, which we're going to use for debugging.

var auth = new AuthenticationHelper(serverUrl);

Querying the discovery URL

If you're like me then you might wonder why we can't use the same URL as we're using to query the admin API, so I did a little debugging to figure it out. If you're not interesting skip right to the next part which will continue on our quest to authenticate.
First of all, if you want to replicate what I'm doing then make sure you've installed Fiddler, and enable HTTPS decryption.
To debug what's happening when I query the discovery URL I've added the following line to the public constructor, just beneath setting the endpoint (duh).

DiscoverAuthority(new Uri(_endpoint + "/api/aad/challenge"));
The appended path to the URL is specified in the Microsoft docs on authenticating against the admin services API, I'm going to elaborate on why I think this was a bad choice in the next part (please don't punish me).
Then instantiate a new auth class
Now add a breakpoint to the line added so we will get the chance to actually get some data. Now, to debug a cmdlet we have to add some parameters to the project. Right click the project in the right hand navigation, and select properties.
Go to the debug section, select the "Start an external program" option, and paste in the following:
C:\Windows\System32\WindowsPowerShell\v1.0\powershell.exe

Inside the command line arguments add the following:

-NoLogo -Command "Import-Module '.\MSDYN365AdminApiAndMore.dll'; Get-DynamicsInstances -Location EMEA;"
This will launch a PowerShell window which runs our commandlet when we start debugging it, and we will be able to step through it as the code executes.

Now start up fiddler (you've remembered to enable HTTPS decryption I hope), and hit [F12] to stop capturing. Delete the requests that might have popped up already by marking them and hitting [Delete]. Resize the fiddler window so you can see additional windows at the same time.
Now start debugging your code in Visual Studio, and wait for it to hit the break point.
When the breakpoint hits and the execution pauses, find the PowerShell window that was started and bring it into the foreground. Then find the fiddler window and bring that to the front.
From the toolbar, left click and hold on the bulls eye which says "any process", and drag your mouse over to the PowerShell window. The PowerShell window should get highlighted, and you can release the mouse button. If you've done it correctly it should look something like this:
Press [F12] in your Fiddler window to resume capturing, and then go into Visual Studio and press [F5] to resume execution. If you've done everything correctly it should look like this in your fiddler window once the execution is finished.
The value of the WWW-Authenticate header is as follows:
Bearer authorization_uri=https://login.windows.net/common/oauth2/authorize,resource_id=https://adminapi.crm4.dynamics.com/

Now, breaking down the header values we can see the following:
uri=https://login.windows.net/common/oauth2/authorize
This one tells us that the uri for authenticating against the service is

resource_id=https://adminapi.crm4.dynamics.com/
This one tells us what the resoure id is. What we can see here is that the resource ID is different from the admin service URL specified in the Microsoft docs.

Q: Why is this important?
A: The resource id needs to be specified when you're requesting an OAuth token because it will issue a token which is valid for a service with the given resource id. If you're using the service URL then you will still get a token when you authenticate, but if you try to call the admin service API you will get a 401 unauthenticated error because the bearer token has a resource id which doesn't match the resource id of the API.

Now that we're done debugging, remove the DiscoveryAuthentication-line we added in the constructor so it doesn't interfere with what we're doing next.

Adding an authentication context and result

Again, we're utilizing the idea Microsoft had for the sample code. It's a good piece of code so there's no reason to reinvent it. I've simply made a few, small changes in the process of understanding how it works.
First of all we're going to add an authentication context. The constructor for AuthenticationContext takes an authority URL as a string input, which means that we have to run the DiscoverAuthority method before we can add a context.
To do this we're adding a public property which will return the authority URL or run the DiscoverAuthority method and return the result.


public string Authority
{
    get
    {
        if (_authority == null)
        {
            DiscoverAuthority(new Uri(_endpoint + "/api/aad/challenge"));
        }
        return _authority;
    }
}

Next, for generating an authentication context we're adding a new private AuthenticationContext
private AuthenticationContext _authContext = null;
Then add a public property to retrieve it. Notice that if we now try to get the authentication context, and the context is null, then it will instantiate a new authentication context and return that. Upon instantiation, if the Authority is null, it will also run the DiscoveryAuthority method which will propagate the private string values for resource and authority.

public AuthenticationContext AuthContext
{
    get
    {
        if (_authContext == null)
        {
            _authContext = new AuthenticationContext(Authority, false);
        }
        return _authContext;
    }
}

Now that that is out of the way, it's time for the actual authentication.
As earlier, we first create a private AuthenticationResult set to null.
private AuthenticationResult _authResult = null;

Then we create a method used to authenticate against the API.

private void Authorize()
{
    if (_authResult == null || _authResult.ExpiresOn.AddMinutes(-30) < DateTime.Now)
    {
        Task.Run(async () =>
        {
            _authResult = await AuthContext.AcquireTokenAsync(_resource, _clientId, new Uri(_redirectUrl),
            new PlatformParameters(PromptBehavior.Always));
        }).Wait();
    }
}
As we can see from this code we first check whether _authResult has a value, and then we see if the expiration date is less than thirty minutes. If either of those conditions are true we perform a new authentication against the resource we got earlier and assign it to _authresult. To acquire the token we also have to submit the clientId (application id) and redirecturl (reply URL) we got from registering the app in Azure AD in the previous post. If we don't specify these, or use invalid values, we will get a response with a very good description of what went wrong.

Finally we add a public property which calls the Authorize() method before returning _authresult. We don't need an if-clause in this because we're already checking inside the Authorize() method.

public AuthenticationResult AuthResult
{
    get
    {
        Authorize();
        return _authResult;
    }
}
Because we're using the public property of AuthContext here we can actually call retrieve the public AuthResult object without instantiating anything first, as all the objects used are propagated through their public properties.

Testing authorization

We'll now hook up fiddler and look at the authorization results. If you're not interested in this part you can jump straight into the next blog post to see how we can create our own custom HTTP message handler and send requests to the adminapi.

To test this part we'll add the following line to the end of the ProcessRecord() method in our commandlet class to trigger all the methods we've added.

var authResult = auth.AuthResult;
Now just add a break point to the new line, make sure you have fiddler started and ready, and then start debugging your code.
Hook fiddler to the new process, start capturing and continue the execution. If you've done everything right you will be presented with the following, hopefully familiar, window to authenticate:

Just fill out your credentials, and approve sign-in with Azure MFA (if applicable).
Next you will be presented with a window which says that the Azure App you registered earlier needs permission to access CRM Online as you, as well as sign you in and read your profile.
There is nothing scary about these permissions, as they don't get access to any of your data. If you already trust the application enough to log in with it you're using then these permissions only says that it will use your authenticated credentials to perform actions. Basically, it looks worse than it is.

Accept these terms, and wait for the execution to stop. Then, head back to fiddler and stop capturing traffic (hit [F12]). Look for one of the latest request (might be the latest, depending on how much you're capturing), host should be "login.windows.net" and the URL should be "/common/oauth2/token". The response here should be 200 OK, and if you check the headers it will look like this.
This response is then transformed into an AuthenticationResult object in our code, and we can use that to set a bearer token in our actual API request.
Finally, go back into the cmdlet class and remove the line which assigned AuthResult to clean up after debugging.

Wrap-up

In this post we've seen how we can build an authentication helper which queries a service for the correct resources, and finally authenticates against the authority to get a valid OAuth2 token. In the next part we'll finally perform the request against the MSDYN365 Customer Engagement admin API, and take a look at the response. Finally, we'll look at how we can extend this code to also work with the normal MSDYN365 data api.

Wednesday, August 9, 2017

Connect to Dynamics 365 using MFA without app tokens, part 2

In part 1 of this series I explained how to use my slightly modified version of the SharePoint-Sites-PnP webauthentication.
The complete code and updates to the powershell module can be found on my github repository

In this post I'm going to dive into getting cookie authentication to work with OrganizationWebProxyClient

First off, our goal for this is to get an IOrganizationService inherited connection that we can use to execute MSDYN365 requests. To do that we have to use one of the connection classes available which allows us to use cookies for authentication.
Unfortunately, the SDK does not contain any constructors which enables us to set cookies programmatically, so we have to look for alternative ways to get around that limitation.
After navigating through the most common connection alternatives I found that the OrganizationWebProxyClient inherits the WebProxyClient, which again inherits the System.ServiceModel.ClientBase class. This is our best way in because the ClientBase class exposes the endpoint used as a public property, and will limit the amount of "hacking" needed to inject our cookies into the request.
So to start with we simply instantiate a new OrganizationWebProxyClient using the organization service endpoint address.

1
var service = new OrganizationWebProxyClient(new Uri("https://myOrganization.crm4.dynamics.com/XRMServices/2011/Organization.svc/web"), false);

I added a break point to debug the connection created and look at the behaviors defined for the underlying endpoint. My hope was to find somewhere to inject my cookies and test the connection, but unfortunately there was nothing I could take advantage of


Yet another minor snafu in the quest for a simple solution. At this point I do what any decent developer should, and that is to google "endpointbehavior cookiecollection". As usual I found a lot of discussions, degrading comments and unrelated answers, but I also found this little brilliant snippet from Markus Wildgruber in a thread on StackOverflow
Adding this into a little helper class allowed me to inject my cookies into the service endpoint without any more issues. A few lines later and I'm sitting with this pretty little thing:


 1
 2
 3
 4
 5
 6
 7
 8
 9
10
11
var webAuthCookies = WebAuthentication.GetAuthenticatedCookies("https://myOrganization.crm4.dynamics.com", Models.AuthenticationType.O365);
var service = new OrganizationWebProxyClient(new Uri("https://myOrganization.crm4.dynamics.com/XRMServices/2011/Organization.svc/web"), false);
var cookieContainer = new CookieContainer();
foreach (Cookie cookie in webAuthCookies)
{
    cookieContainer.Add(cookie);
}
var cookieBehavior = new CookieBehavior(cookieContainer);
service.Endpoint.EndpointBehaviors.Add(cookieBehavior);

service.Execute(new WhoAmIRequest());

Unfortunately, my joy was short-lived. Executing this request presented me with a 401 error saying the following:

 1
 2
 3
 4
 5
 6
 7
 8
 9
10
11
12
13
14
15
16
System.ServiceModel.Security.MessageSecurityException occurred
  HResult=0x80131501
  Message=The HTTP request is unauthorized with client authentication scheme 'Anonymous'. The authentication header received from the server was 'Bearer redirect_uri=https%3a%2f%2flogin.windows.net%2fcommon%2fwsfed, realm=Microsoft.CRM'.
  Source=mscorlib
  StackTrace:
   at System.Runtime.Remoting.Proxies.RealProxy.HandleReturnMessage(IMessage reqMsg, IMessage retMsg)
   at System.Runtime.Remoting.Proxies.RealProxy.PrivateInvoke(MessageData& msgData, Int32 type)
   at Microsoft.Xrm.Sdk.IOrganizationService.Execute(OrganizationRequest request)
   at Microsoft.Xrm.Sdk.WebServiceClient.OrganizationWebProxyClient.<>c__DisplayClassd.<ExecuteCore>b__c()
   at Microsoft.Xrm.Sdk.WebServiceClient.WebProxyClient`1.ExecuteAction[TResult](Func`1 action)
   at Microsoft.Xrm.Sdk.WebServiceClient.OrganizationWebProxyClient.ExecuteCore(OrganizationRequest request)
   at Microsoft.Xrm.Sdk.WebServiceClient.OrganizationWebProxyClient.Execute(OrganizationRequest request)
   at <this line has been omitted on purpose>

Inner Exception 1:
WebException: The remote server returned an error: (401) Unauthorized.

I have to admit, I scratched my head for a long time, trying all kinds of silly things, before I remembered that I was dealing with web requests here, and that meant that the next natural step was to try and use fiddler.
I set an early break point, started up fiddler and hooked it to my process to try and see what was happening. I noticed that when sending the request the cookies seemed to be added to the header correctly, but I also noticed that there was a security header there that I didn't add myself.

This reminded me that when I checked the endpoint behaviors earlier there was one behavior for the client credentials. I fired up the debugger again and dived into the endpoint behaviors, and as I suspected there was a header there with no value since I was doing cookie injection instead of traditional authentication. I went into my cookie behavior and added this little snippet to get rid of the unnecessary header:

1
2
3
4
if (httpRequestMsg.Headers.AllKeys.Contains("Authorization"))
{
    httpRequestMsg.Headers.Remove("Authorization");
}

Firing up the debugger again, I set went to my break point and hooked up fiddler again. This time the Authorization header was missing, and to my pleasant surprise the WhoAmIRequest returned a 200 OK. Going into the results view I could see that I had successfully retrieved the userid, businessunitid and organizationid.

Finally! A working OrganizationWebProxyClient that I could use, and all of this without having to register the application with Azure AD.

Now I can finally go back to writing my Dynamics365-PoSh module without having to worry about authentication until version 9.1 comes out and removes the endpoint I used.

Finally, I would like to give a huge shout-out to Mikael Svenson. I would have spent considerably longer to figure out all of this if he hadn't let me bounce some ideas off him.